

Pourquoi votre iPhone est le studio de podcasting parfait
Votre iPhone est bien plus qu'un simple téléphone; c'est un studio de podcasting étonnamment performant que vous pouvez emporter partout. Bien que les studios professionnels offrent des fonctionnalités haut de gamme, la facilité d'utilisation de l'iPhone et sa technologie en constante amélioration en font un choix populaire, surtout pour ceux qui débutent dans le podcasting. Cela permet aux créateurs de se concentrer sur leur contenu, sans se soucier de configurations techniques compliquées.
Simplicité et Accessibilité
L'un des principaux avantages d'enregistrer un podcast sur votre iPhone est sa simplicité. L'interface est conviviale et facile à appréhender. Cela signifie que vous pouvez passer du brainstorming à l'enregistrement en quelques minutes, saisissant ces idées spontanées dès qu'elles surgissent. Imaginez enregistrer une pensée rapide lors d'une promenade ou saisir une conversation avec un invité sur place. Ce genre d'accessibilité est difficile à battre avec un équipement de studio traditionnel.
Utiliser Ce Que Vous Possédez Déjà
Vous possédez déjà le cœur de votre studio de podcasting mobile : votre iPhone. Cela évite le gros investissement initial nécessaire pour l'équipement audio professionnel. De plus, des tonnes d'applications spécialement conçues pour le podcasting sur iPhone offrent des fonctionnalités telles que l'enregistrement multipistes, les effets sonores et les interviews à distance. Ces outils vous permettent de créer des podcasts de qualité professionnelle avec un budget limité.
Mobilité : Le Superpouvoir de Votre Podcast
L'enregistrement sur un iPhone vous libère des limitations d'un studio typique. Cette mobilité peut être un atout majeur pour un contenu authentique. Interviewer quelqu'un dans son environnement naturel, comme un atelier animé ou un parc calme, ajoute du réalisme et une profondeur difficiles à recréer en studio. Cela donne une autre dimension à votre podcast, l'aidant à se démarquer. Cette flexibilité vous permet également de tester facilement différents lieux d'enregistrement pour trouver le meilleur son pour votre émission.
Le Podcasting Mobile en Pleine Croissance
Cet environnement de création et d'écoute facile sur iOS ne passe pas inaperçu. Le podcasting sur un iPhone est une tendance en croissance, alimentée par l'augmentation du nombre d'auditeurs de podcasts. D'ici 2025, il est prévu que 63,6% des auditeurs de podcasts utiliseront un Apple iPhone pour écouter. Le marché mondial du podcast est également en plein essor, avec une projection de 39,63 milliards de dollars d'ici 2025, et plus de 584,1 millions d'auditeurs dans le monde entier. La disponibilité croissante d'outils de podcasting contribue directement à cette croissance, permettant à de plus en plus de personnes de créer du contenu depuis leur iPhone. Vous trouverez plus de statistiques ici : Statistiques de Podcasting de ToneIsland
Comprendre les Limites
Bien que les iPhones offrent une commodité fantastique, ils ont des limites. Le bruit de fond peut être un problème, surtout dans des environnements bruyants. Le microphone intégré, bien que surprenant, pourrait ne pas avoir la même qualité qu'un micro de studio haut de gamme. Ces problèmes peuvent être résolus avec des accessoires relativement peu coûteux comme des microphones externes et des casques réducteurs de bruit.
Pour illustrer les compromis, examinons une comparaison entre l'enregistrement sur iPhone et une configuration de studio traditionnelle.
Enregistrement de Podcast sur iPhone : Avantages et Inconvénients
Aspect | Enregistrement iPhone | Configuration de Studio Traditionnelle |
Coût | Bas | Élevé |
Accessibilité | Élevée | Basse |
Mobilité | Élevée | Basse |
Qualité Sonore | Bonne, amélioré avec accessoires | Excellente |
Complexité | Basse | Élevée |
Contrôle Environnemental | Limité | Élevé |
Ce tableau résume les principales différences, mettant en évidence les forces de l'iPhone en matière d'accessibilité, de mobilité et d'efficacité budgétaire, tout en reconnaissant la qualité sonore et le contrôle supérieur offerts par une configuration traditionnelle.
En fin de compte, la meilleure façon d'enregistrer votre podcast dépend de vos besoins et objectifs. Si la commodité, l'accessibilité financière et la mobilité sont importantes, votre iPhone pourrait être le studio de podcast parfait pour vous. Avec les bons outils et techniques, vous pouvez surmonter les limitations et créer un podcast de haute qualité qui résonne avec vos auditeurs.
Le Trésor Caché : Applications qui Transforment Votre iPhone
Votre iPhone a des capacités audio remarquables. Cependant, les bonnes applications peuvent véritablement libérer son potentiel pour le podcasting. Oubliez les interfaces flashy ; nous parlons de fonctionnalité et d'efficacité. Explorons quelques applications essentielles pour élever vos enregistrements de podcast sur iPhone.
Applications d'Enregistrement Indispensables
Plusieurs applications conçues spécifiquement pour le podcasting offrent une gamme de fonctionnalités qui simplifient le processus d'enregistrement.
GarageBand : Cette application gratuite de Apple propose l'enregistrement multipistes, une bibliothèque de musique et d'effets sonores libres de droits, et une interface conviviale. C'est un excellent point de départ pour les débutants.
Ferrite Recording Studio : Ferrite offre des outils d'édition avancés comme l'édition non destructrice et l'automatisation. C'est parfait pour les podcasters cherchant un plus grand contrôle sur leur audio sans avoir besoin d'un ordinateur. Cela permet des ajustements précis et des raffinement pour un produit final poli.
Anchor : Connu pour sa distribution, Anchor dispose également d'une fonction d'enregistrement intégrée. Sa simplicité est idéale pour des pensées rapides ou des interviews sur le pouce. La transition fluide de l'enregistrement à la distribution simplifie votre flux de travail.
Élever Votre Son avec des Applications d'Édition
Une fois enregistré, ces applications peuvent aider à peaufiner et polir votre podcast.
Auphonic : Cette application alimentée par IA maîtrise automatiquement votre audio, assurant des niveaux cohérents et une clarté à travers les épisodes. Elle gère le bruit de fond, le équilibrage de volume, et l'optimisation pour diverses plateformes, vous faisant économiser un temps et des efforts significatifs. Consultez cette ressource sur la transcription AI : Meilleures Applications de Transcription AI pour Podcasts.
Hokusai Audio Editor : Hokusai offre une interface simplifiée pour des modifications rapides. Coupez les silences, supprimez le bruit de fond, et ajustez les niveaux de volume en toute simplicité. C'est un moyen adapté aux mobiles pour gérer les tâches d'édition essentielles.
Rationaliser le Flux de Travail avec des Applications Compagnonnes
Au-delà de l'enregistrement et de l'édition, ces applications peuvent encore améliorer votre processus.
Voice Record Pro : Cette application arbore une interface propre axée sur l'enregistrement audio de haute qualité. Supportant plusieurs formats de fichiers et l'intégration cloud, c'est un choix robuste pour capturer un audio clair.
Scrivener : Bien que n'étant pas exclusivement pour le podcasting, Scrivener est inestimable pour organiser la recherche, les scripts et les notes d'émission. Cela est particulièrement utile pour les épisodes complexes ou axés sur la recherche.
Pour vous aider à choisir la bonne application d'enregistrement, nous avons compilé un tableau comparatif :
Applications de Podcasting : Comparaison détaillée des meilleures applications d'enregistrement disponibles pour iOS
Nom de l'App | Caractéristiques Clés | Prix | Idéal Pour | Note |
GarageBand | Enregistrement multipistes, bibliothèque libre de droits | Gratuit | Débutants | 4,5/5 |
Ferrite Recording Studio | Édition avancée, édition non destructrice | Payant | Podcasters expérimentés | 4,7/5 |
Anchor | Enregistrement intégré, distribution fluide | Gratuit | Enregistrements rapides, interviews | 4,2/5 |
Ce tableau met en évidence les forces de chaque application, vous aidant à sélectionner celle qui convient le mieux à vos besoins. GarageBand est idéal pour les débutants, Ferrite pour les utilisateurs avancés, et Anchor pour des enregistrements rapides et faciles.
L'essor du podcasting est lié aux plateformes de création accessibles. Enregistrer des podcasts sur un iPhone est plus facile que jamais grâce à ces applications. D'ici 2026, on estime que les auditeurs de podcasts atteindront 619 millions. De plus, 84,8% des auditeurs utilisent des appareils mobiles, soulignant l'importance des outils adaptés aux mobiles. Pour plus de statistiques, consultez : Statistiques de Podcasts Riverside.fm.
La bonne combinaison de ces applications peut créer un flux de travail rivalisant avec les studios professionnels. Expérimentez pour trouver ce qui vous convient le mieux. Ces applications offrent un excellent point de départ pour faire briller votre podcast sur iPhone.
Enregistrer un Podcast sur iPhone : La Méthode de A à Z
Transformer votre iPhone en un studio de podcasting robuste peut sembler intimidant au début. Mais avec une approche structurée, vous pouvez absolument obtenir des enregistrements de qualité professionnelle. Cette section décompose le processus, de l'aménagement de votre espace à la capture d'un son clair, vous donnant les moyens de créer un contenu de podcast captivant.
Préparer Votre Environnement d'Enregistrement Mobile
Le secret de grands enregistrements sur iPhone réside dans la gestion de votre environnement d'enregistrement. Cela ne nécessite pas un isolement acoustique coûteux, juste une approche réfléchie pour réduire les bruits indésirables. Commencez par choisir un endroit calme. Une pièce avec des meubles doux comme des tapis, des rideaux, ou même un placard rempli de vêtements peut effectivement absorber les réflexions sonores. Cela minimise les échos et permet un enregistrement plus net. Pensez également au meilleur moment de la journée pour enregistrer. Enregistrer pendant des périodes plus calmes aide à minimiser les bruits extérieurs comme le trafic ou les activités du voisinage.
Optimiser les Paramètres d'Entrée Audio de l'iPhone
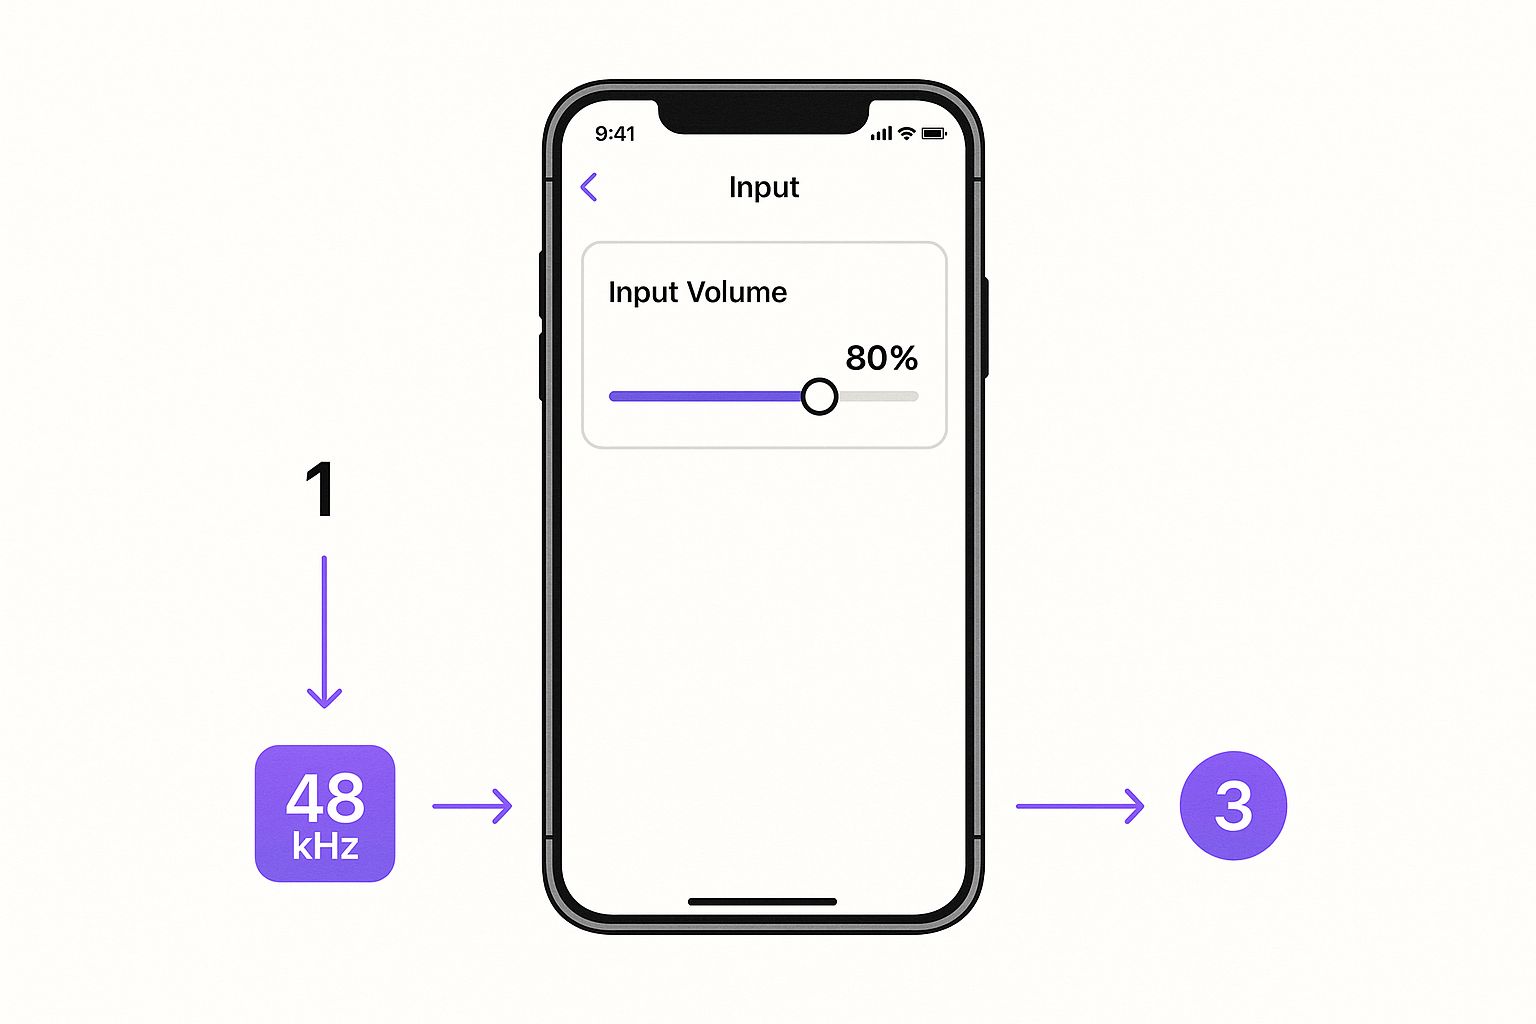
Cette infographie illustre les meilleurs paramètres d'entrée audio pour enregistrer sur un iPhone, mettant en évidence un curseur de volume à 80% et l'icône de fréquence d'échantillonnage. Garder le volume autour de ce niveau prévient la saturation (distorsion due au dépassement du niveau d'enregistrement maximal). Comprendre votre fréquence d'échantillonnage garantit également une capture audio de haute-fidélité. Ces réglages sont essentiels pour un enregistrement bien équilibré, propre de distorsion et prêt pour l'édition.
Positionnement de l'iPhone pour une Capture Sonore Optimale
La façon dont vous positionnez votre iPhone influence grandement la qualité sonore. Imaginez tenir un microphone trop près de votre bouche - le son devient étouffé et déformé. Inversement, placer votre iPhone trop loin produit un enregistrement faible, empli de réverbération. Expérimentez pour trouver le point idéal, généralement à 15-30 cm de distance. Cette distance offre un bon équilibre entre clarté et sonorité naturelle. Utiliser un support ou un trépied stabilisera également votre iPhone, prévenant les bruits de manipulation et maintenant les niveaux audio cohérents.
Rituels Avant Enregistrement pour une Qualité Constante
Les podcasters professionnels ont des routines avant enregistrement pour une raison – elles garantissent une qualité constante. Ces petites étapes peuvent faire une différence significative. Commencez par un test d'enregistrement. Cela vous permet de vérifier les niveaux audio, de repérer les problèmes de bruits de fond, et d'ajuster la position de votre iPhone. C'est comme un échauffement avant une performance, assurant que tout est parfait avant d'appuyer sur enregistrer. Ensuite, désactivez les notifications et activez le mode Avion (gardez le Wi-Fi activé si nécessaire pour votre application d'enregistrement). Cela empêche les interruptions et les sons indésirables de perturber votre session.
Dépannage des Problèmes Audio Communs
Même avec la meilleure préparation, les problèmes audio peuvent toujours se produire. Un problème courant est l'effet de proximité, où les basses fréquences sont amplifiées lorsque le microphone est trop proche. Ajustez la distance de votre iPhone ou envisagez un filtre anti-pop pour minimiser les plosives (sons durs des consonnes « p » et « b »). Le bruit de fond est un autre problème fréquent. Bien qu'un emplacement calme aide, utiliser des écouteurs réducteurs de bruit ou un logiciel d'édition peut encore réduire les sons indésirables. Audacity est une option de logiciel d'édition audio open-source et gratuit.
Capturer un Son de Qualité dans des Lieux Défiants
Parfois, l'environnement d'enregistrement parfait n'est pas possible. Adapter votre configuration est essentiel dans ces situations. Lors de l'enregistrement en extérieur, méfiez-vous du bruit du vent. Un pare-brise sur le microphone de votre iPhone peut considérablement le réduire. Si vous enregistrez dans une pièce avec des échos, ajouter des matériaux doux comme des couvertures ou des coussins peut aider à absorber ces réflexions, créant un environnement d'enregistrement plus contrôlé.
Liste de Contrôle Après Enregistrement pour Chaque Épisode
Pour vous assurer que vous n'avez rien manqué d'important, passez par cette liste :
Test d'enregistrement : Vérifiez les niveaux et le bruit de fond.
Notifications désactivées : Minimisez les interruptions.
Mode Avion : Prévenez les sons inattendus.
iPhone positionné correctement : Captez le meilleur son.
Microphone externe (si utilisé) : Assurez-vous qu'il est connecté et testé.
Cette liste aide à rationaliser votre processus et à éviter les erreurs courantes.
La popularité croissante des podcasts et l'enregistrement sur iPhones se reflète dans les statistiques récentes. Aux États-Unis, 55% de la population écoute des podcasts mensuellement, avec l'auditeur moyen profitant d'environ 7 heures par semaine. Trouvez des statistiques plus détaillées ici. Le fait que 73% des Américains aient écouté un podcast au moins une fois montre son attrait généralisé. WhisperTranscribe peut rationaliser votre flux de travail en générant rapidement des transcriptions, des notes d'émission, et plus à partir de vos enregistrements.
L'Investissement Intelligent : Équipement de Podcasting Essentiel pour iPhone
Créer un podcast de haute qualité sur votre iPhone ne nécessite pas de casser votre tirelire. Quelques investissements judicieux dans des accessoires clés peuvent considérablement améliorer votre audio. Ce guide vous aidera à choisir le bon équipement de podcasting pour iPhone, en se concentrant sur les améliorations réelles, pas sur le battage publicitaire marketing.
Microphones : Capturer un Son Clair et Précis
Le microphone intégré de votre iPhone est étonnamment capable, mais un microphone externe élève les enregistrements. Le Shure MV88, par exemple, se connecte directement au port Lightning de votre iPhone pour une capture audio pratique et de haute qualité.
Une autre excellente option est le Rode PodMic, connu pour son son riche de qualité broadcast. Bien qu'il nécessite un adaptateur, la qualité audio est exceptionnelle.
Adaptateurs et Câbles : Connecter Votre Configuration
Les microphones externes ont souvent besoin d'adaptateurs, surtout ceux avec des connexions XLR ou USB. Un adaptateur Lightning vers USB ou un adaptateur Lightning vers prise casque 3,5 mm élargit vos options de microphones.
Des câbles de haute qualité sont également importants. Ils assurent un signal fiable et minimisent les interférences sonores, améliorant davantage votre audio.
Casques : Surveiller Votre Son
De bons casques sont cruciaux pour surveiller votre audio pendant l'enregistrement. Ils vous permettent de détecter immédiatement les bruits de fond ou les déséquilibres audio.
Les casques filaires, comme les Audio-Technica ATH-M50x, offrent une clarté excellente et une faible latence. Cela vous donne une représentation précise de votre enregistrement, permettant des ajustements en temps réel.
Stabilisateurs et Supports : Éliminer le Bruit de Manipulation
Tenu votre iPhone lors de l'enregistrement peut créer des bruits de manipulation indésirables. Un trépied ou un support stabilise votre iPhone, minimisant ces distractions.
Un placement cohérent du microphone contribue également à un audio plus propre et plus équilibré.
Alternatives Économiques et Investissements Judicieux
Vous n'avez pas besoin d'équipement haut de gamme pour un podcast iPhone au son excellent. Un microphone lavalier attaché à votre chemise offre une amélioration substantielle par rapport au microphone intégré à un coût bien plus bas que les microphones professionnels XLR.
Une simple cabine vocale DIY peut aussi améliorer dramatiquement votre environnement d'enregistrement en réduisant les échos et le bruit de fond sans traitement sonore coûteux.
Construire Votre Kit d'Enregistrement Adaptable
Considérez votre lieu d'enregistrement. Allez-vous principalement enregistrer à la maison, ou prévoyez-vous d'enregistrer sur place ? Un kit portable pourrait inclure un microphone compact, un adaptateur Lightning, et un petit trépied.
Pour un studio à la maison, un microphone plus robuste, une interface audio, et un filtre anti-pop pourraient valoir l'investissement. Construire progressivement vous permet d'expérimenter et de découvrir ce qui fonctionne le mieux. Commencez petit et améliorez au fur et à mesure que votre podcast évolue.
WhisperTranscribe offre des fonctionnalités puissantes comme des transcriptions automatisées et des notes d'émission, rationalisant votre flux de travail après l'enregistrement sur votre iPhone. Essayez-le gratuitement dès aujourd'hui.
Du Brute à la Production Professionnelle

Alors, vous venez d'enregistrer votre épisode de podcast sur votre iPhone. Génial ! Maintenant, quoi ? Comment transformer ces fichiers audio bruts en un podcast poli et professionnel ? La réponse réside dans la post-production. Cette étape cruciale peut élever votre podcast, le faisant ressembler à avoir été enregistré dans un studio haut de gamme, même si vous travaillez depuis le confort de votre iPhone.
Nettoyer Vos Enregistrements Mobiles
La post-production commence par nettoyer votre audio. Cela implique de supprimer les bruits de fond indésirables comme le trafic, le bourdonnement, ou même le froissement de papiers. Heureusement, plusieurs applications peuvent aider à automatiser ce processus. Auphonic est un excellent exemple, utilisant des algorithmes de réduction du bruit pour identifier et minimiser les sons distrayants sans compromettre la qualité de votre voix. Vous pouvez également éditer manuellement les toux, hésitations, et longues pauses pour un contenu plus serré et engageant.
Améliorer la Clarté et la Cohérence Vocale
Après avoir nettoyé l'audio, l'étape suivante consiste à améliorer la clarté vocale. Cela implique souvent d'ajuster l'égaliseur (EQ) pour équilibrer les fréquences dans votre voix, boostant la clarté et la chaleur. La compression est un autre outil précieux en post-production. Elle réduit la plage dynamique de votre audio, rendant les parties plus calmes plus fortes et les parties plus fortes plus calmes, créant une expérience d'écoute plus cohérente. Cela évite que les auditeurs ajustent constamment leur volume et améliore la qualité professionnelle globale de votre podcast.
Défis Audio Spécifiques à l'iPhone et Solutions
L'enregistrement sur un iPhone présente des défis audio uniques. L'effet de proximité, par exemple, peut rendre votre voix étouffée si le téléphone est trop proche de votre bouche. Un placement soigné du microphone lors de l'enregistrement peut atténuer cela, mais vous pouvez encore affiner l'audio en post-production en ajustant les basses fréquences dans votre EQ. Gérer le bruit de fond est un autre obstacle commun. Un bon trépied ou support peut minimiser le bruit de manipulation pendant l'enregistrement, mais tout bruit restant peut être abordé dans le processus d'édition. Pour plus d'informations sur la maximisation de l'impact de votre podcast, consultez ce guide : Comment maitriser le ROI de votre podcast.
Techniques d'Édition Économisant du Temps
L'édition efficace est impérative, surtout si vous êtes un podcaster occupé. L'édition non destructrice, offerte par des applications comme Ferrite Recording Studio, vous permet de faire des modifications sans altérer définitivement vos enregistrements originaux. Cela offre un filet de sécurité, vous permettant d'expérimenter et de faire des révisions sans craindre de ruiner votre audio. Apprendre les raccourcis clavier dans votre logiciel d'édition choisi peut également accélérer considérablement votre flux de travail, rendant des tâches comme couper, ajuster les niveaux, et appliquer des effets beaucoup plus rapides.
Stratégies de Gestion et de Sauvegarde des Fichiers
Un bon système de gestion de fichiers est essentiel pour tout podcaster. Établir une convention de nommage claire et cohérente pour vos fichiers permet de localiser facilement des épisodes spécifiques. Par exemple, envisagez un format comme "NomPodcast_NuméroÉpisode_Date". Les sauvegardes régulières sont tout aussi importantes. Les services de stockage cloud comme Google Drive ou Dropbox offrent un moyen pratique de sauvegarder automatiquement vos enregistrements, protégeant votre contenu précieux contre la perte accidentelle due à des problèmes techniques.
Se Préparer pour la Distribution
L'étape finale consiste à préparer votre audio pour la distribution. La plupart des plateformes de podcast exigent des fichiers audio au format MP3 avec un débit spécifique, souvent de 128 kbps. Votre logiciel d'édition devrait vous permettre d'exporter votre mix final au format correct, prêt à être téléchargé. Maintenir un niveau audio cohérent à travers tous vos épisodes est crucial, garantissant une expérience d'écoute fluide et agréable pour votre public sur toutes les plateformes. Vous pouvez utiliser des outils comme Auphonic pour obtenir une sonorité uniforme.
En suivant diligemment ces étapes de post-production, vous pouvez transformer vos enregistrements de podcast sur iPhone de l'audio brut à des épisodes produits professionnellement qui captivent vraiment votre public.
Maîtriser les Interviews à Distance avec Votre iPhone
Enregistrer un podcast sur votre iPhone offre une flexibilité incroyable, particulièrement pour les interviews à distance. Connectez-vous avec des experts et des personnes fascinantes dans le monde entier ! Cette section présente une stratégie pratique pour conduire des interviews à distance sans heurts en utilisant seulement votre iPhone, assurant une qualité audio professionnelle où que vous soyez.
Préparer Votre Invité pour un Audio Optimal
Avant de commencer l'enregistrement, préparer votre invité est essentiel pour une interview sans accroc. Envoyez-leur un court guide décrivant les meilleures pratiques pour enregistrer de leur côté. Cela pourrait inclure :
Trouver un Endroit Calme : Une pièce avec un bruit de fond minimal est essentielle. Suggérez des espaces avec des meubles doux comme des tapis ou des rideaux pour absorber les échos.
Utiliser des Écouteurs : Les écouteurs évitent la rétroaction audio et permettent aux invités de surveiller leur propre son.
Vérification de la Connexion Internet : Une connexion internet stable est cruciale pour un enregistrement sans accroc. Conseillez aux invités de tester leur connexion à l'avance.
Positionnement du Microphone : Recommandez une distance optimale du microphone (15-30 cm) pour un audio clair et sonnant naturellement.
Cette approche proactive assure une haute qualité audio dès le départ.
Établir une Connexion Fiable
Une connexion fiable est primordiale pour les interviews à distance. Considérez ces options :
Plateformes de Enregistrement Dédiées : Des plateformes comme Riverside.fm ou Zencastr sont conçues pour l'enregistrement à distance, offrant des pistes audio séparées et des enregistrements locaux pour chaque participant.
Logiciel de Conférence Vidéo : Bien qu'ils ne soient pas idéaux pour le podcasting professionnel, des applications comme Zoom ou Skype peuvent servir de sauvegarde. Priorisez les paramètres de qualité audio dans ces plateformes pour obtenir les meilleurs résultats possibles.
Enregistrement Double : Dans cette méthode, vous et votre invité enregistrez votre audio localement. Cela crée des pistes distinctes de haute qualité que vous combinez lors de l'édition. Cela offre un son supérieur mais nécessite plus de coordination.
Choisissez la méthode qui convient le mieux à vos besoins et configuration technique. Chaque option offre des avantages et des inconvénients distincts.
Mettre en Œuvre des Méthodes d'Enregistrement de Sauvegarde
Les difficultés techniques peuvent survenir de manière imprévue. Sauvegarder votre interview avec des enregistrements de secours est essentiel. Voici quelques techniques :
Enregistrements Locaux : Encouragez votre invité à enregistrer son audio localement comme sauvegarde en utilisant une application de mémos vocaux ou une application d'enregistrement secondaire.
Enregistrement de l'Appel : Certaines applications permettent l'enregistrement d'appels, fournissant un filet de sécurité si d'autres enregistrements échouent.
Sauvegardes Cloud : Les sauvegardes cloud automatiques de votre session d'enregistrement assurent la redondance des données et protègent contre les problèmes techniques imprévus.
Ces mesures de sauvegarde minimisent le risque de perdre votre précieuse interview.
Techniques de Communication pour des Interviews Captivantes
Maintenir une qualité audio tout en conduisant une interview captivante nécessite des techniques de communication spécifiques. Voici quelques conseils :
Évitez d'Interrompre : Les interruptions perturbent le flux conversationnel et créent des montages maladroits plus tard.
Minimiser le Bruit de Fond : Rappelez à votre invité de couper les notifications et de minimiser les potentielles distractions.
Confirmer les Niveaux Audio : Vérifiez périodiquement avec votre invité pour vous assurer que leurs niveaux audio restent cohérents.
Utiliser des Questions Claires et Concises : Des questions bien structurées suscitent des réponses perspicaces et gardent la conversation concentrée.
Ces stratégies contribuent à une expérience d'enregistrement plus fluide et productive.
Trouver des Solutions aux Défis de l'Enregistrement à Distance
Même avec une préparation minutieuse, des problèmes peuvent survenir. Voici quelques problèmes courants et solutions :
Problèmes de Connectivité Internet : Une méthode d'enregistrement de secours peut être un sauveur. Un test de connexion avant l'interview est toujours recommandé.
Problèmes de Synchronisation Audio : Applaudir ou créer un autre son distinct au début de l'enregistrement aide à synchroniser les pistes audio lors de l'édition.
Distractions de Bruit de Fond : Un logiciel de réduction de bruit peut aider à minimiser les sons indésirables en post-production.
En anticipant et en abordant ces défis, vous pouvez garantir une interview réussie à distance.
Techniques de Post-Production pour l'Amélioration des Interviews
La post-production est essentielle pour affiner votre interview à distance. Concentrez-vous sur ces domaines :
Réduction de Bruit : Supprimez tout bruit de fond restant pour une clarté améliorée.
Égalisation et Compression : Équilibrez les niveaux audio et créez un son cohérent.
Suppression des Hesitations et Bégaiements : Éditez soigneusement les pauses inutiles et mots de remplissage pour une présentation soignée.
Ces techniques de post-production créeront un produit final professionnel et captivant. WhisperTranscribe peut rationaliser votre flux de travail en automatisant la transcription, vous permettant de vous concentrer sur la création de contenu captivant.
De l'iPhone à l'Impact : Lancer Votre Podcast Avec Succès
Enregistrer un podcast sur votre iPhone n'est que la première étape. Le véritable voyage — et la récompense ultime — réside dans le lancement efficace de votre podcast et la création d'un public dévoué. Cela signifie aller au-delà du simple fait d'appuyer sur "enregistrer" et adopter une approche stratégique de la promotion et de la croissance. Cette section vous guidera à travers les stratégies clés de lancement, illustrant comment les podcasters mobiles réussis ont transformé leurs émissions produites sur iPhone en plateformes influentes.
Créer une Description d'Émission Captivante
Pensez à votre description d'émission comme un discours d'ascenseur pour votre podcast. Elle doit capturer instantanément l'attention des potentiels auditeurs. Concentrez-vous sur la proposition de valeur : quels aperçus uniques, divertissements ou sens de la communauté votre podcast offrira-t-il ? Au lieu de simplement énumérer des sujets, communiquez la transformation que les auditeurs peuvent attendre. Acquerront-ils de nouvelles compétences ? Se sentiront-ils inspirés ? Deviendront-ils partie intégrante d'une communauté solidaire ? Une description d'émission puissante est essentielle pour attirer vos auditeurs idéaux.
Créer une Pochette Attrayante
Votre pochette de podcast est la première impression visuelle que les auditeurs ont de votre émission. Elle doit être visuellement attrayante et représentative du contenu et du ton de votre podcast. Bien que créer quelque chose d'attrayant visuellement soit important, considérez aussi la lisibilité. Le titre peut-il être facilement lu, même lorsqu'il est affiché en tant que petite vignette ? Cela garantit que votre podcast est reconnaissable sur diverses plateformes et appareils.
Créer des Titres d'Épisodes Qui Attirent les Clics
Vos titres d'épisodes sont comme de mini-titres conçus pour attirer les auditeurs. Utilisez des mots-clés pertinents au contenu de votre épisode, mais évitez l'utilisation excessive de mots-clés qui semblerait non naturelle. Au lieu de cela, considérez ce qui génèrerait réellement l'intérêt de quelqu'un. Une question, une déclaration audacieuses, ou un soupçon d'intrigue peuvent tous être très efficaces. Vous pourriez être intéressé par comment commercialiser un podcast pour élargir votre portée et stimuler l'engagement.
Stratégies de Promotion Durable pour les Créateurs Indépendants
Promouvoir votre podcast ne nécessite pas un budget marketing énorme. Concentrez-vous sur des stratégies durables et efficaces pour les créateurs indépendants :
Engagez-vous avec Votre Audience : Répondez aux commentaires et aux messages, cultivant un sens de communauté autour de votre podcast. Tisser des liens avec les auditeurs crée de la loyauté et encourage le marketing de bouche-à-oreille organique.
Co-Promotion : Collaborez avec d'autres podcasters dans votre niche. Les apparitions en tant qu'invité et les mentions mutuelles peuvent présenter votre podcast à un nouveau public.
Engagement sur les Réseaux Sociaux : Partagez des extraits de vos épisodes, des contenus en coulisses, et engagez-vous avec les communautés pertinentes sur des plateformes comme Twitter, Instagram, et Facebook.
Exploitez le Marketing Par Courriel : Construisez une liste de diffusion pour partager des mises à jour d'épisode, du contenu exclusif, et connectez-vous directement avec vos auditeurs les plus engagés.
Ces stratégies offrent une croissance durable sans nécessiter un investissement financier substantiel.
Exemple de Chronologie de Lancement sur 30 Jours
Jours 1-7 | Définir l'Audience Cible, Créer une Description d'Émission, Concevoir la Pochette |
Jours 8-14 | Enregistrer & Editer Les 3 Premiers Épisodes, Mettre en Place l'Hébergement & Distribution de Podcast |
Jours 15-21 | Soumettre le Podcast aux Répertoires (Apple Podcasts, Spotify, etc.), Établir une Présence sur les Réseaux Sociaux de Base |
Jours 22-28 | Commencer la Promotion, Contacter des Invités Potentiels, S'engager Avec des Communautés en Ligne Pertinentes |
Jours 29-30 | Lancez Votre Podcast ! Continuez la Promotion et l'Engagement, Analysez les Premiers Résultats |
Cette chronologie fournit une approche structurée pour lancer votre podcast en un mois, fixant des objectifs réalisables basés sur des méthodes éprouvées.
Transformer vos enregistrements sur iPhone en un podcast réussi nécessite plus que simplement de la maîtrise technique. Cela exige une compréhension claire de votre audience, un format d'émission captivant, et une promotion constante. En mettant en œuvre ces stratégies, vous pouvez transformer votre podcast sur iPhone en une plateforme engageante et influente.
Étapes Suivantes
Utilisez des outils alimentés par l'IA comme WhisperTranscribe pour porter votre podcast au niveau supérieur en générant des transcriptions, notes d'émission et postes pour les réseaux sociaux ! Tout le contenu dont vous avez besoin en un seul endroit pour économiser du temps et des efforts. Visitez WhisperTranscribe maintenant pour en savoir plus !

