Como transcrever reuniões do Zoom (mesmo que você não seja o anfitrião)

Resumo Rápido
Este guia abrange duas maneiras de transcrever reuniões do Zoom. Desde a transcrição nativa do Zoom para anfitriões de planos pagos até o WhisperTranscribe para qualquer pessoa com acesso à gravação. Você obterá as etapas exatas para ambos os métodos, o que cada um exige e uma comparação clara para ajudá-lo a escolher o fluxo de trabalho correto. Para guias de transcrição mais práticos, visite o nosso blog.
Suas Notas de Reunião do Zoom Ainda São um Problema?
Uma reunião termina com decisões, tarefas ou algo importante que alguém disse. Mas você fica olhando para suas notas com três tópicos e um nome que não consegue ler, tentando reconstruir o que você realmente precisa.
O Zoom relatou 300 milhões de participantes diários em reuniões, mas sua transcrição de áudio integrada ainda depende de uma conta paga, gravação em nuvem e de as configurações corretas estarem ativadas antes da chamada.
Isso deixa muitas pessoas como você sem um registro pesquisável após a reunião: sem transcrição, sem itens de ação claros e sem uma maneira fácil de transformar a discussão em notas de clientes ou documentação de equipe.
Este guia do WhisperTranscribe mostra como funciona a transcrição nativa do Zoom, o que ela exige e como podemos ajudar quando você já tem uma gravação do Zoom e precisa de uma transcrição fora do fluxo de trabalho integrado do Zoom.
Por que nos Ouvir?
O WhisperTranscribe é uma ferramenta de transcrição por IA confiada por mais de 100.000 usuários, incluindo equipes da Harvard Law School, UC Berkeley, Oracle e a ONU. Nós acompanhamos as pessoas lutando com opções de transcrição gratuitas por anos, então este guia reflete o que economiza tempo, não o que parece bonito em uma lista de recursos.
Por que Transcrever Suas Reuniões do Zoom?
Capture o que foi dito: Uma transcrição fornece um registro por escrito da reunião, para que você não precise depender de notas rascunhadas ou da memória.
Encontre Momentos-Chave Mais Rápido: Pesquise na transcrição por decisões, objeções, perguntas, nomes ou itens de ação em vez de assistir novamente a gravação completa.
Crie Acompanhamentos Claros: Transforme a conversa em notas de clientes, atualizações de equipe, resumos de reuniões ou documentação de próximos passos.
Suporte para Chamadas com Vários Interlocutores: Os rótulos de identificação dos palestrantes tornam entrevistas, chamadas de vendas, reuniões de equipe e webinars mais fáceis de revisar.
Reaproveite Conversas Úteis: Use a transcrição para criar postagens de blog, newsletters, publicações em redes sociais, relatórios ou pequenos clipes a partir da mesma gravação.
2 Maneiras Relevantes de Transcrever Reuniões do Zoom
Método 1: Transcrição Integrada do Zoom (Anfitriões em Planos Pagos)
O Zoom pode transcrever automaticamente gravações na nuvem em planos pagos. Quando ativado, ele cria um arquivo de transcrição após o término da reunião, junto com a gravação de vídeo.
Isso funciona melhor se você for o anfitrião, já usar um plano pago do Zoom e quiser manter o fluxo de trabalho dentro do Zoom. Veja como configurar.
Passo 1: Confirme se o Seu Plano Inclui Gravação na Nuvem
Faça login na sua conta do Zoom em zoom.us e abra suas configurações de gravação. Dependendo da sua conta, isso pode aparecer em Configurações, Configurações da Conta, Gravações & Transcritos ou Gravação & Transcrito.
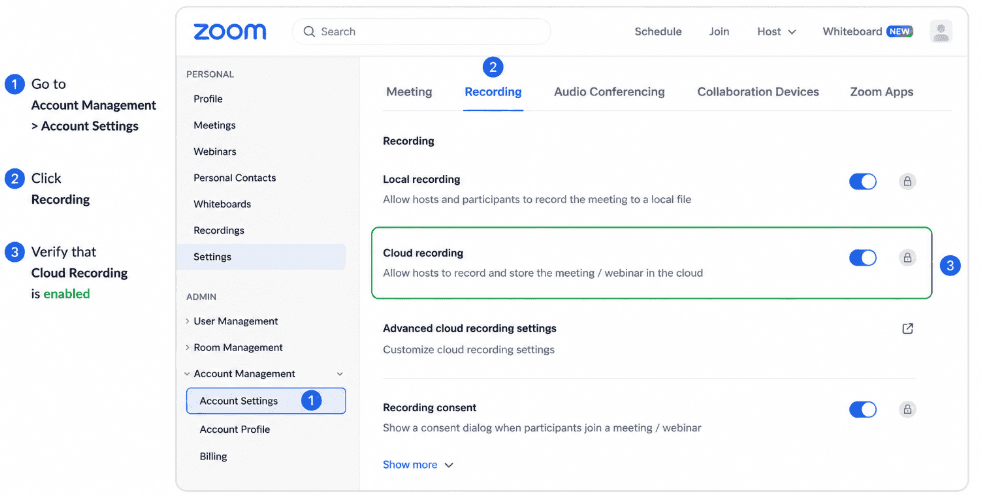
Verifique se a gravação na nuvem está disponível e ativada. Se a opção estiver ausente, bloqueada ou esmaecida, seu plano ou as configurações do administrador podem não permitir a gravação na nuvem.
A gravação na nuvem está disponível para contas pagas do Zoom. Contas gratuitas do Zoom podem gravar localmente, mas as gravações locais não geram a transcrição automática de áudio do Zoom.
Passo 2: Ative a Transcrição de Áudio nas Suas Configurações
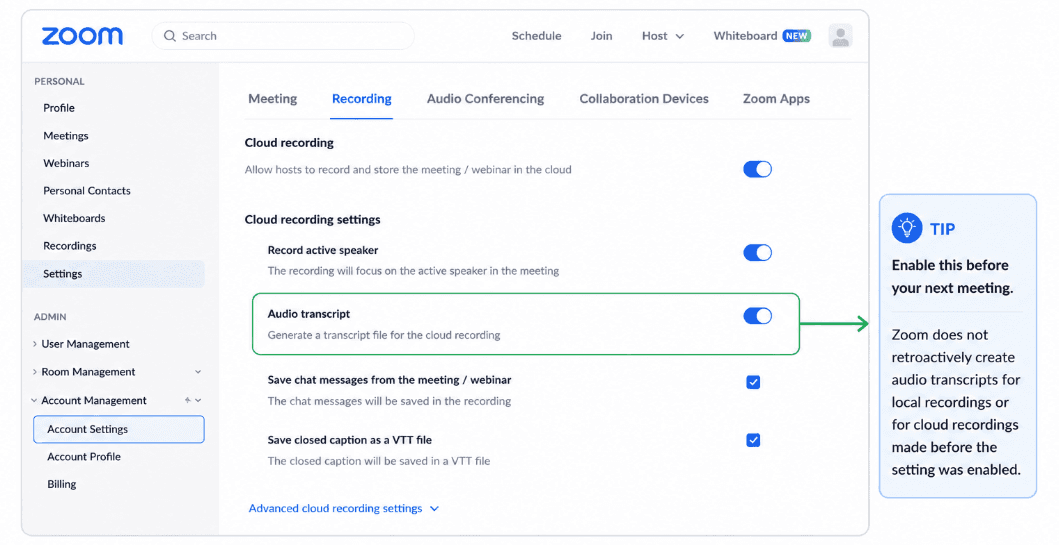
Nas suas configurações de gravação, encontre as opções de gravação na nuvem e ative a Transcrição de áudio. Isso instrui o Zoom a gerar uma transcrição para futuras gravações na nuvem.
Dica: Ative isso antes da sua próxima reunião. O Zoom não criará transcrições para gravações anteriores, incluindo gravações locais ou gravações na nuvem feitas antes de a configuração ser ativada.
Passo 3: Inicie a Reunião e Grave na Nuvem
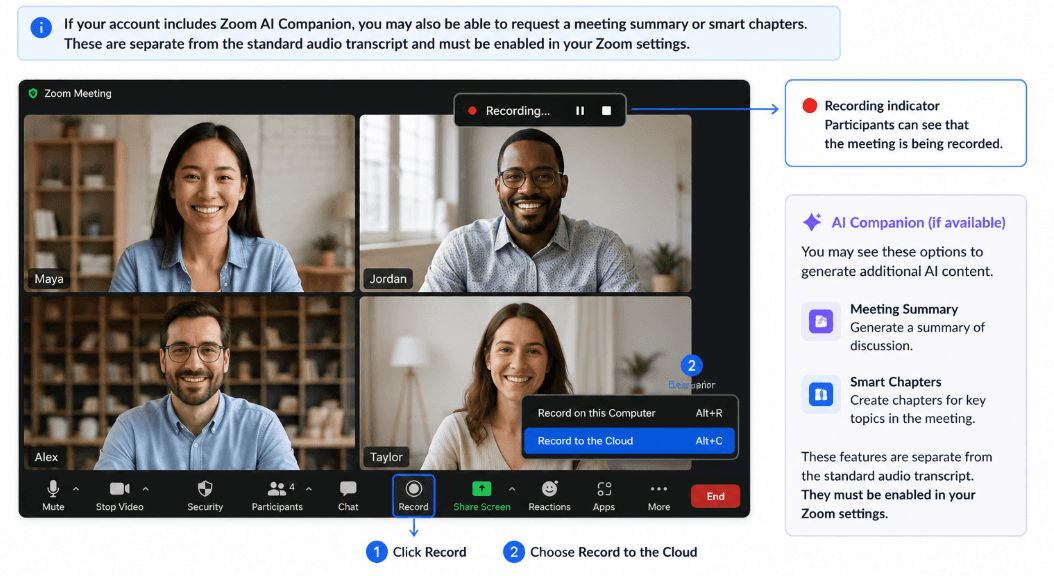
Quando sua reunião começar, clique em Gravar na barra de ferramentas da reunião e escolha Gravar na Nuvem. O Zoom mostrará um indicador de gravação para que os participantes saibam que a reunião está sendo gravada.
Se a sua conta incluir o Zoom AI Companion, você também poderá solicitar um resumo da reunião ou capítulos inteligentes. Estes são separados da transcrição de áudio padrão e devem ser ativados nas suas configurações do Zoom.
Passo 4: Encerre a Reunião
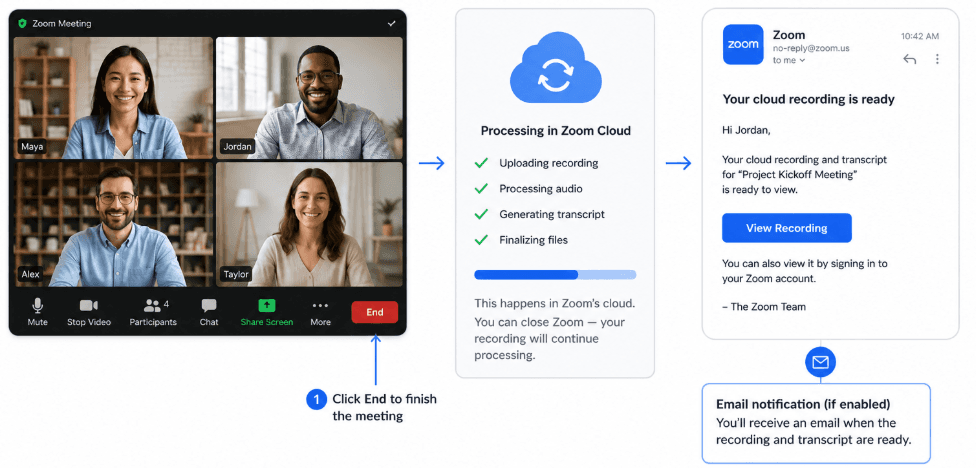
Quando a reunião termina, o Zoom processa a gravação na nuvem e a transcrição. O processamento ocorre na nuvem do Zoom, então você não precisa manter o computador ligado enquanto ele é concluído.
O tempo de processamento varia de acordo com a duração da gravação, o tamanho do arquivo e a carga do sistema do Zoom. Se as notificações por e-mail estiverem ativadas, o Zoom enviará um e-mail ao anfitrião quando a gravação estiver pronta.
Passo 5: Acesse e Baixe a Transcrição
Faça login no Zoom e vá para Gravações ou Gravações & Transcritos. Abra a gravação na nuvem da sua reunião. Se a transcrição de áudio foi ativada, você deverá ver a Transcrição de Áudio listada com os arquivos de gravação.
O Zoom salva as transcrições de áudio como arquivos VTT. Você pode visualizar a transcrição no player web do Zoom, editá-la no portal web quando disponível ou baixar o arquivo VTT para legendas, edição ou documentação.

Limitações: A transcrição do Zoom é útil, mas limitada: exige gravação na nuvem em um plano pago, deve ser ativada antes da reunião e não funciona para gravações locais. A precisão pode cair com áudio ruim, fala rápida ou sotaques fortes. Também carece de ferramentas integradas de reaproveitamento de conteúdo, e os participantes dependem do anfitrião para compartilhar a gravação.
Método 2: WhisperTranscribe (Recomendado)
O WhisperTranscribe funciona a partir do arquivo de gravação, não das configurações do Zoom. Portanto, sua função, plano do Zoom ou configuração pré-reunião não importam depois que você tem a gravação.
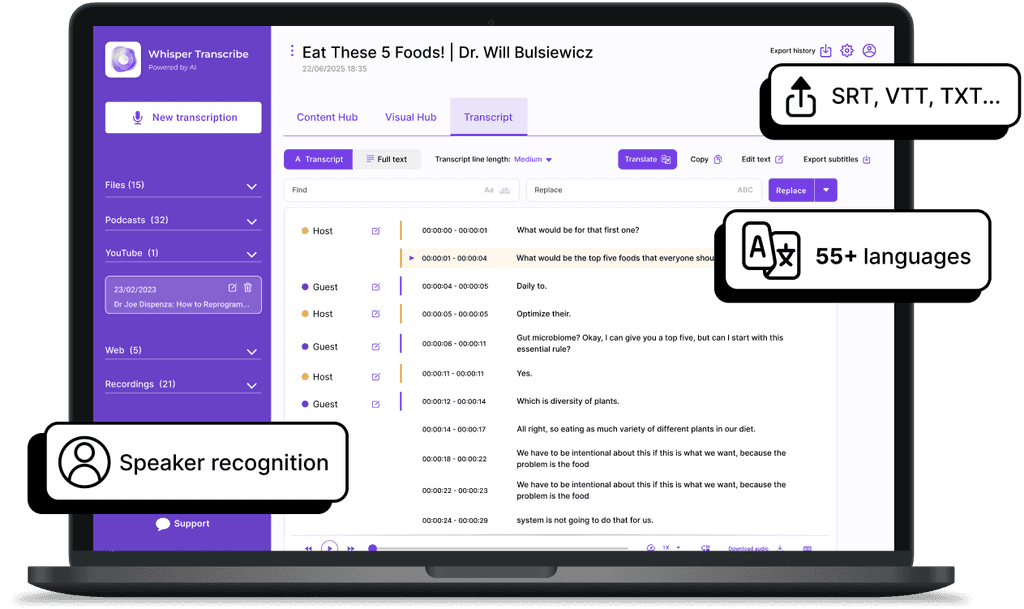
Ele também vai além da transcrição nativa do Zoom, oferecendo até 95% de precisão, reconhecimento de locutores, mais de 99 idiomas de tradução e ferramentas para transformar transcrições em resumos, itens de ação, postagens de blog, conteúdo para redes sociais e muito mais.
Passo 1: Obtenha a Gravação do Zoom
Primeiro, você precisa do arquivo de gravação. Existem duas maneiras de obtê-lo:
Se Você For o Anfitrião com Gravação na Nuvem: Faça login no zoom.us, vá em Minha Conta > Gravações e baixe o arquivo MP4.

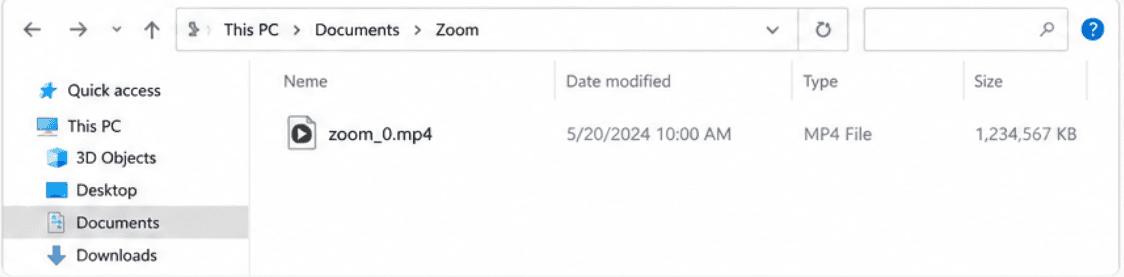
Se Você Gravou Localmente: O Zoom salva as gravações locais no seu computador por padrão em Documentos > Zoom. O arquivo será um MP4.
Se Você For um Participante: Peça ao anfitrião para compartilhar o arquivo de gravação ou o link da gravação na nuvem com você.

O WhisperTranscribe suporta MP4, MP3, M4A, WAV, OGG, FLAC e a maioria dos outros formatos de áudio e vídeo comuns, então você não precisará converter o arquivo na maioria dos casos.
Passo 2: Baixe o WhisperTranscribe e Crie Sua Conta
Acesse whispertranscribe.com e clique em ‘Try for Free’ (Experimente Gratuitamente).

Baixe o aplicativo para desktop para Mac ou Windows, ou use a versão web diretamente.

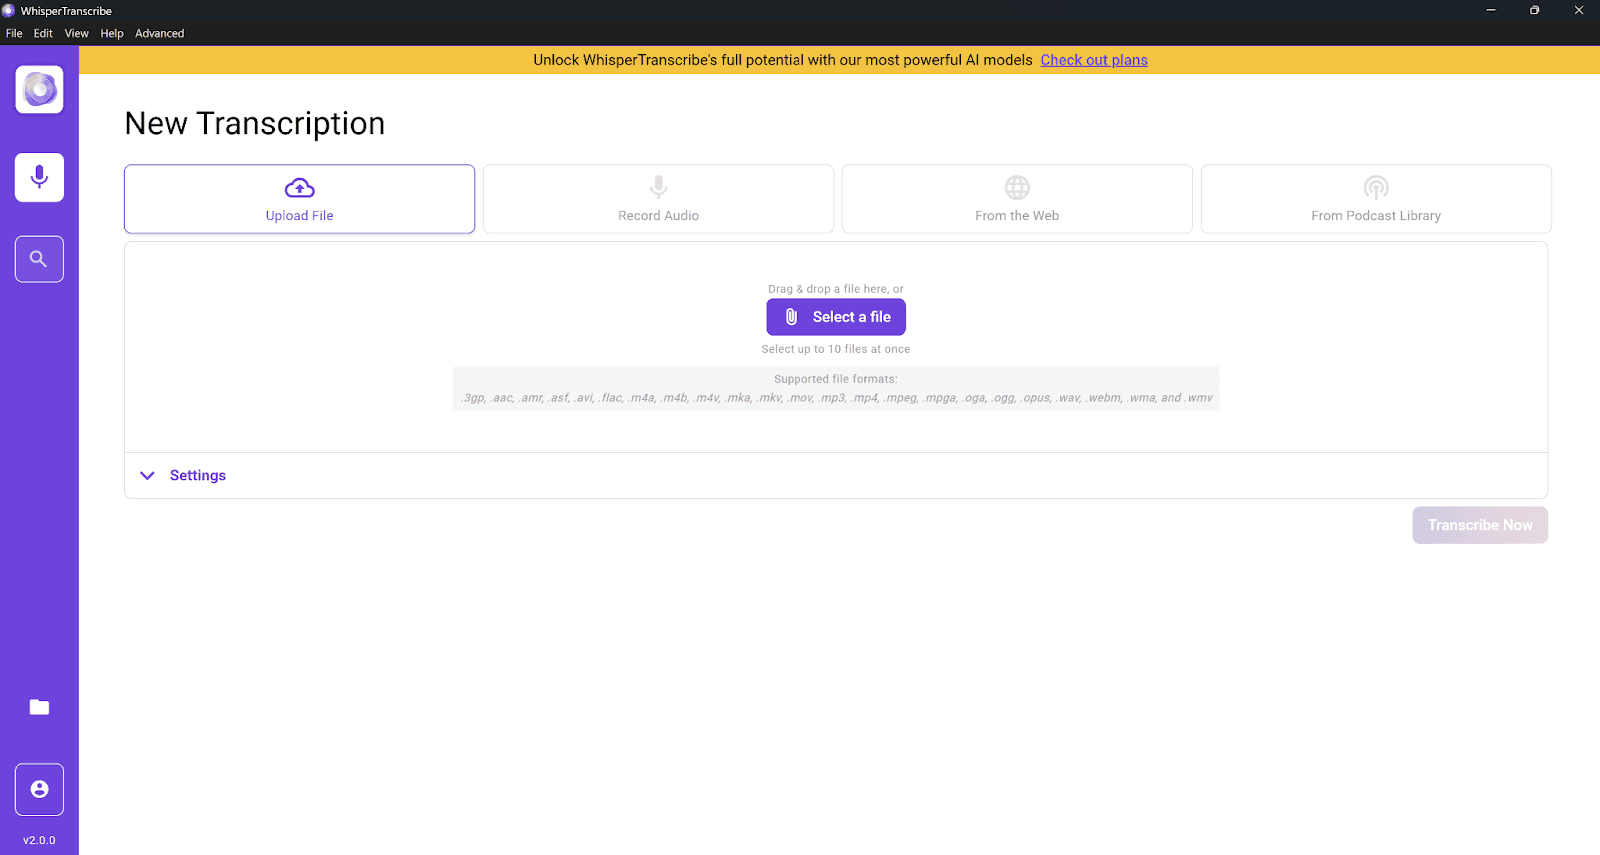
Crie sua conta, sem necessidade de cartão de crédito, e você chegará à tela ‘New Transcription’ (Nova Transcrição).
O teste gratuito inclui 60 minutos de transcrição, o que cobre a maioria das reuniões padrão.
Passo 3: Faça o Upload da Gravação
Na tela ‘New Transcription’, clique em ‘Upload File’ (Enviar Arquivo) e selecione a gravação do Zoom do seu dispositivo. Se a sua reunião foi gravada na nuvem do Zoom e você tem o link compartilhável, também pode colá-lo usando a opção From the Web (Da Web) e o WhisperTranscribe extrairá o áudio diretamente.
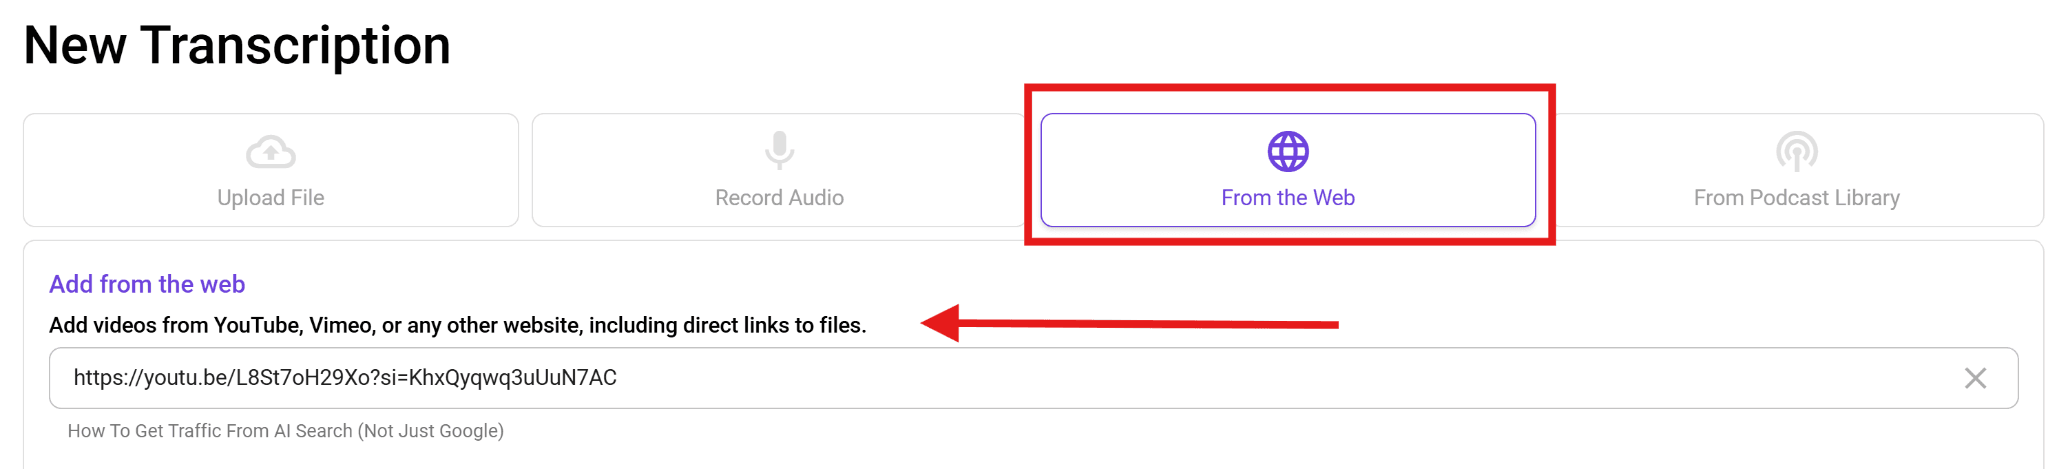
É aqui que o WhisperTranscribe simplifica o fluxo de trabalho. Você não depende de configurações do Zoom que precisavam ser ativadas antes da reunião; o arquivo de gravação é tudo de que você precisa.
Passo 4: Defina Suas Configurações
Antes de iniciar a transcrição, reserve 30 segundos para definir suas preferências.
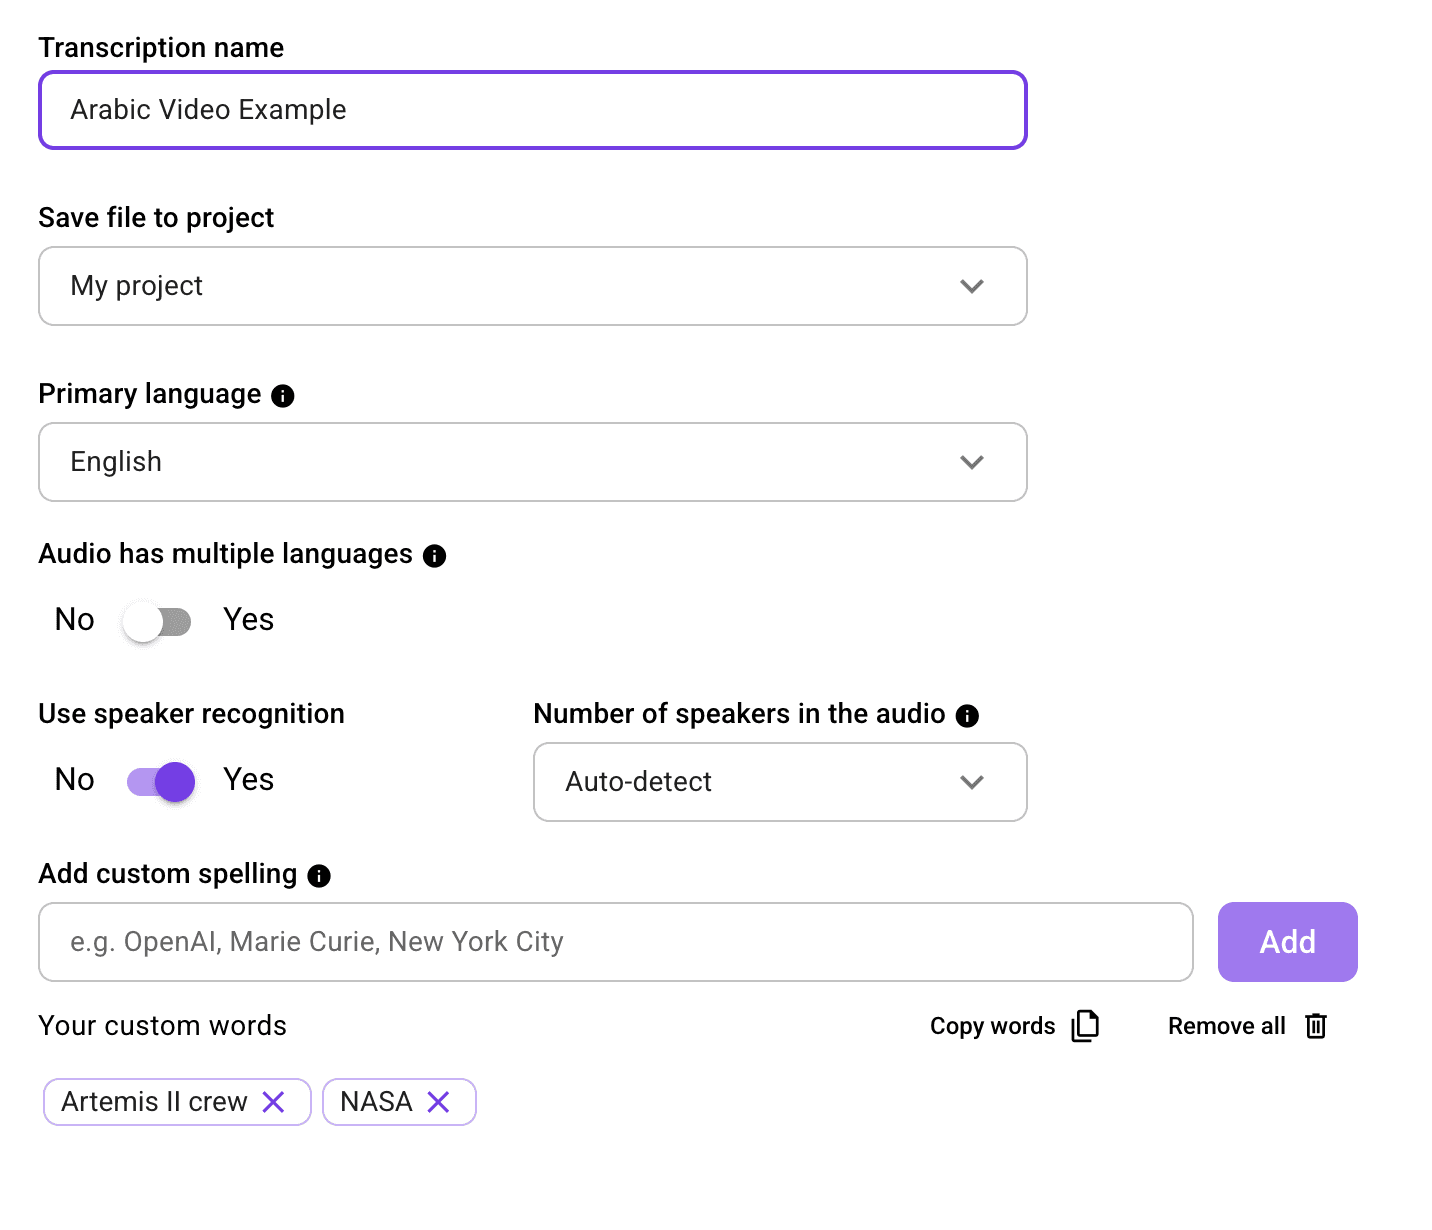
Especificamente para reuniões do Zoom, estas configurações fazem uma diferença significativa:
Dê um nome ao projeto com o nome e a data da reunião para que seja fácil de encontrar mais tarde (ex: "Kickoff com Cliente, Junho de 2025")
Selecione o idioma principal falado na reunião entre as mais de 55 opções suportadas
Ative o reconhecimento de locutores; isso é especialmente importante para chamadas do Zoom com múltiplos participantes. O WhisperTranscribe detectará e rotulará automaticamente cada voz, permitindo que você acompanhe quem disse o quê ao longo da transcrição
Ative a opção ‘multiple languages’ (múltiplos idiomas) se a sua chamada envolveu participantes falando idiomas diferentes
Passo 5: Execute a Transcrição
Clique em ‘Transcribe Now’ (Transcrever Agora). O WhisperTranscribe processa o áudio automaticamente. Uma reunião de 60 minutos é normalmente processada de forma muito mais rápida que o tempo real, embora a velocidade dependa do tamanho do arquivo e das condições do sistema.
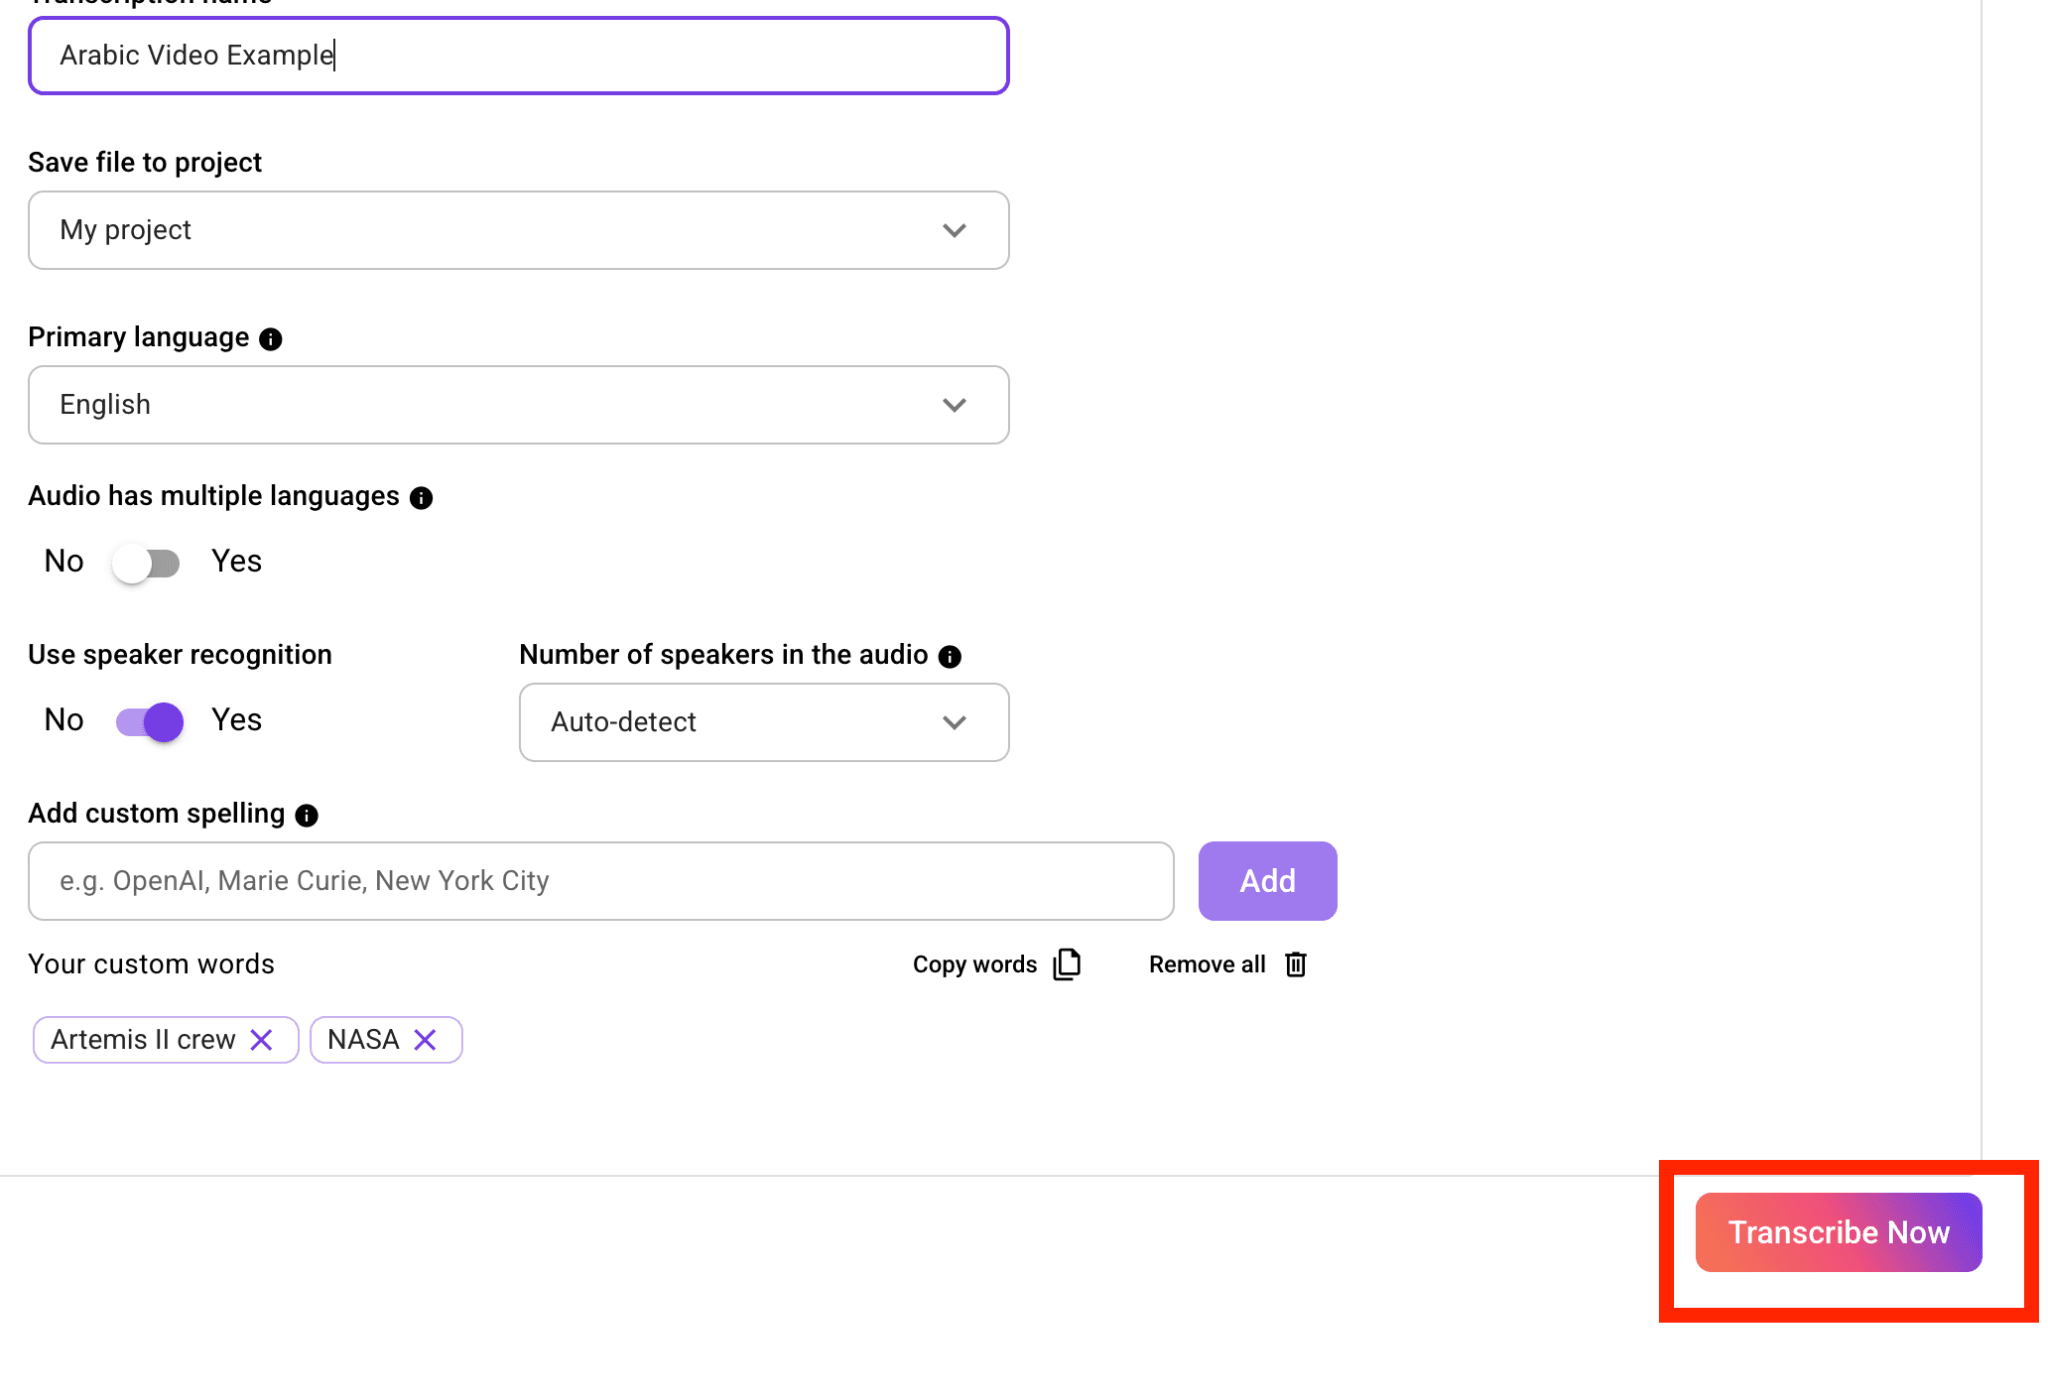
Diferente da transcrição do Zoom, isso não depende de nada que tenha acontecido durante a reunião. Funciona em gravações às quais você já tem acesso, tenham sido gravadas recentemente ou salvas de uma reunião mais antiga.
Passo 6: Revise e Edite
Assim que o processamento for concluído, a transcrição será aberta no editor integrado do WhisperTranscribe. Para uma chamada típica do Zoom, você desejará:
Confirmar se os rótulos dos locutores estão atribuídos corretamente, renomeando "Speaker 1" e "Speaker 2" para os nomes reais dos participantes
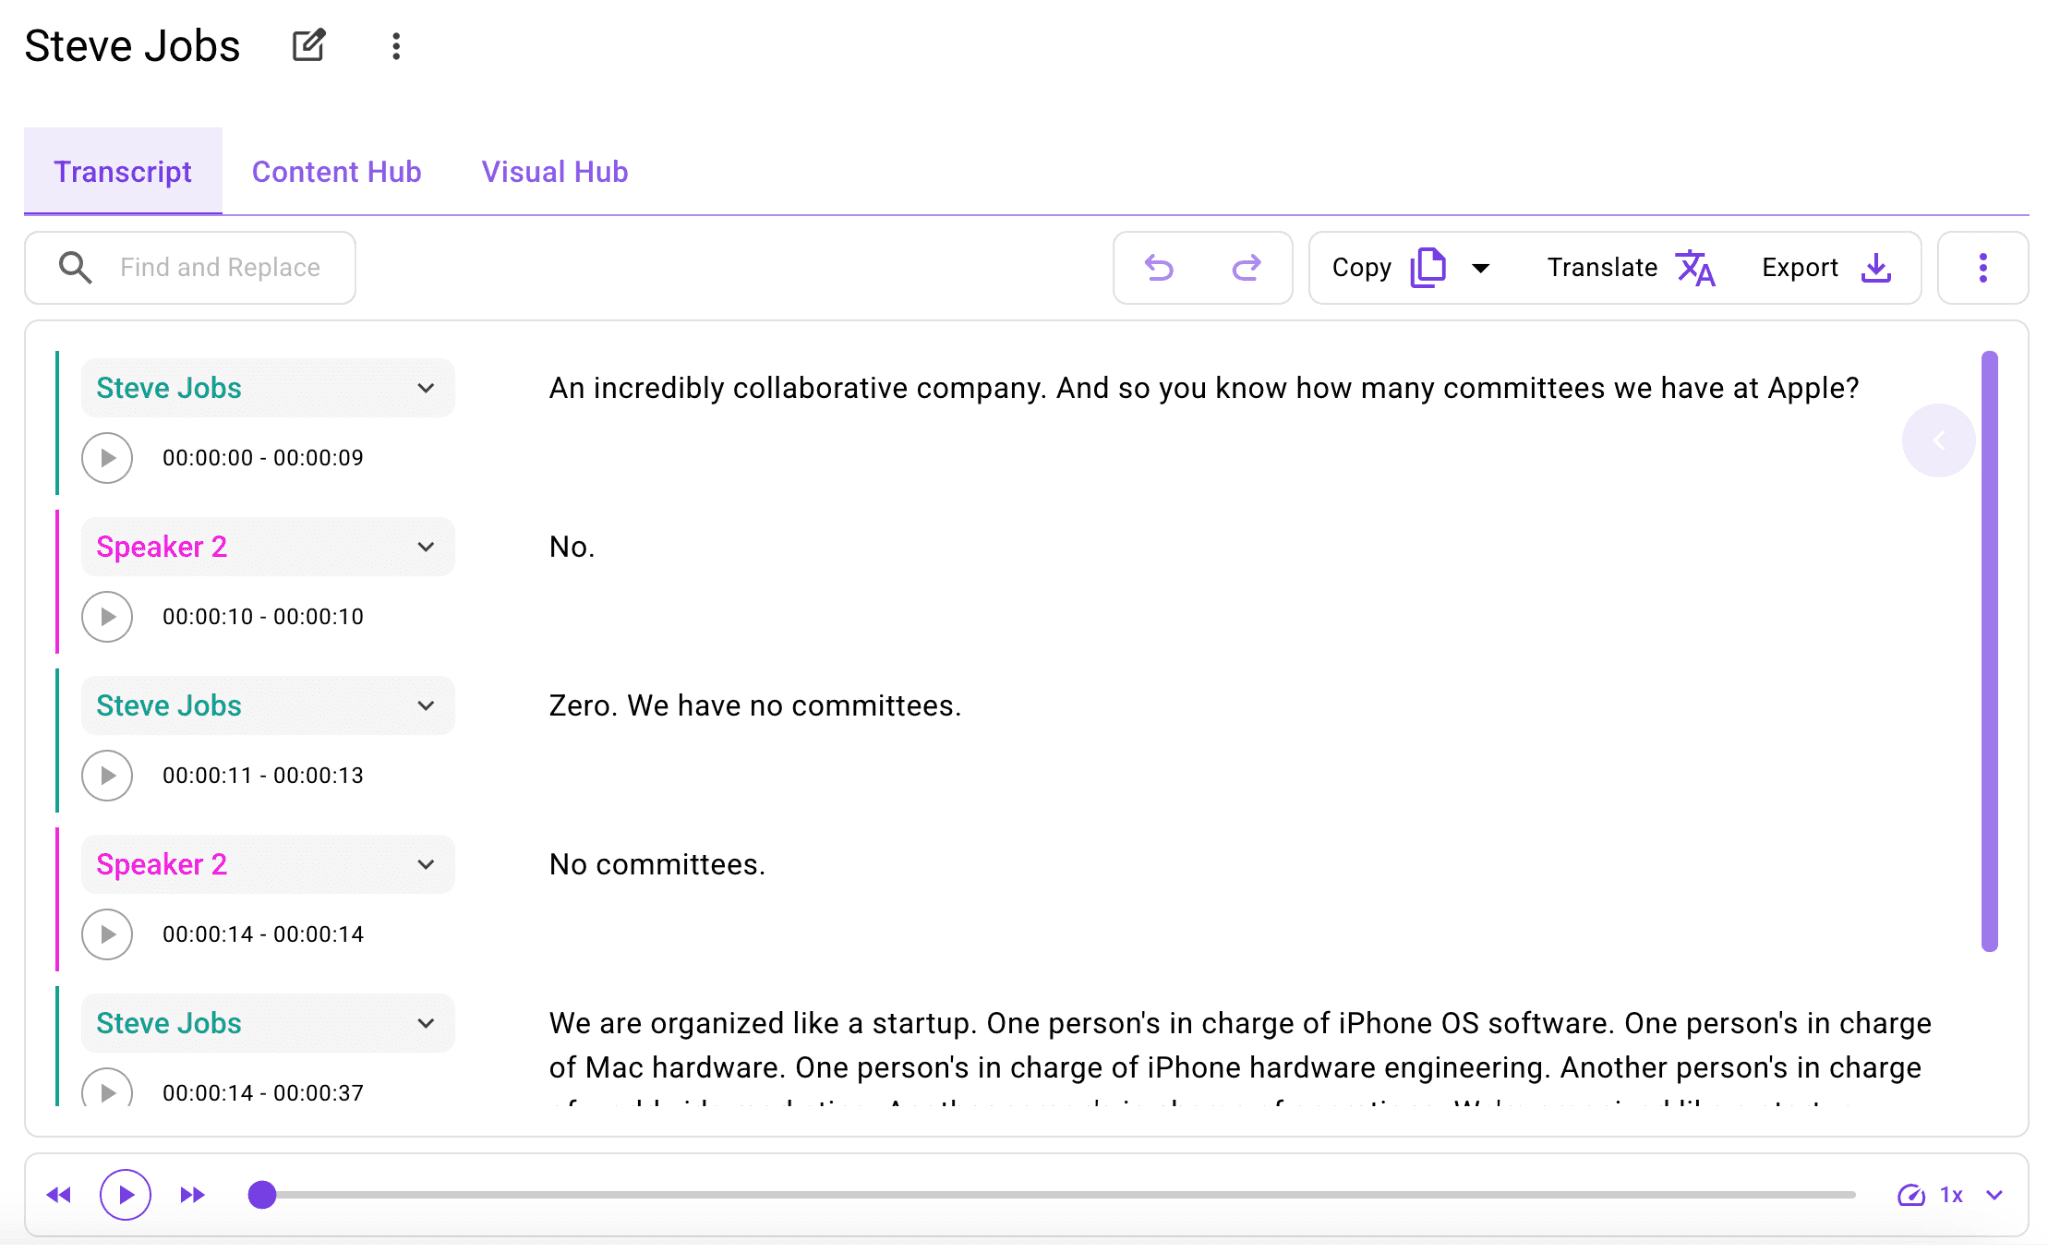
Corrigir eventuais termos técnicos, nomes de produtos ou nomes próprios mal interpretados
Destacar seções que você usará para a documentação de acompanhamento
Esta etapa é significativamente mais rápida do que criar uma transcrição do zero, pois você está refinando, não escrevendo.
Passo 7: Exporte ou Reaproveite a Transcrição
Exporte a transcrição como SRT, VTT, TXT ou Word, dependendo do que precisar a seguir. Para reuniões do Zoom, você também pode usar as ferramentas de conteúdo do WhisperTranscribe para transformar a transcrição em resumos, itens de ação, e-mails de acompanhamento, postagens de blog, newsletters ou conteúdo para redes sociais.
Use o ‘Magic Chat’ para extrair detalhes sem precisar ler a transcrição completa. Faça perguntas como “Quais itens de ação foram atribuídos?” ou “Quais objeções o cliente apresentou?” e obtenha respostas da reunião em segundos.
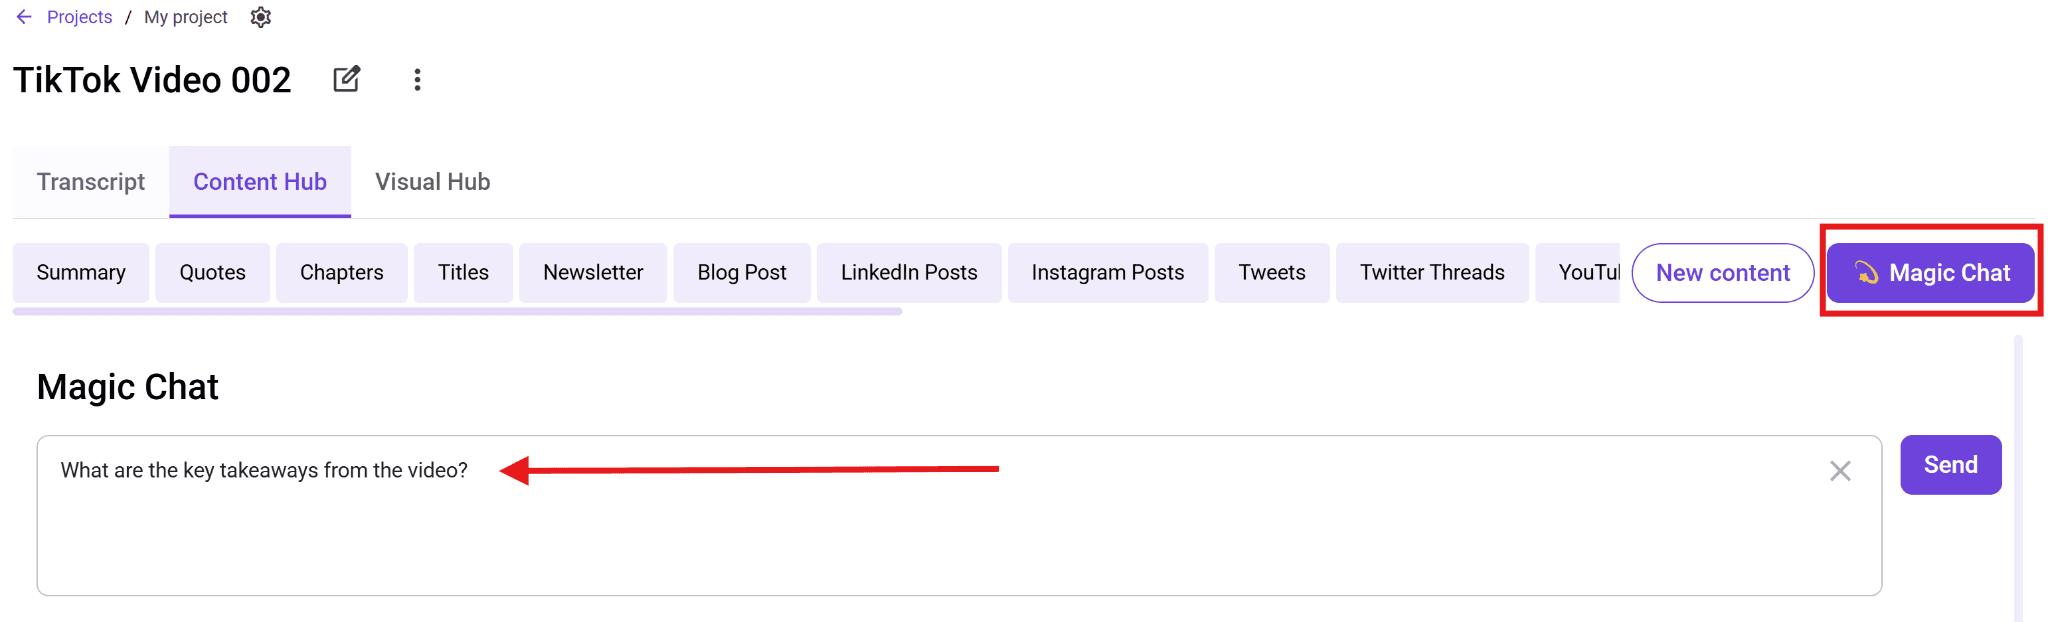
Para equipes que realizam chamadas com clientes, entrevistas de pesquisa ou sessões de planejamento com frequência, é aqui que a transcrição se torna mais do que um registro. Ela se torna uma maneira mais rápida de transformar conversas em trabalho de acompanhamento útil.
Transcrição Nativa do Zoom vs. WhisperTranscribe
Critério | Transcrição Nativa do Zoom | WhisperTranscribe |
Plano necessário | Plano pago do Zoom (Pro ou superior) | Teste gratuito disponível, sem cartão de crédito |
Quem pode usar | Apenas o anfitrião | Qualquer pessoa com o arquivo de gravação |
Funciona em gravações locais | Não | Sim |
Deve ser ativado antes da reunião | Sim | Não |
Precisão | Depende da qualidade do áudio e das configurações da reunião | Até 95% |
Reconhecimento de locutores | Básico | Automático, rótulos renomeáveis |
Formatos de exportação | VTT, TXT | SRT, VTT, TXT, Word |
Tradução | Não | Mais de 99 idiomas |
Reaproveitamento de conteúdo | Não | Mais de 57 tipos de formatos |
Funciona em gravações antigas | Apenas se gravado na nuvem | Sim, qualquer gravação |
Melhores Práticas para Transcrever Reuniões do Zoom
Grave a Reunião: A transcrição nativa do Zoom só funciona quando a gravação na nuvem e a transcrição de áudio estão ativadas. O WhisperTranscribe também requer um arquivo de gravação, então decida antes do início da reunião.
Notifique os Participantes: Avise a todos que a reunião está sendo gravada antes de começar. Isso define expectativas claras e ajuda a evitar mal-entendidos.
Ative o Reconhecimento de Locutores: Ative os rótulos de locutores para reuniões em grupo. Eles tornam entrevistas, webinars, chamadas com clientes e discussões de equipe muito mais fáceis de revisar.
Renomeie os Locutores: Substitua rótulos genéricos como "Speaker 1" e "Speaker 2" por nomes reais enquanto a reunião ainda está fresca na memória. É muito mais fácil do que tentar identificar os locutores mais tarde.
Revise os Itens de Ação: Não deixe a transcrição parada sem uso. Extraia itens de ação, compromissos com clientes, perguntas em aberto e próximos passos enquanto a conversa ainda está fresca.
Crie um Fluxo de Trabalho de Gravação: Se você não for sempre o anfitrião, combine quem grava as reuniões, onde as gravações são armazenadas e como elas são compartilhadas com a equipe depois.
Torne Qualquer Reunião do Zoom Mais Fácil de Revisar e Reaproveitar
A transcrição nativa do Zoom funciona se você for o anfitrião em um plano pago e a gravação na nuvem tiver sido ativada antes da reunião. Mas se você for um participante, usuário de um plano gratuito ou estiver trabalhando com uma gravação mais antiga, precisará de outro caminho.
O WhisperTranscribe ajuda você a transformar a gravação do Zoom que você já possui em uma transcrição 95% precisa com rótulos de locutores em minutos. A partir daí, você pode criar o trabalho de acompanhamento que realmente importa: um resumo, itens de ação, notas para clientes, um e-mail de acompanhamento ou conteúdo reutilizável.
Experimente o WhisperTranscribe gratuitamente hoje mesmo e transforme sua próxima gravação do Zoom em uma transcrição pesquisável em minutos, sem necessidade de cartão de crédito.