Wie man Audio kostenlos in Text umwandelt: (3 Methoden, ehrlich bewertet)

Schnelle Zusammenfassung
Diese Anleitung beschreibt drei kostenlose Möglichkeiten, Audio online in Text zu transkribieren: die kostenlose Testversion von WhisperTranscribe, die integrierte Transkriptionsfunktion von Microsoft Word und den kostenlosen Tarif von Otter AI. Sie sehen die genauen Schritte für jede Methode, die realen Einschränkungen und welche Methode für Ihren Arbeitsablauf am sinnvollsten ist. Besuchen Sie unseren Blog für weitere praktische Anleitungen zur Transkription.
Verbringen Sie immer noch 4 Stunden mit der Transkription jeder 1-stündigen Aufnahme?
Sie haben eine Podcast-Episode, ein Kundeninterview, ein aufgezeichnetes Meeting oder einen Coaching-Call, den Sie schriftlich benötigen, möchten aber nicht für eine Transkriptionssoftware bezahlen.
Die manuelle Erstellung mag wie die naheliegende kostenlose Option erscheinen, erfordert jedoch oft mehr Zeit und Aufwand, um ein perfektes Transkript zu erhalten. Wenn dann noch Hintergrundgeräusche, Akzente oder mehrere Sprecher hinzukommen, wird der Prozess noch langsamer.
Glücklicherweise können kostenlose Transkriptionstools Ihnen die schwere Arbeit abnehmen. In diesem WhisperTranscribe-Leitfaden stellen wir drei kostenlose Methoden und Tools vor, die tatsächlich funktionieren, was sie an Zeit und Aufwand kosten und wo die Schwachstellen der einzelnen Optionen liegen.
Warum sollten Sie uns vertrauen?
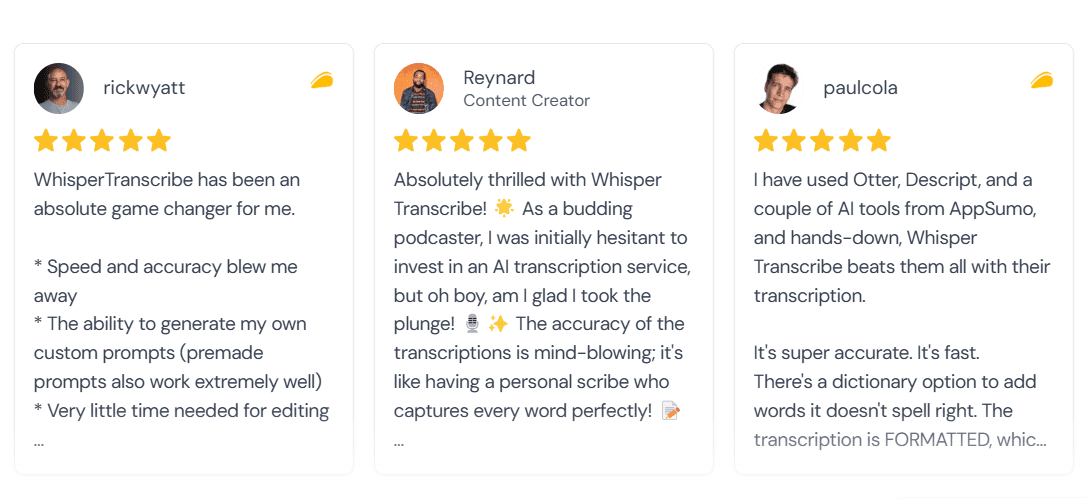
Wir haben WhisperTranscribe entwickelt, ein KI-Transkriptionstool, dem über 100.000 Nutzer vertrauen, darunter Teams der Harvard Law School, der UC Berkeley, von Oracle und der UN. Wir wissen also genau, wo kostenlose Transkriptionstools helfen, wo sie den Workflow verlangsamen und worauf es ankommt, wenn Sie ein brauchbares Transkript benötigen.
Warum sollte man Audio überhaupt transkribieren?
Ein Transkript verwandelt gesprochene Inhalte in ein Format, das Sie durchsuchen, bearbeiten, teilen und wiederverwenden können. Dies ermöglicht Ihnen:
Inhalte schneller wiederzuverwenden: Verwandeln Sie eine einzige Aufnahme in Blogbeiträge, Social-Media-Beiträge, Newsletter oder Shownotes, ohne alles aus dem Gedächtnis neu schreiben zu müssen.
Barrierefreiheit: Untersuchungen haben gezeigt, dass 69 % der Verbraucher Videos in der Öffentlichkeit ohne Ton ansehen und 25 % dies im privaten Rahmen tun. Text bietet Ihrem Publikum einen barrierefreien Zugang.
SEO und Auffindbarkeit: Suchmaschinen können Audioinhalte nicht indexieren, ein Transkript hingegen schon.
Durchsuchbare Archive: Zitate, Referenzen und Schlüsselmomente lassen sich später mühelos wiederfinden.
Skalierung Ihrer Inhalte: Aus einer Stunde Audio kann eine ganze Woche an Inhalten entstehen, wenn Sie das entsprechende Transkript als Arbeitsgrundlage haben.
3 kostenlose Wege, um Audio online in Text zu transkribieren
Methode 1: WhisperTranscribe (Empfohlen)
WhisperTranscribe bietet Ihnen 60 Freiminuten für die Transkription, ohne dass eine Kreditkarte erforderlich ist. Es basiert auf dem Whisper-Modell von OpenAI und erzielt eine Genauigkeit von bis zu 95 % – selbst bei Hintergrundgeräuschen, Akzenten oder Aufnahmen mit mehreren Sprechern.
Der kostenlose Tarif deckt weit mehr als nur die Grundlagen ab. Sie können Transkripte in über 99 Sprachen übersetzen, mit dem Magic Chat Fragen zu Ihren Audioaufnahmen stellen und das Transkript direkt in der App in Blogbeiträge, Zusammenfassungen, Social-Media-Beiträge und andere Formate umwandeln.
Schritt 1: App herunterladen und installieren
Besuchen Sie die WhisperTranscribe-Website und klicken Sie auf "Try for Free", um die Download-Seite zu öffnen. Wählen Sie die für Ihren Computer passende Version (Mac oder Windows). Installieren Sie die App und erstellen Sie Ihr Konto. Sie werden automatisch angemeldet.

Die Desktop-App belässt Ihre Audiodaten auf Ihrem Computer, bis Sie sich für die Verarbeitung entscheiden. Das ist besonders wichtig, wenn Ihre Aufnahmen sensible Inhalte enthalten.
Schritt 2: Audio hochladen oder Link einfügen
Öffnen Sie die App und starten Sie eine neue Transkription. Sie haben zwei Möglichkeiten, Audio zu importieren.
Datei hochladen: Klicken Sie auf "Upload File" und wählen Sie die Audiodatei von Ihrem Gerät aus. WhisperTranscribe unterstützt MP3, MP4, M4A, WAV, OGG, FLAC, MPEG und mehr, sodass Sie sich in den meisten Fällen den Konvertierungsschritt sparen können.
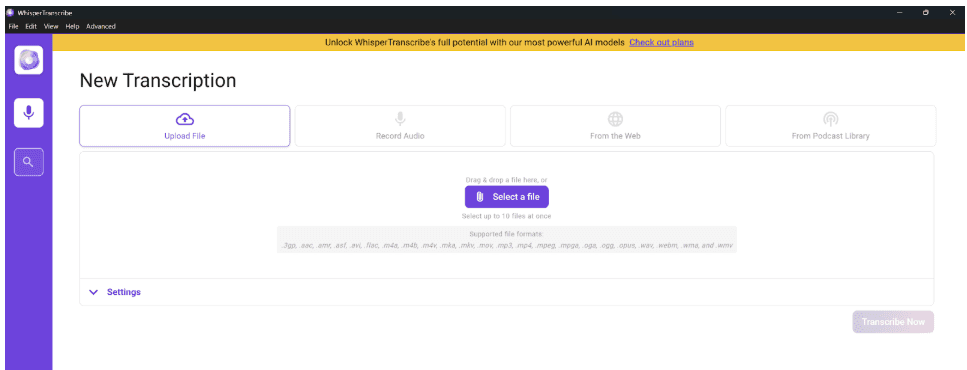
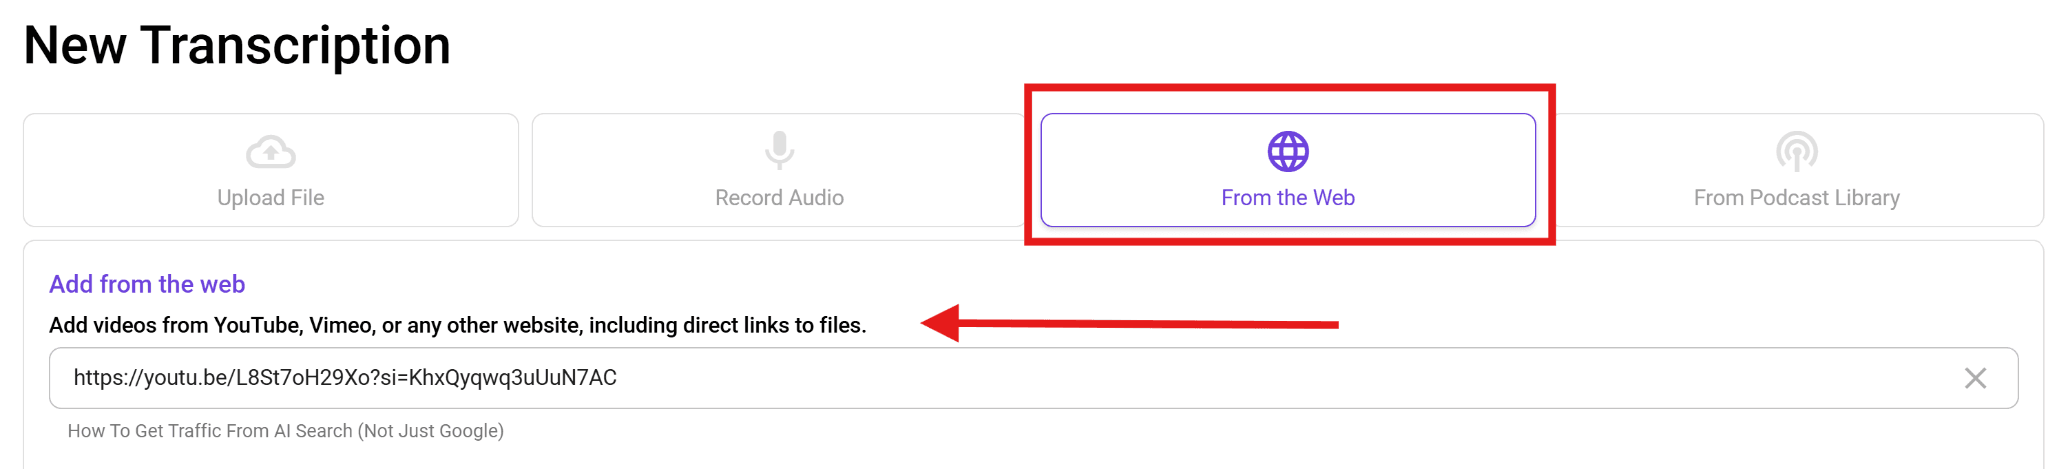
Link einfügen: Dieser Schritt unterscheidet WhisperTranscribe von den meisten kostenlosen Tools. Sie müssen ein YouTube-Video nicht erst herunterladen oder einen externen Extractor verwenden. Klicken Sie einfach auf "From the Web" und fügen Sie eine URL von YouTube, Vimeo oder einen direkten Dateilink ein. Die App ruft das Audio automatisch für Sie ab.
Schritt 3: Transkriptionseinstellungen konfigurieren
Nehmen Sie vor dem Start der Transkription ein paar Einstellungen vor:
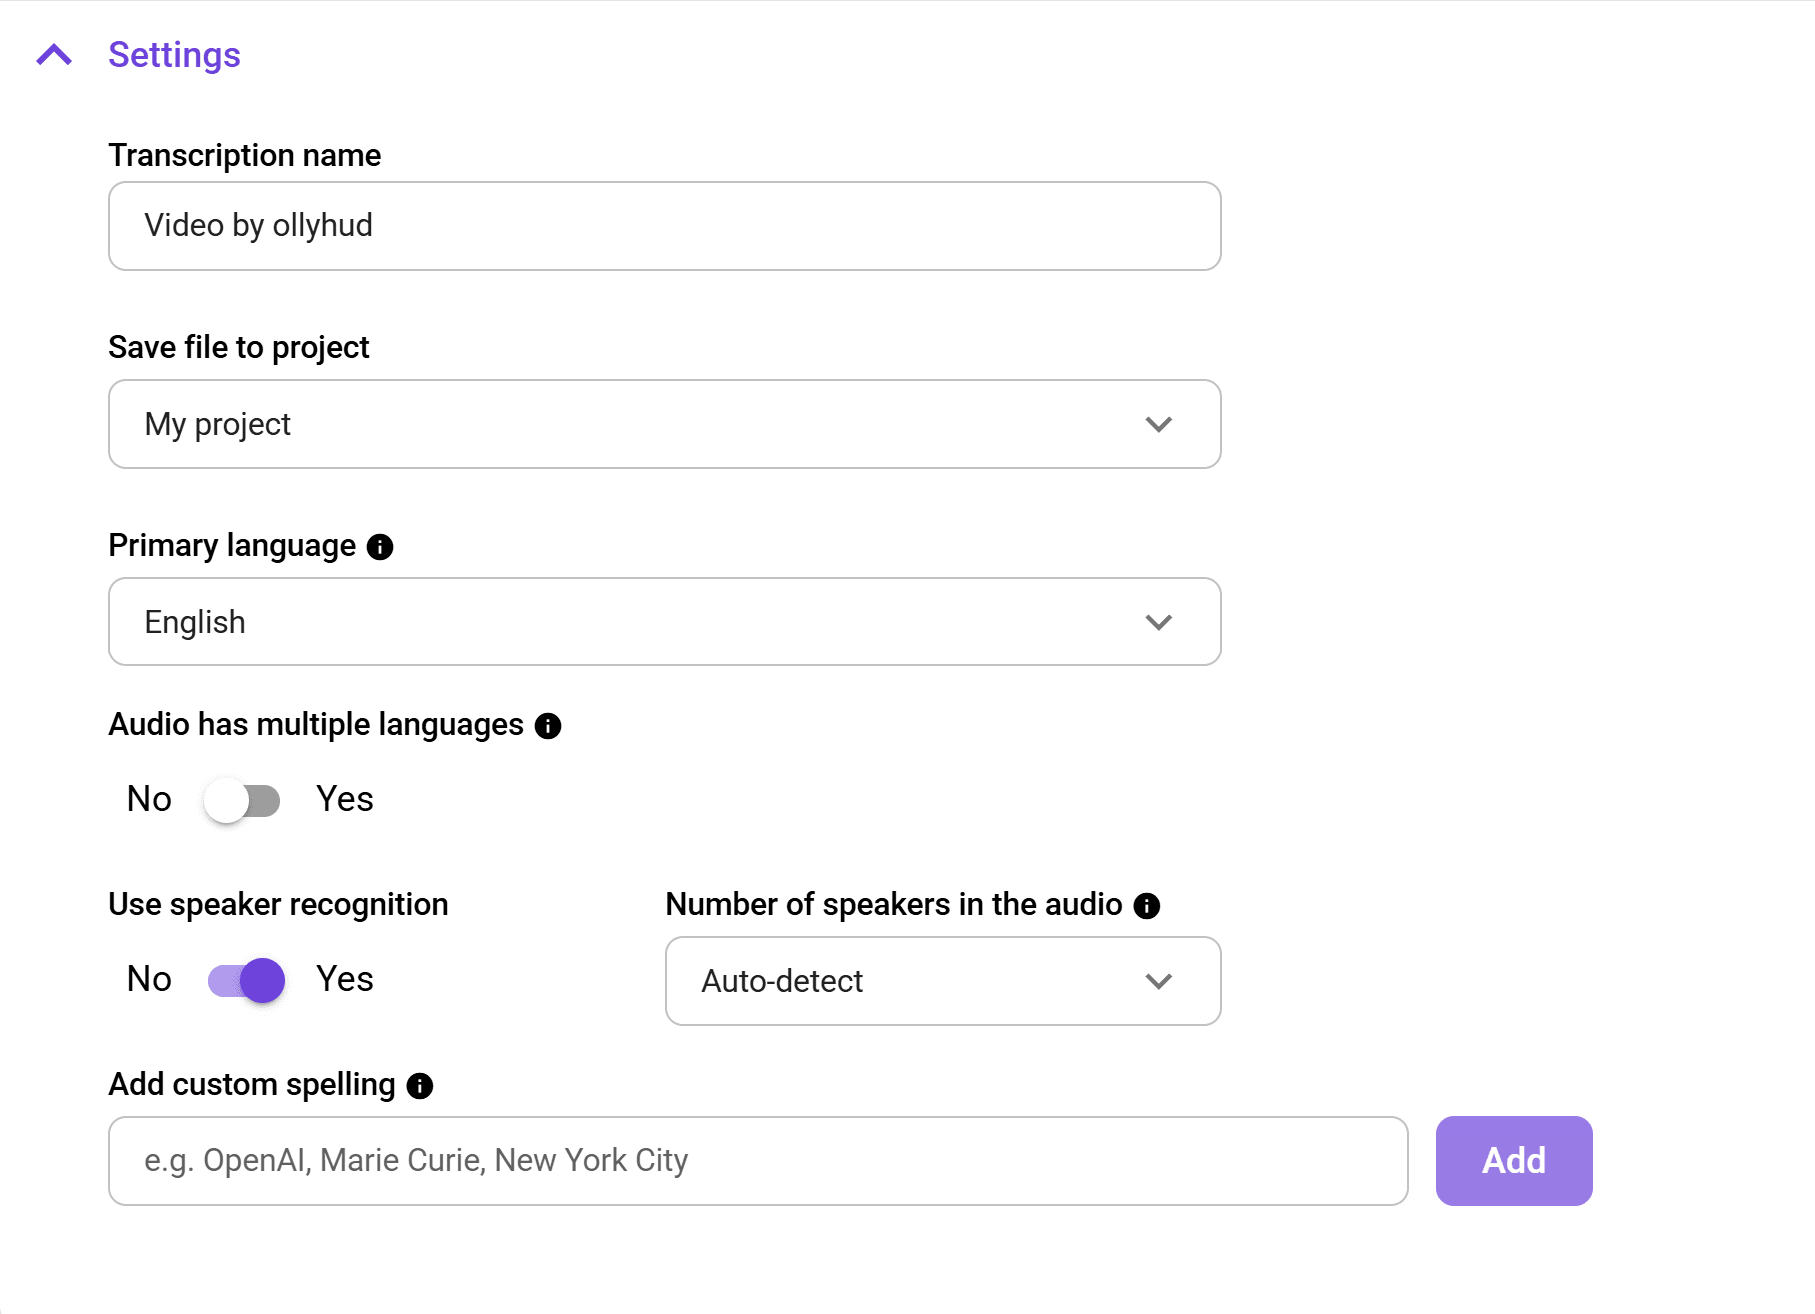
Projekt benennen: Wählen Sie einen Namen, den Sie später leicht wiedererkennen.
Primärsprache: Wählen Sie aus über 55 unterstützten Sprachen.
Mehrere Sprachen: Aktivieren Sie diese Option, wenn in der Aufnahme zwischen verschiedenen Sprachen gewechselt wird.
Sprechererkennung: Aktivieren Sie diese Option für Interviews, Podiumsdiskussionen oder Aufnahmen mit mehr als einer Stimme.
Eigene Schreibweisen: Fügen Sie Eigennamen, Fachbegriffe oder Markennamen hinzu, die die KI andernfalls übersehen könnte.
Das dauert weniger als eine Minute und zahlt sich bei der Qualität des fertigen Transkripts aus.
Schritt 4: Transkription starten
Klicken Sie auf "Transcribe Now" und lassen Sie die KI arbeiten. Eine 60-minütige Datei wird in der Regel innerhalb weniger Minuten verarbeitet, abhängig von der Dateigröße und der Serverauslastung.
Es handelt sich hierbei nicht um eine Echtzeit-Transkription. Die Aufnahme wird also zuerst vollständig hochgeladen, bevor die Transkription startet. Die Verarbeitung der gesamten Audiodatei liefert dem Modell den nötigen Kontext, was die Genauigkeit erheblich verbessert.
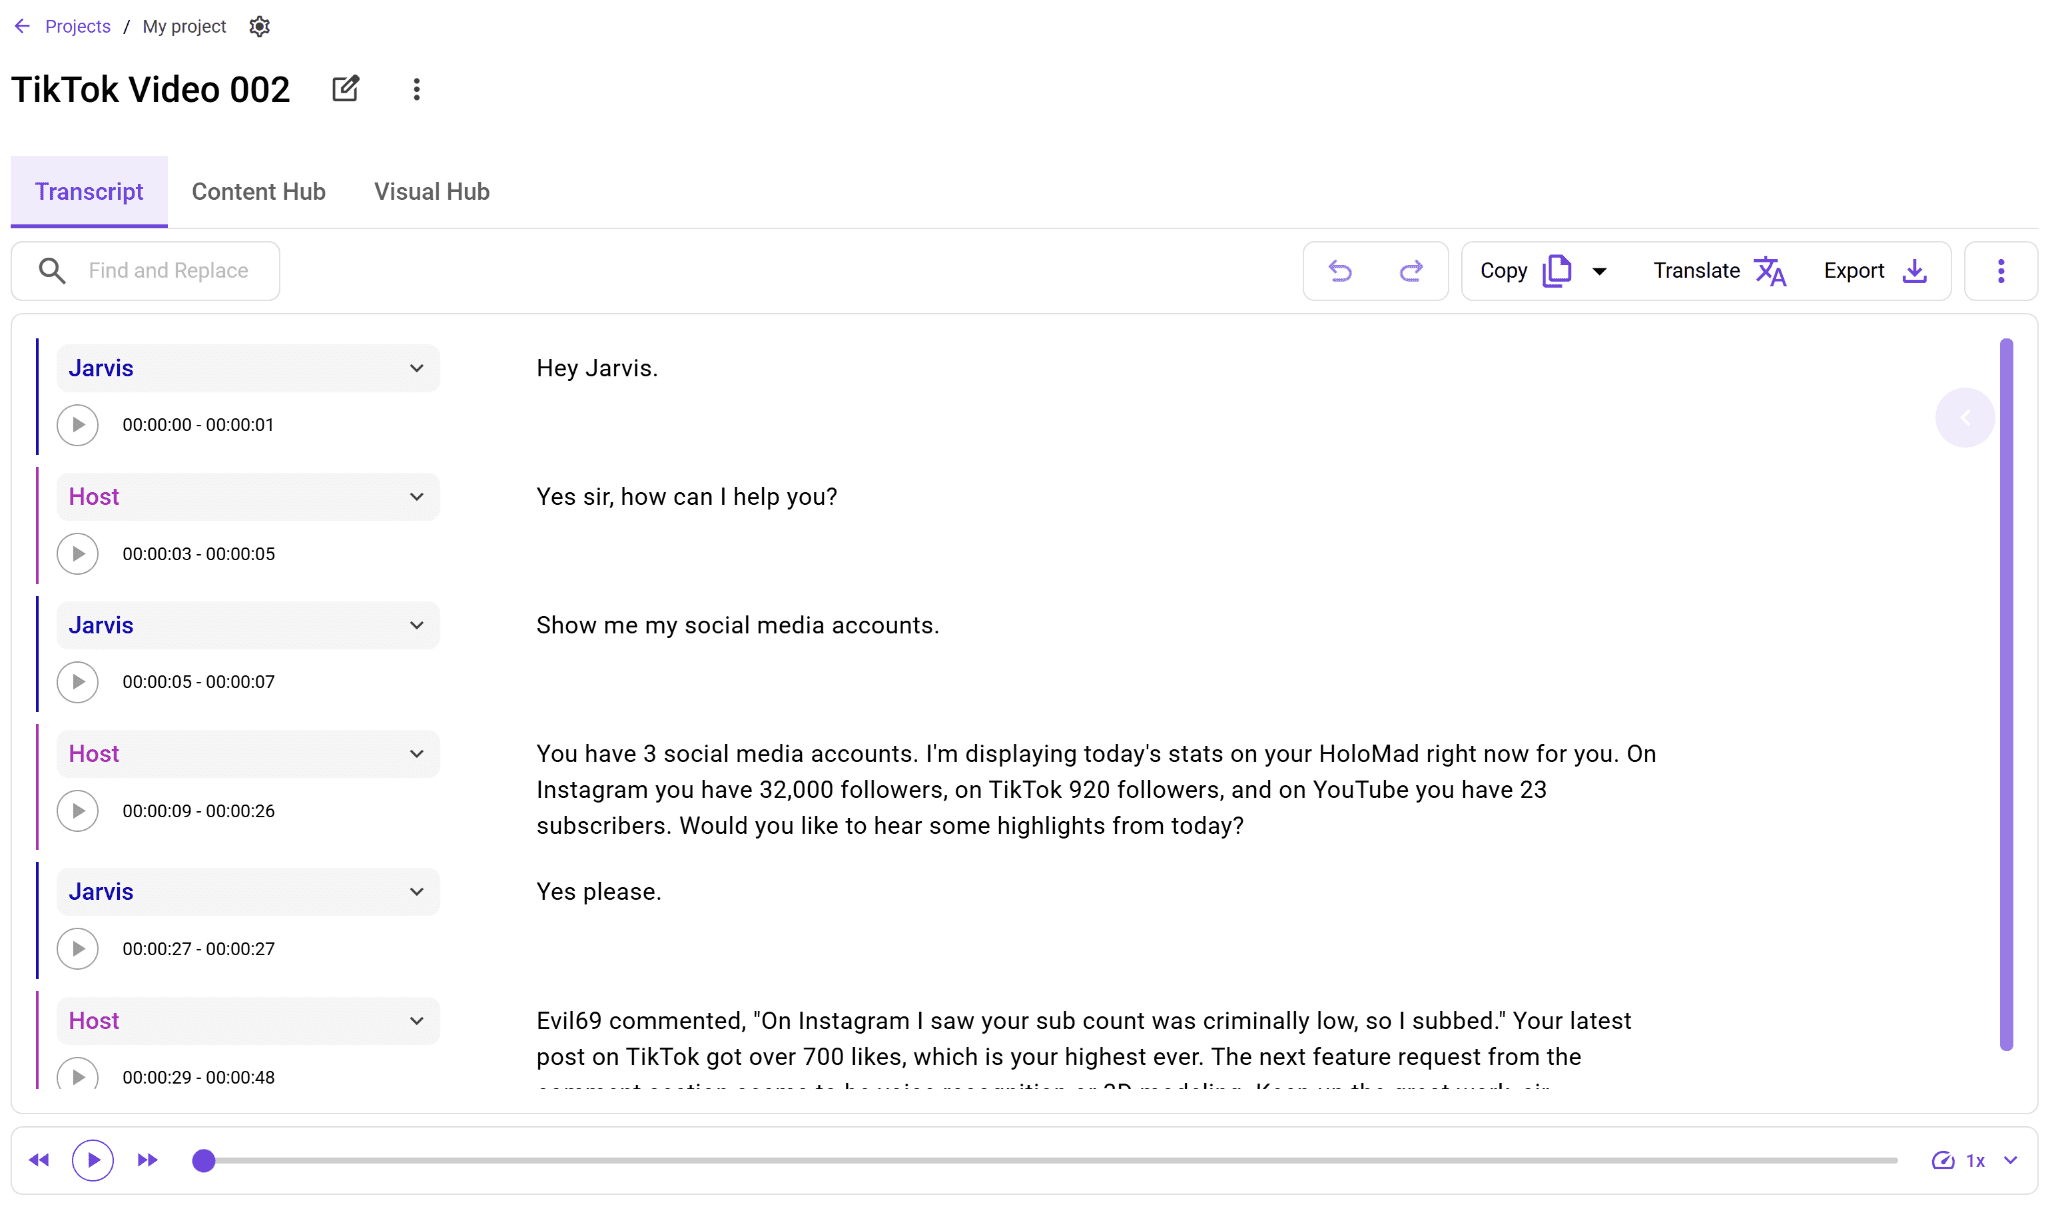
Schritt 5: Überprüfen, Bearbeiten und Übersetzen
Sobald die Transkription abgeschlossen ist, öffnet sich das Transkript im integrierten Editor. Dort können Sie falsch verstandene Wörter korrigieren, Sprecherlabels anpassen und Abschnitte markieren, die Sie später verwenden möchten. Aber das ist noch nicht alles.
Sie können auf "Translate" klicken, um das Transkript in eine von über 99 Sprachen zu übersetzen, wobei die Zeitstempel für Untertitel erhalten bleiben.

Schritt 6: Exportieren und Wiederverwenden
Exportieren Sie Ihr Transkript als SRT, VTT, TXT oder Word, je nachdem, wofür Sie den Text benötigen. SRT eignet sich ideal für Untertitel. Word und TXT sind perfekt für Blogs und Dokumentationen.
Sobald Sie das Transkript haben, öffnen Sie den Reiter Content Hub und wählen Sie aus, was Sie daraus generieren möchten: Zusammenfassungen, Blogbeiträge, LinkedIn-Posts, Newsletter, Twitter/X-Threads, Shownotes oder kurze Videoclips.
Jedes Inhaltsformat wird direkt aus Ihrem Transkript extrahiert, sodass das Ergebnis genau das widerspiegelt, was tatsächlich gesagt wurde.

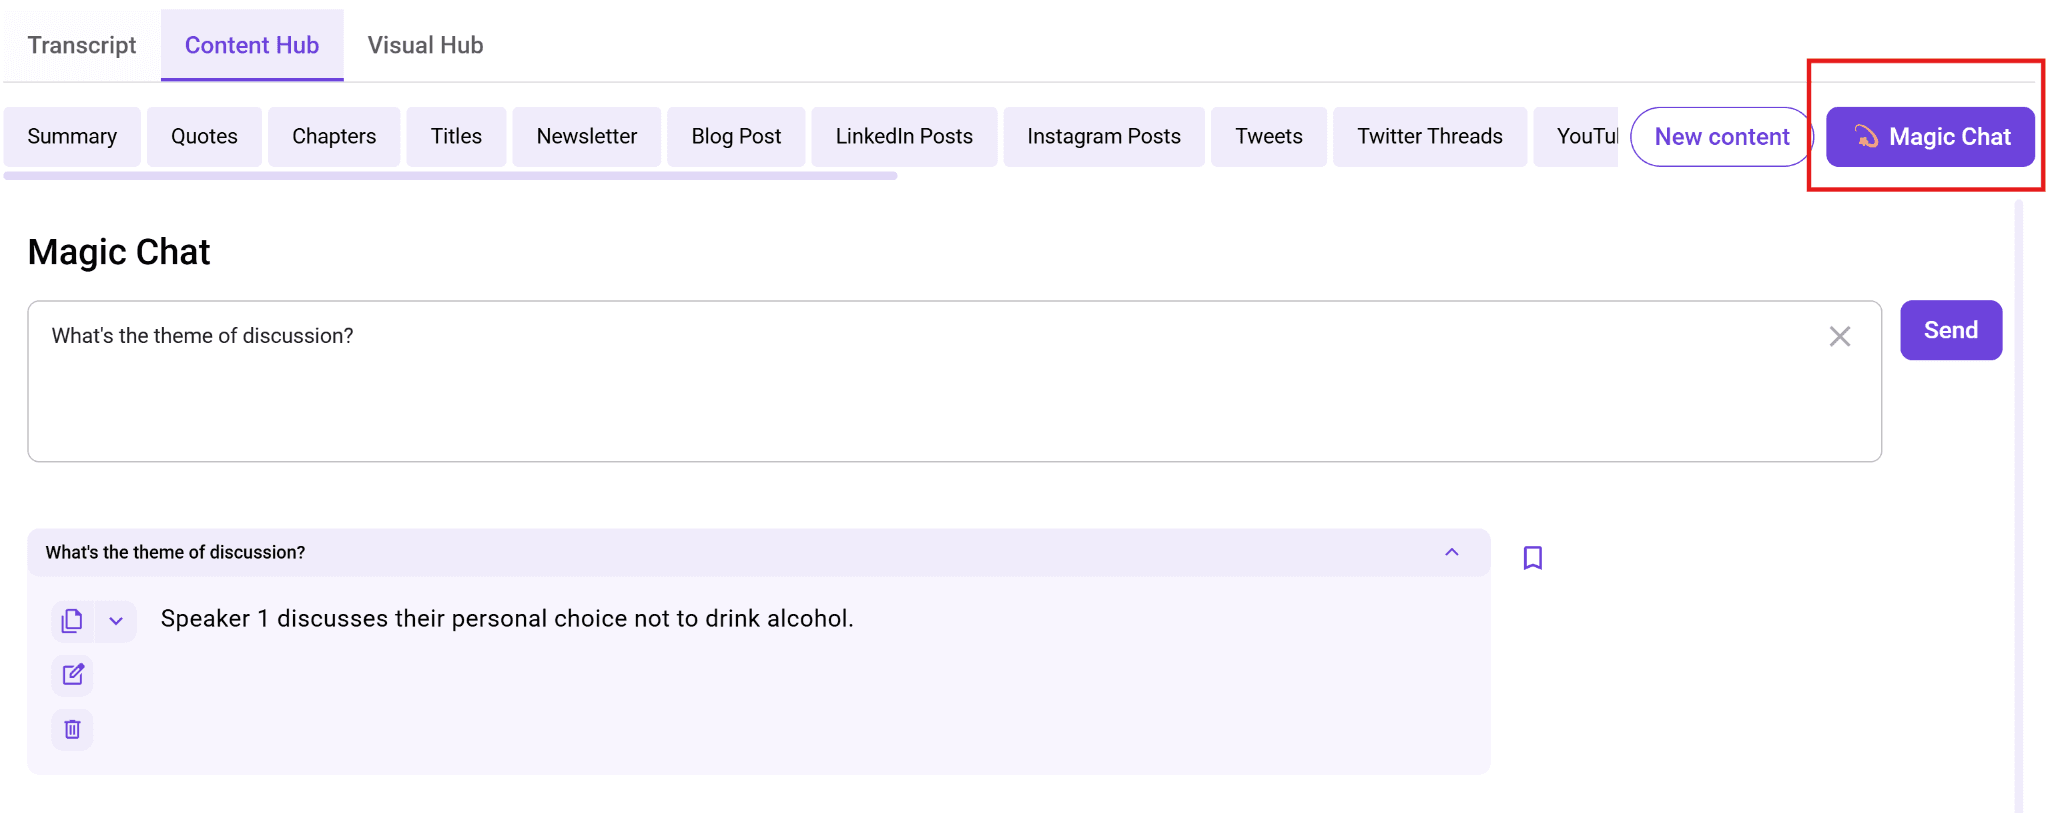
Mit Magic Chat können Sie dem Transkript direkt Fragen zum Audioinhalt stellen und erhalten sofortige Antworten.
Sie können beispielsweise fragen: "Was waren die wichtigsten Einwände?" oder "Was hat der Sprecher zum Thema Preisgestaltung gesagt?" und erhalten innerhalb von Sekunden Antworten, anstatt den gesamten Text mühsam durchsuchen zu müssen.
Methode 2: Die Transkribieren-Funktion in Microsoft Word
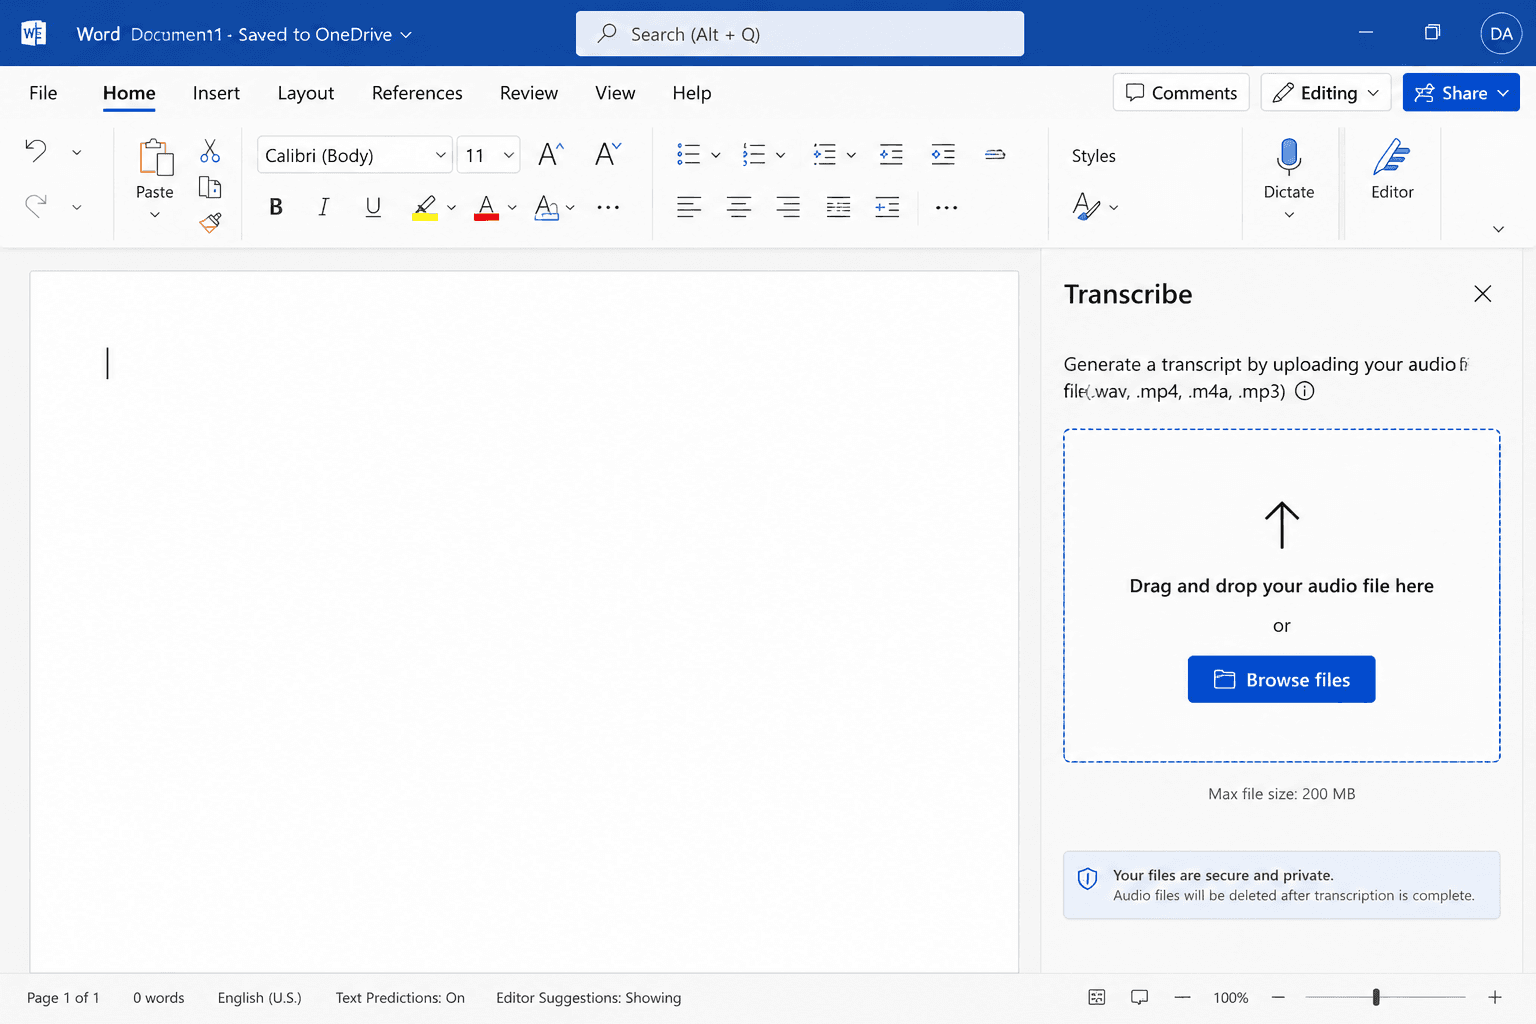
Wenn Sie Microsoft 365 nutzen, können Sie die Funktion Transkribieren in Word verwenden, um Audiodateien hochzuladen und in Text umzuwandeln. Microsoft erlaubt derzeit die Transkription von bis zu 300 Minuten hochgeladener Audiodateien pro Monat und unterstützt die Formate WAV, MP4, M4A und MP3.
Sie benötigen ein aktives Microsoft 365-Abonnement, Internetzugang sowie Microsoft Edge oder Chrome. Die Verfügbarkeit hängt zudem von Ihrer Word-Version und Ihrem Kontotyp ab. Überprüfen Sie daher vor dem Start unter Start > Diktieren, ob die Option "Transkribieren" verfügbar ist.
Dies ist nützlich, wenn Sie bereits für Microsoft 365 bezahlen, stellt jedoch kein vollständig kostenloses Transkriptionstool dar. Kostenlose Word-Online-Konten beinhalten in der Regel nur das Diktieren von Live-Sprache, nicht jedoch die Transkription hochgeladener Audiodateien.
Schritt 1: Bei Word im Web anmelden
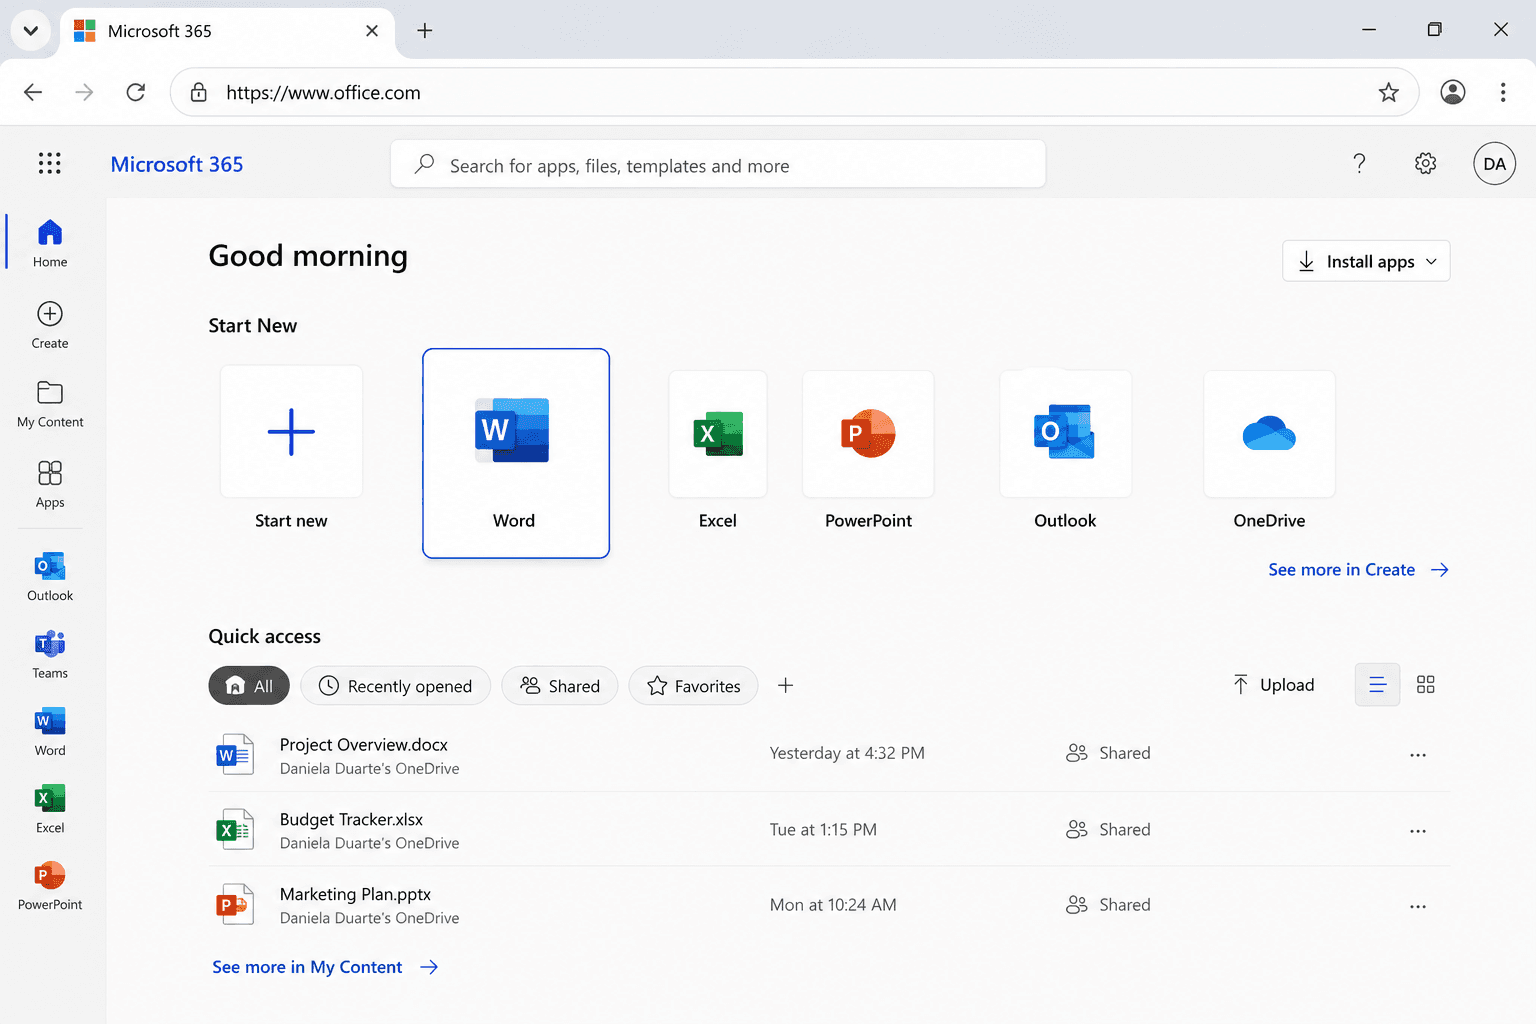
Gehen Sie auf office.com und melden Sie sich mit Ihrem Microsoft-Konto an. Öffnen Sie Word über das App-Startfeld.
Schritt 2: Ein neues Dokument öffnen und das Transkriptions-Tool finden
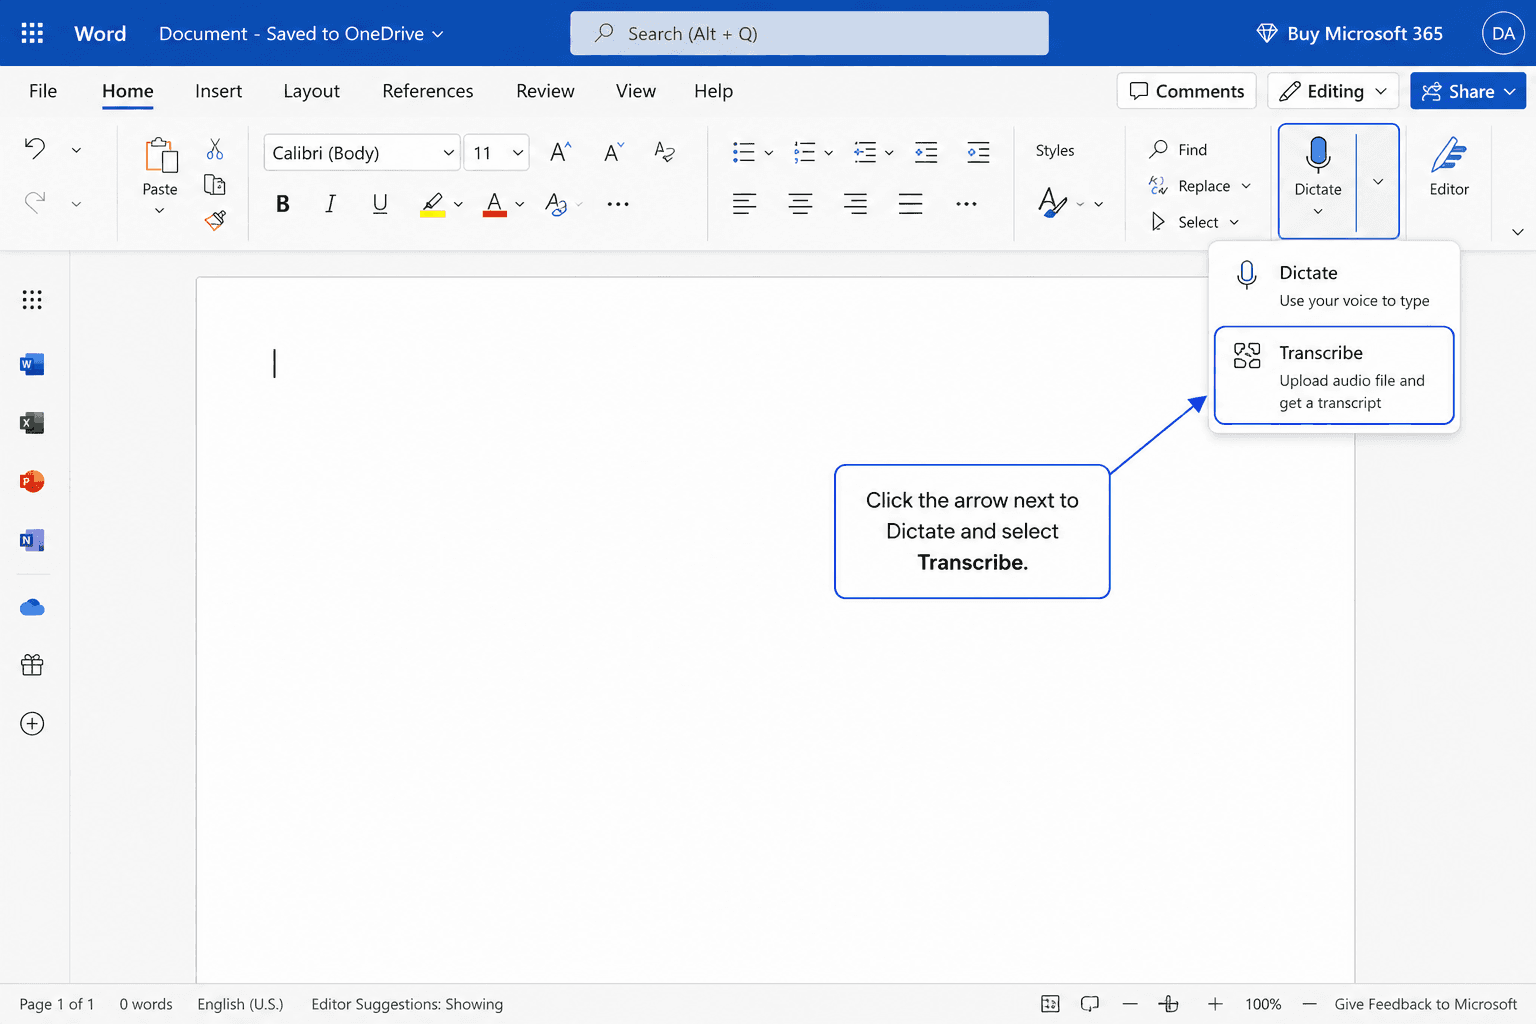
Öffnen Sie ein leeres Dokument und gehen Sie zu Start > Diktieren > Transkribieren.
Der Bereich Transkribieren öffnet sich mit zwei Optionen: Audio hochladen oder Aufzeichnung starten.
Schritt 3: Audio hochladen oder live aufnehmen
Wählen Sie "Audio hochladen", um die MP3-, MP4-, M4A- oder WAV-Datei hinzuzufügen, die Sie transkribieren möchten. Um eine neue Audioaufnahme zu erstellen, wählen Sie Aufzeichnung starten, nehmen Sie den Ton auf und speichern Sie ihn anschließend für die Transkription.
Schritt 4: Warten, bis Word das Audio verarbeitet hat
Die Verarbeitung erfolgt in der Cloud. Die Verarbeitungszeit variiert je nach Dateilänge und Auslastung der Microsoft-Server. Sie können den Tab schließen und später wiederkommen. Das Transkript wird automatisch in Ihrem OneDrive gespeichert.
Schritt 5: Transkript überprüfen und zum Dokument hinzufügen
Sobald die Verarbeitung abgeschlossen ist, erscheint das Transkript im Seitenfenster mit Sprecherlabels und Zeitstempeln. Klicken Sie auf eine beliebige Zeile, um diesen Abschnitt des Audios abzuspielen.
Um den Text zu verwenden, klicken Sie auf "Zum Dokument hinzufügen" und wählen Sie aus, was eingefügt werden soll: nur der Text, der Text mit Sprechern, der Text mit Zeitstempeln oder die vollständige Version. Das Ergebnis wird direkt in Ihr Dokument eingefügt und kann bearbeitet werden.
Insgesamt funktioniert die Transkribieren-Funktion von Microsoft Word wie erwartet für gelegentliche Meetings, Interviews und Notizen, hat jedoch klare Grenzen.
Beispielsweise erhalten Sie als Microsoft 365-Abonnent nur 300 Minuten für hochgeladene Transkriptionen pro Monat. Zudem können Sie keine YouTube- oder Podcast-Links hochladen. Außerdem erhalten Sie lediglich ein Transkript und keine Zusammenfassungen, Tools zur Wiederverwendung von Inhalten oder Publishing-Workflows.
Methode 3: Der kostenlose Tarif von Otter AI
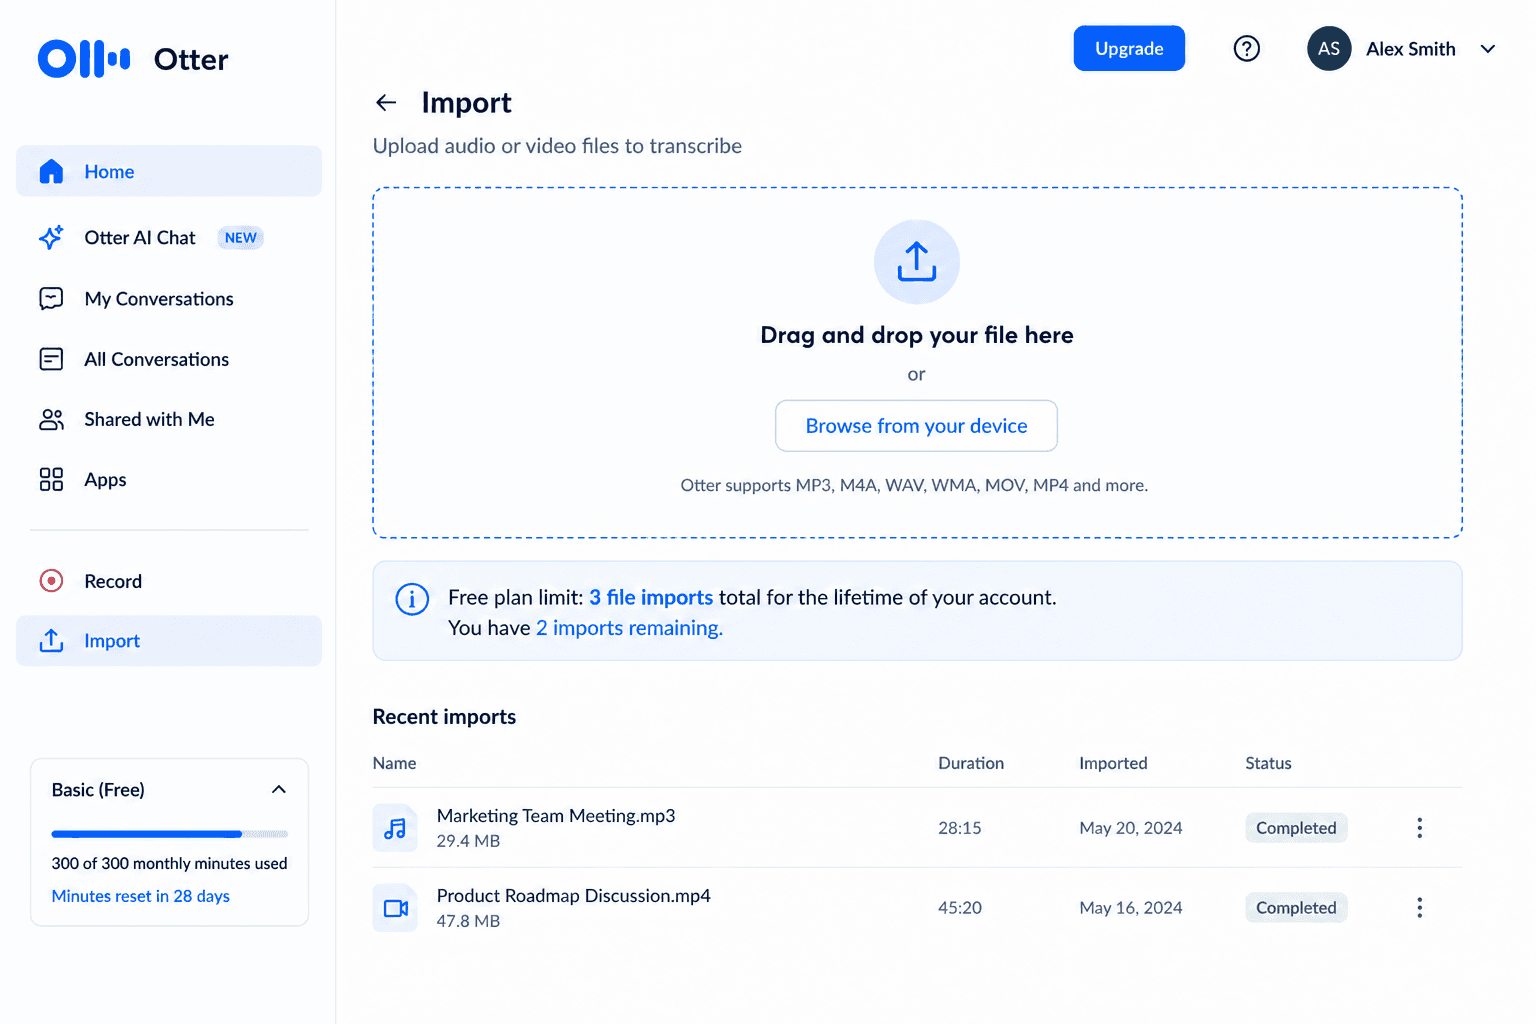
Otter AI ist ein beliebtes kostenloses Transkriptionstool für Meetings und kurze Aufnahmen. Der kostenlose Tarif beinhaltet 300 Transkriptionsminuten pro Monat, ein Limit von 30 Minuten pro Gespräch und insgesamt 3 Datei-Imports für die gesamte Lebensdauer des Kontos.
Schritt 1: Kostenloses Otter-Konto erstellen
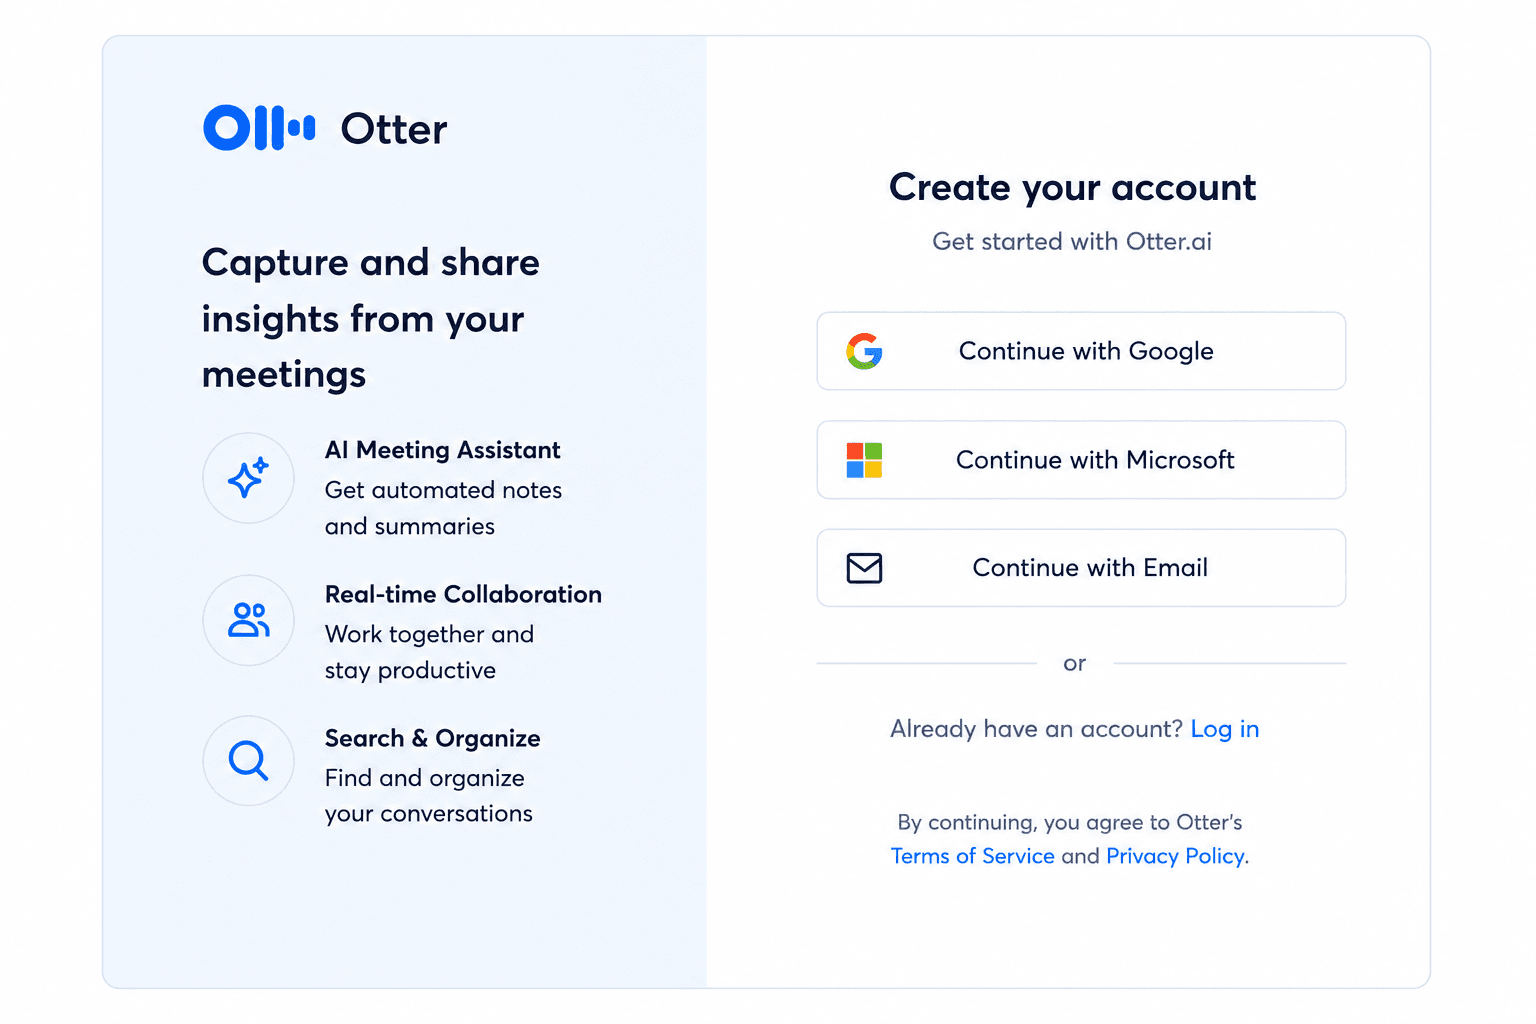
Gehen Sie auf otter.ai und registrieren Sie sich mit Ihrer E-Mail-Adresse, Ihrem Google- oder Microsoft-Konto. Sie können direkt ohne Kreditkarte starten.
Schritt 2: Auf dem Dashboard auf „Import“ klicken
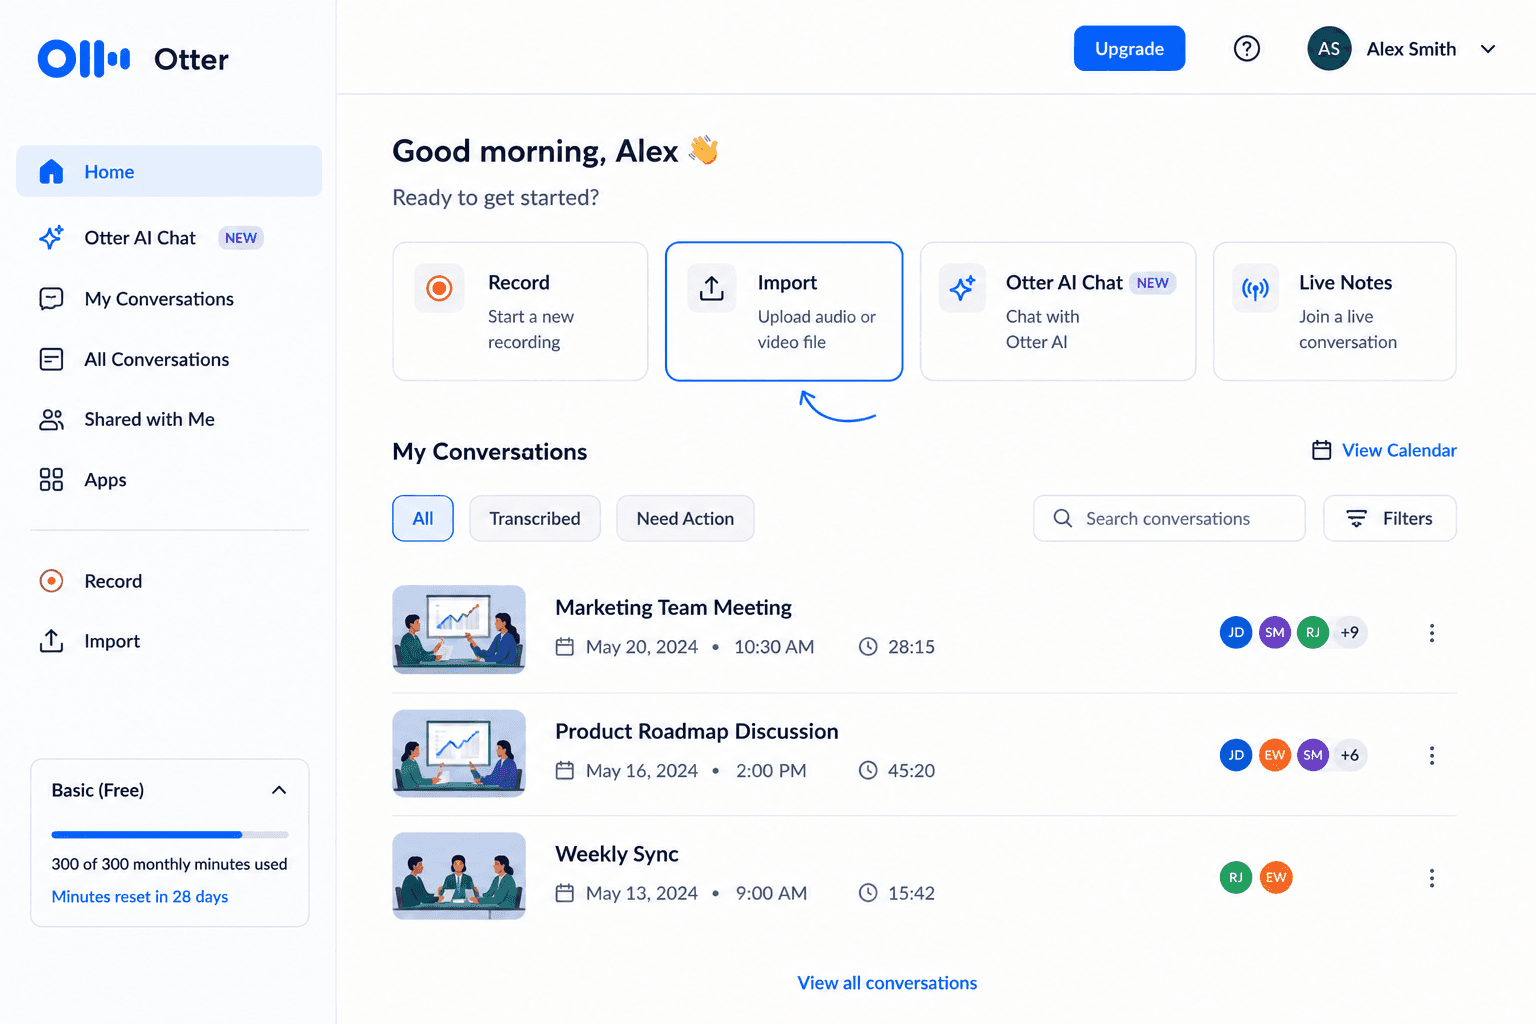
Klicken Sie auf dem Dashboard auf "Import", um eine vorhandene Aufnahme hochzuladen. Otter unterstützt gängige Audio- und Videoformate wie MP3, M4A, WAV, WMA, MOV, MP4 und weitere.
Schritt 3: Audiodatei hochladen
Ziehen Sie Ihre Datei in den Upload-Bereich oder wählen Sie sie auf Ihrem Gerät aus. Nutzen Sie diese Option im kostenlosen Tarif mit Bedacht, da die Datei-Imports auf insgesamt 3 für die gesamte Lebensdauer des Kontos begrenzt sind.
Schritt 4: Transkript überprüfen und Fehler korrigieren
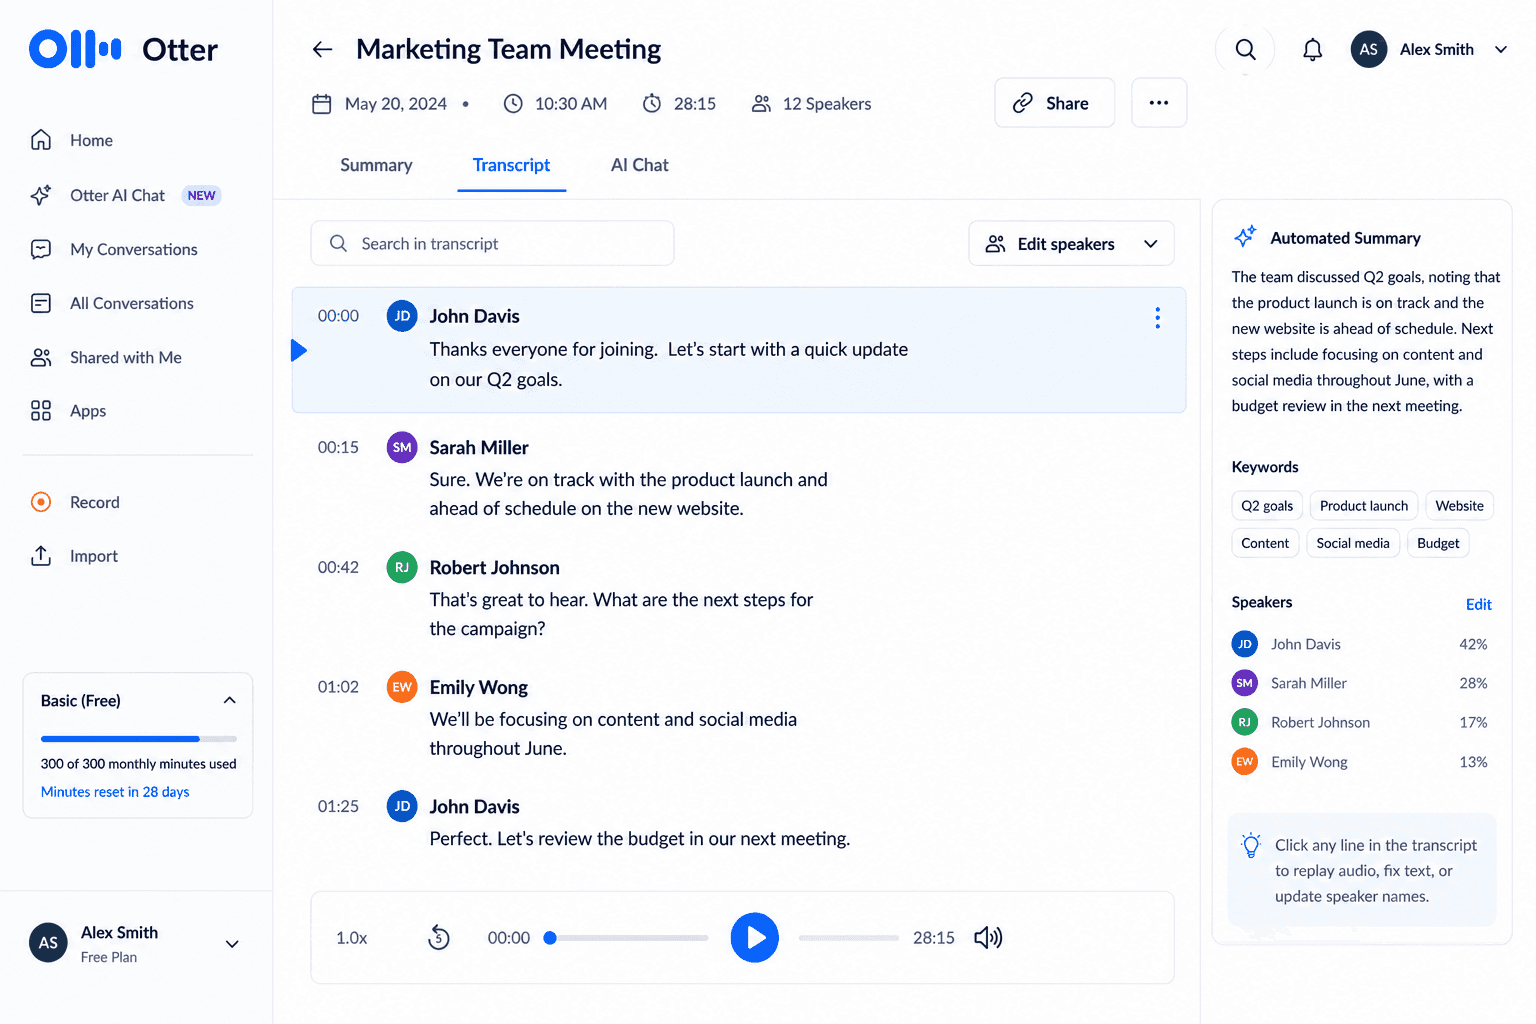
Öffnen Sie das Gespräch, sobald die Verarbeitung abgeschlossen ist. Otter zeigt das Transkript mit Sprecherlabels, Zeitstempeln und einer automatischen Zusammenfassung an.
Klicken Sie auf eine beliebige Zeile, um diesen Teil des Audios abzuspielen, Fehler zu korrigieren oder Sprechernamen zu aktualisieren.
Schritt 5: Text kopieren oder innerhalb der Tarifgrenzen exportieren
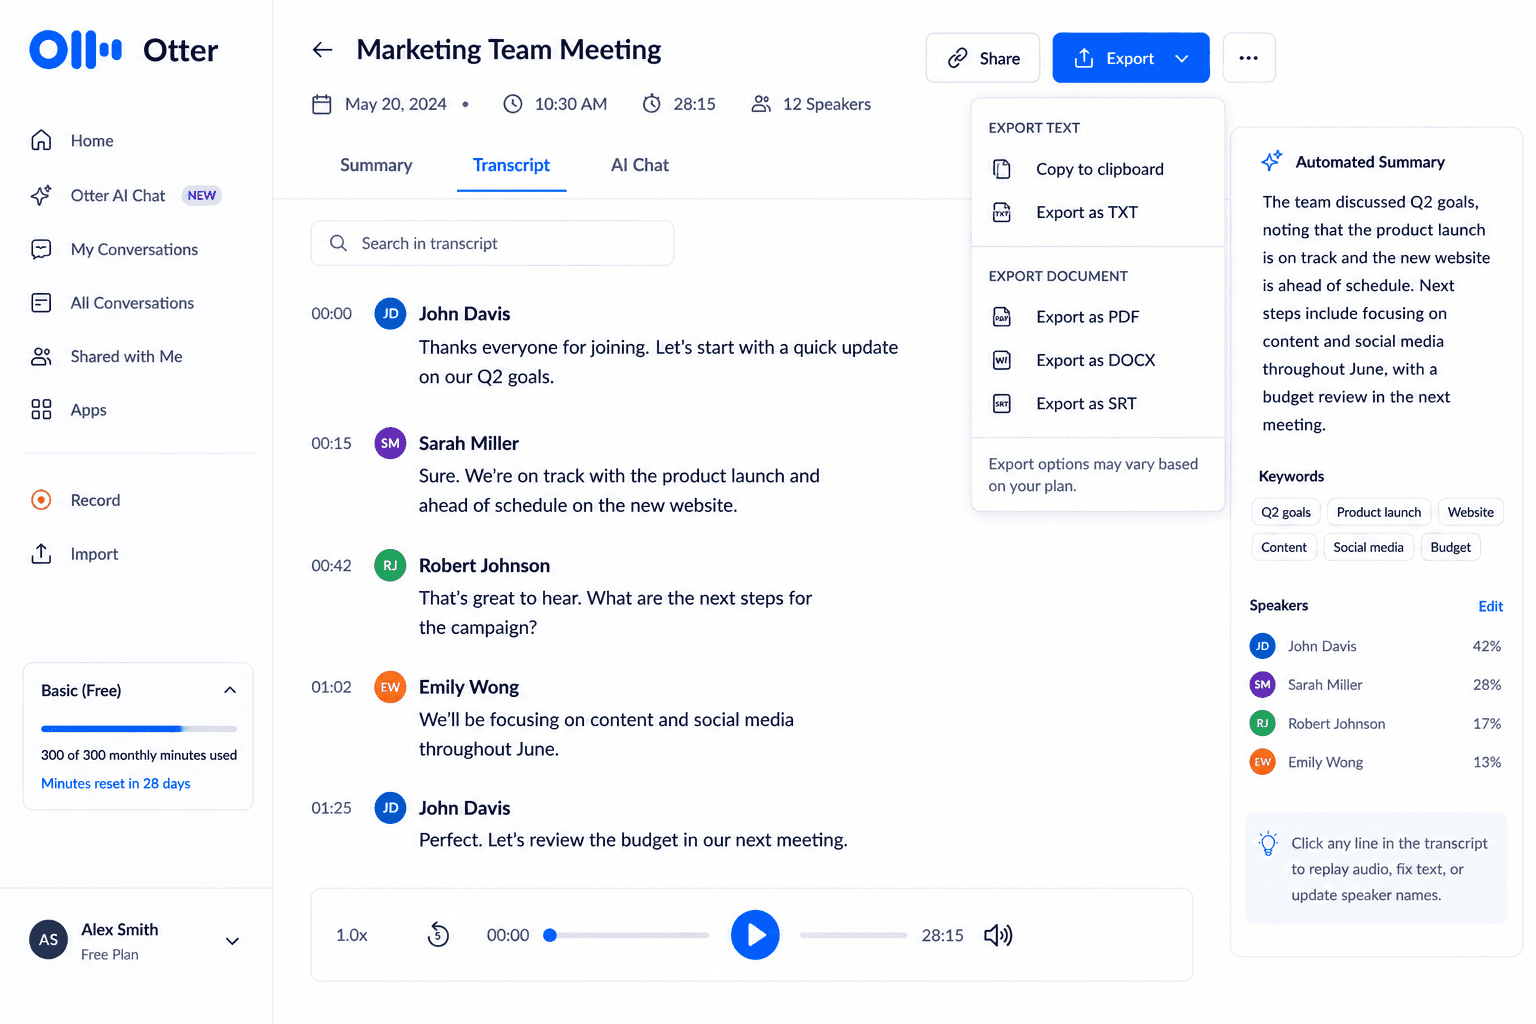
Sie können das Transkript kopieren oder im Rahmen der Grenzen Ihres Tarifs exportieren. Fortgeschrittene Exportoptionen und größere Transkriptionsvolumen erfordern ein kostenpflichtiges Abonnement.
Obwohl der kostenlose Tarif von Otter ideal für kurze Meetings und kleinere Tests geeignet ist, können die Einschränkungen sehr einschränkend sein. Beispielsweise schließt das 30-Minuten-Limit viele Podcasts und lange Interviews aus, während die Begrenzung auf insgesamt 3 Datei-Imports das Tool für regelmäßige Audio-Uploads weniger nützlich macht.
Es eignet sich zudem nicht als umfassendes Tool zur Wiederverwendung von Inhalten, sodass Sie im Wesentlichen nur das Transkript, die Zusammenfassung und grundlegende Bearbeitungsoptionen erhalten.
Vergleich: Kostenlose Audio-Transkriptionstools im Überblick
Funktion | WhisperTranscribe | Microsoft Word | Otter AI |
Datei-Upload | Ja, bis zu 5 GB in den kostenpflichtigen Tarifen | Ja, max. 200 MB | Ja, begrenzte Imports insgesamt |
YouTube-/Podcast-Link-Eingabe | Ja | Nein | Nein |
Limit der kostenlosen Version | 60 Minuten (einmalige Testversion) | 300 Min./Monat (Microsoft 365) | 300 Min./Monat, max. 30 Min./Aufnahme |
Sprechererkennung | Ja | Ja | Ja |
Exportformate | SRT, VTT, TXT, Word | Word, TXT | Nur TXT (kostenlose Version) |
Integrierte Content-Wiederverwendung | Ja (über 57 Formattypen) | Nein | Eingeschränkt |
Unterstützte Sprachen | 55+ | Hauptsächlich Englisch | Für Englisch optimiert; andere Sprachen unterstützt, aber mit geringerer Genauigkeit |
Wählen Sie WhisperTranscribe, wenn Sie höchste Genauigkeit, YouTube-Unterstützung oder Tools zur Wiederverwendung von Inhalten benötigen.
Best Practices für die kostenlose Audio-Transkription
Ein paar einfache Gewohnheiten können Ihr Transkript von einem Rohentwurf in ein gebrauchsfertiges Dokument verwandeln – unabhängig davon, welches Tool Sie wählen.
Wählen Sie das passende Tool für die Quelle: Wenn Ihr Audio auf YouTube liegt, nutzen Sie ein Tool, das Links unterstützt. Wenn es in OneDrive gespeichert ist, ist Word unter Umständen schneller. Eine ausführliche Anleitung für linkbasierte Workflows finden Sie in unserem Leitfaden zur Transkription von YouTube-Videos.
Starten Sie mit der bestmöglichen Audioqualität: Hintergrundmusik, Raumhall und durcheinander sprechende Stimmen verringern die Genauigkeit bei jedem Transkriptionsprozess und jeder Software.
Überprüfen Sie das Ergebnis vor der Veröffentlichung: Kein kostenloses Tool liefert ein fehlerfreies Transkript. Eine fünfminütige Durchsicht reicht meist aus, um falsch verstandene Namen, fehlende Satzzeichen und Fachbegriffe zu korrigieren.
Aktivieren Sie die Sprechererkennung bei mehreren Stimmen: Interviews und Diskussionsrunden lassen sich viel einfacher lesen, wenn jeder Sprecher klar gekennzeichnet ist.
Nutzen Sie den Inhalt, solange der Kontext noch präsent ist: Wenn ein Transkript zwei Wochen lang liegt, vergisst man oft, welche Zitate besonders wichtig waren. Verwandeln Sie es innerhalb von ein bis zwei Tagen in die gewünschten Formate.
Wählen Sie die kostenlose Methode, die am besten zu Ihrem Workflow passt
Kostenlose Transkription bringt immer Kompromisse mit sich. Die kostenlose Version von Word reicht für kurze, in OneDrive gespeicherte englischsprachige Meetings völlig aus. Otter eignet sich für eine Handvoll kurzer Gespräche im Monat. Beide Tools stoßen jedoch an ihre Grenzen, wenn Sie lange Audioformate verarbeiten, mit Links arbeiten oder die transkribierten Inhalte direkt weiterverwenden möchten.
Die kostenlose Testversion von WhisperTranscribe deckt alle drei Anforderungen in einer einzigen App ab. Deshalb steht sie bei uns an erster Stelle. Sie erhalten 60 volle Minuten, um ein echtes Projekt umzusetzen, sich selbst von der Genauigkeit zu überzeugen, den Content Hub zu testen und zu entscheiden, ob der Workflow zu Ihnen passt.
Testen Sie WhisperTranscribe kostenlos und machen Sie mehr aus Ihren Audioaufnahmen.