How to Transcribe a Video: Three Methods That Fit Any Workflow

Quick Summary
This guide walks through three ways to transcribe a video: WhisperTranscribe for any source, YouTube Studio for videos on your own channel, and Adobe Premiere Pro for footage you're already editing. You'll see the exact steps for each method, the real limits, and how to pick the right one for your video. Visit our blog for more transcription guides.
Do You Have a Video and Need It in Writing?
When the line you need is buried in a video, finding it can mean scrubbing, pausing, and replaying until you catch the words. A transcript makes that easier.
And this comes up more often than you might think. 91% of businesses use video as a marketing tool, but much of that content still stays locked inside video files, where it is harder to search, quote, caption, or repurpose.
Transcription opens it up. But the right method depends on where your video lives. A file on your computer needs a different workflow than a video already uploaded to YouTube or footage you are editing in Premiere.
In this WhisperTranscribe guide, we’ll cover all three scenarios. You’ll see the steps, the limits, and how to choose the right method for your video.
Why Listen to Us?
We built WhisperTranscribe for creators, marketers, researchers, and teams who need video transcripts, captions, and reusable content. Our platform supports 55+ languages, with a 4.7-star user rating. We drew on that experience to create this guide to show what works across video files, YouTube uploads, and edited footage.
Why Transcribe a Video at All?
Make Video Content Easier To Find: Add the transcript to your page so viewers and search engines have more context around the topic, keywords, and key points.
Improve Accessibility: Captions and transcripts help people follow along without relying only on audio.
Repurpose Faster: Turn one interview, webinar, or tutorial into blog posts, newsletters, social posts, clips, and show notes.
Review Without Rewatching: Scan the transcript to find quotes, decisions, questions, or timestamps without scrubbing through the full video.
Build a Searchable Archive: Keep transcripts for older recordings so you can find useful lines, ideas, and references months later.
3 Smart Ways to Transcribe a Video
Three methods cover the main scenarios. We'll start with the one we recommend.
Method 1: WhisperTranscribe (Recommended)
WhisperTranscribe lets you upload a video file or paste a YouTube, Vimeo, or podcast link, then turns the audio into text with up to 95% accuracy. It works well for creators and teams who need a transcript they can review, edit, export, and repurpose.
The free trial includes 60 minutes of transcription with no credit card required.
Step 1: Download and Install WhisperTranscribe
Open the WhisperTranscribe website and click "Try for Free."
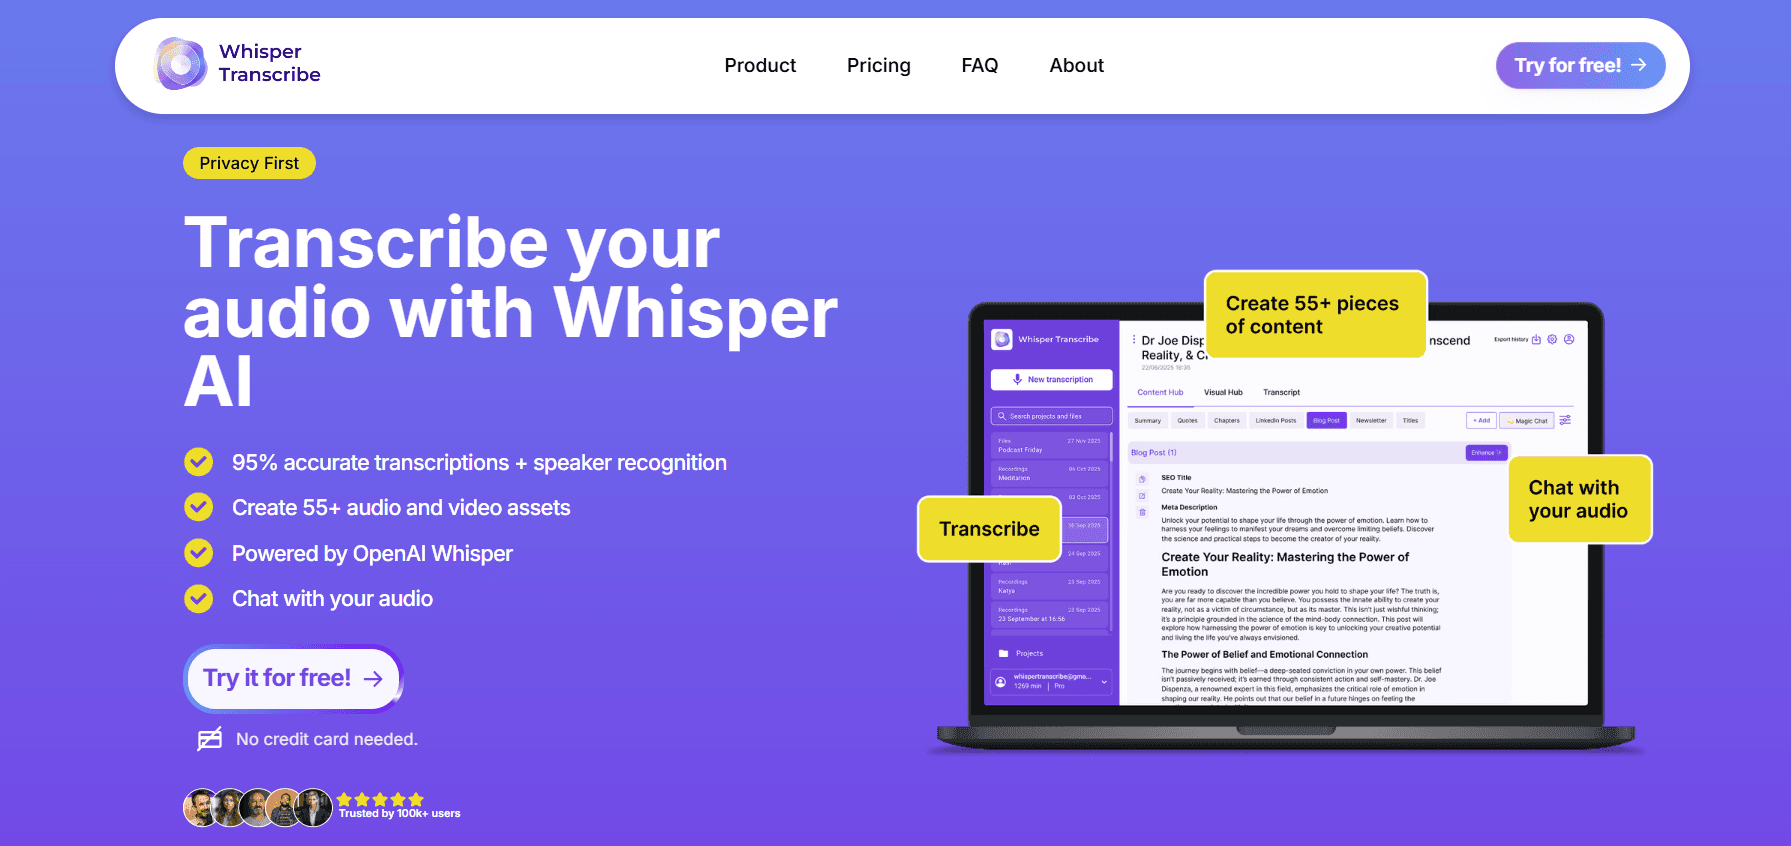
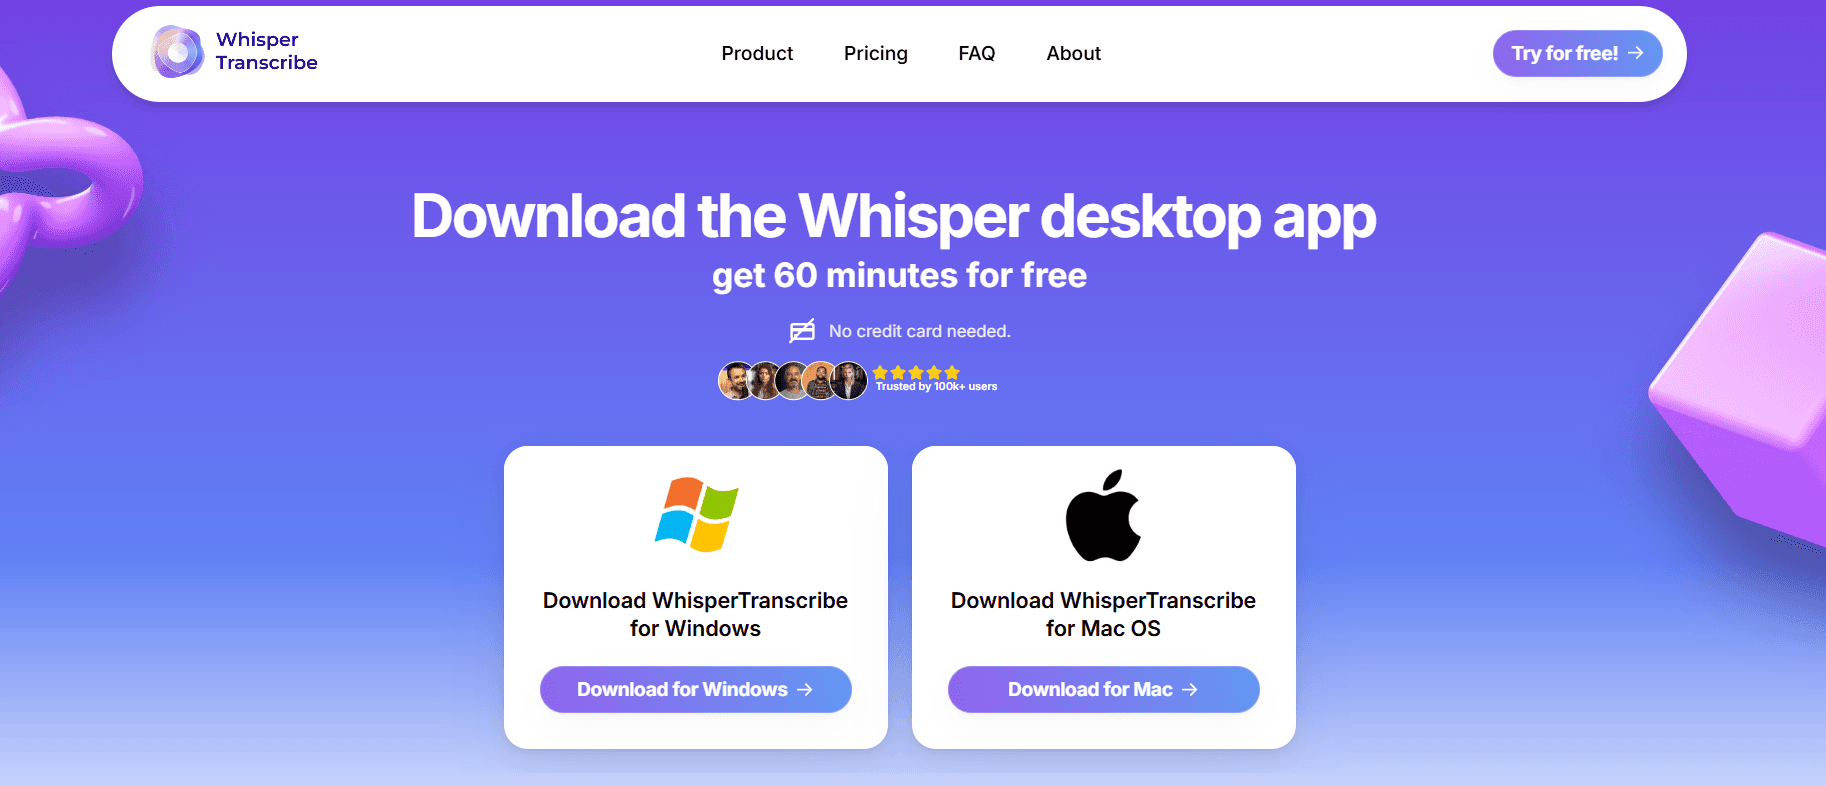
Pick the Mac or Windows build for your computer, install it, then create your account. Sign-in happens automatically after signup.
The desktop app lets you prepare your transcription locally before uploading the file for transcription.
Step 2: Upload Your Video or Paste a Link
Start a new transcription from the app's home screen. You have two paths in.
Upload a Video File: Click "Upload File" and select your video. WhisperTranscribe supports MP4, MOV, AVI, MKV, MPEG, and most other common formats, so you won't need to convert in most cases.
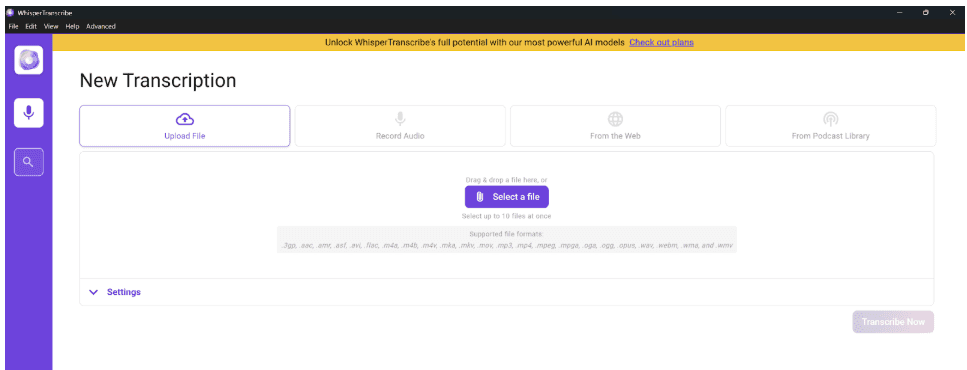
Paste a Link: Click "From the Web" and drop in a YouTube, Vimeo, or other direct video URL. The app pulls the audio track on its own.
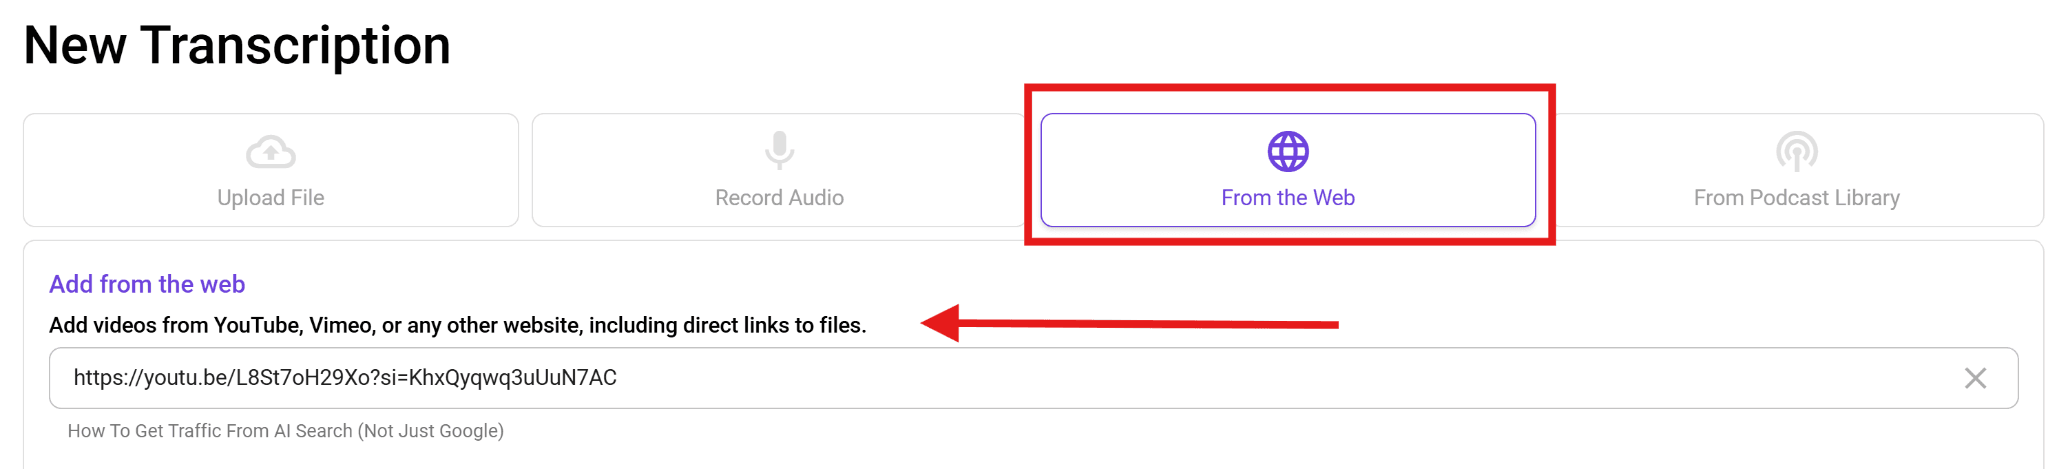
This option ensures you don't have to download a YouTube video to your machine first.
Step 3: Configure Your Transcription Settings
A few settings shape the quality of the output. Set them before you click run.
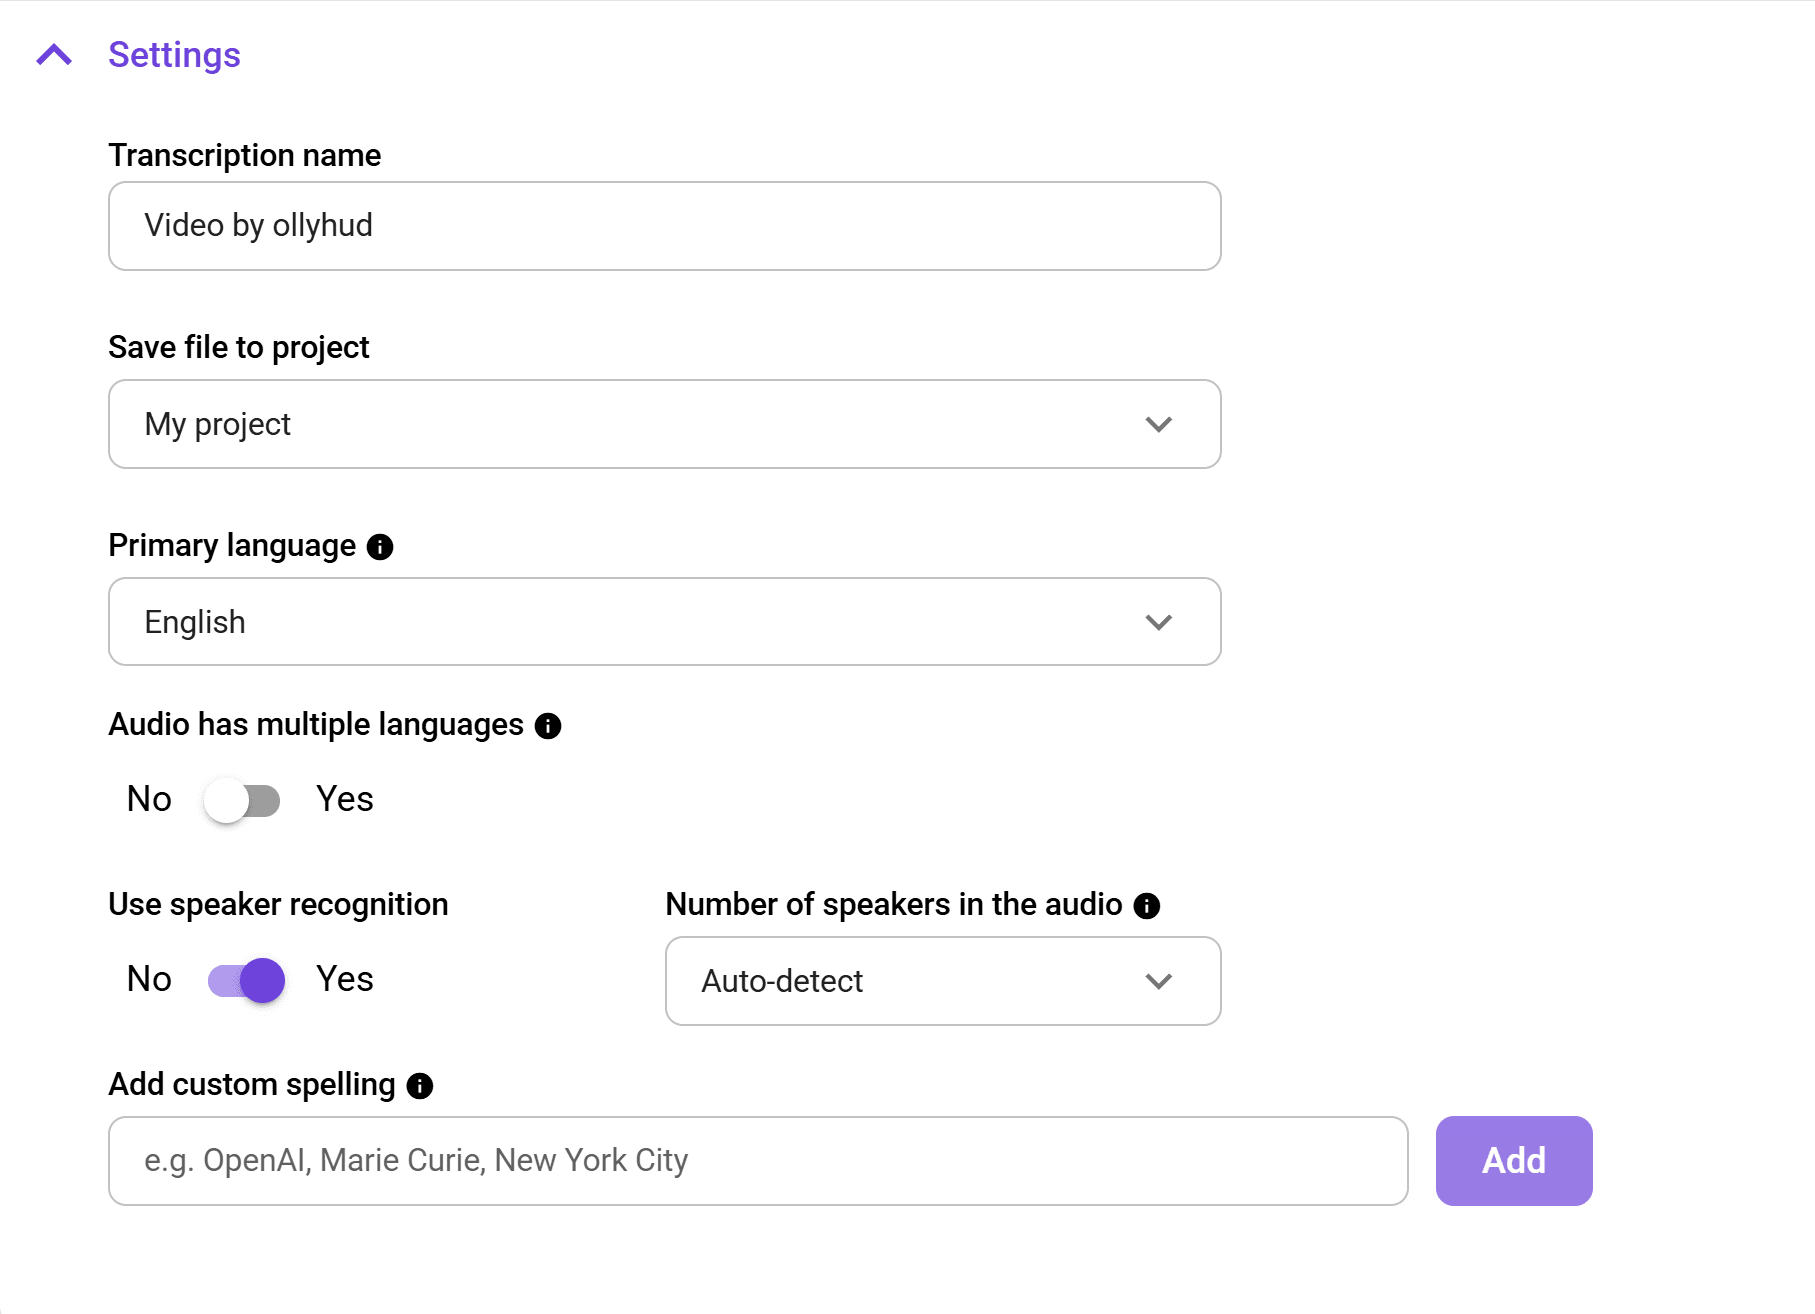
Project Name: Use something descriptive of the video content, it helps when you have a library of past transcripts to navigate later.
Primary Language: Choose what the on-camera speaker uses most. Pick from the dropdown of 55+ supported languages.
Multiple Languages: Enable this if your video includes more than one spoken language. The model handles up to five in a single file.
Speaker Recognition: Essential for interviews, panels, and any video with two or more voices.
Custom Spelling: Add product names, character names, or technical terms the model is unlikely to know on its own.
Step 4: Run the Transcription
Click “Transcribe Now” and let WhisperTranscribe process the file. Most videos finish well under their actual runtime. Processing is typically much faster than the recording length, although speed depends on file size and system conditions.
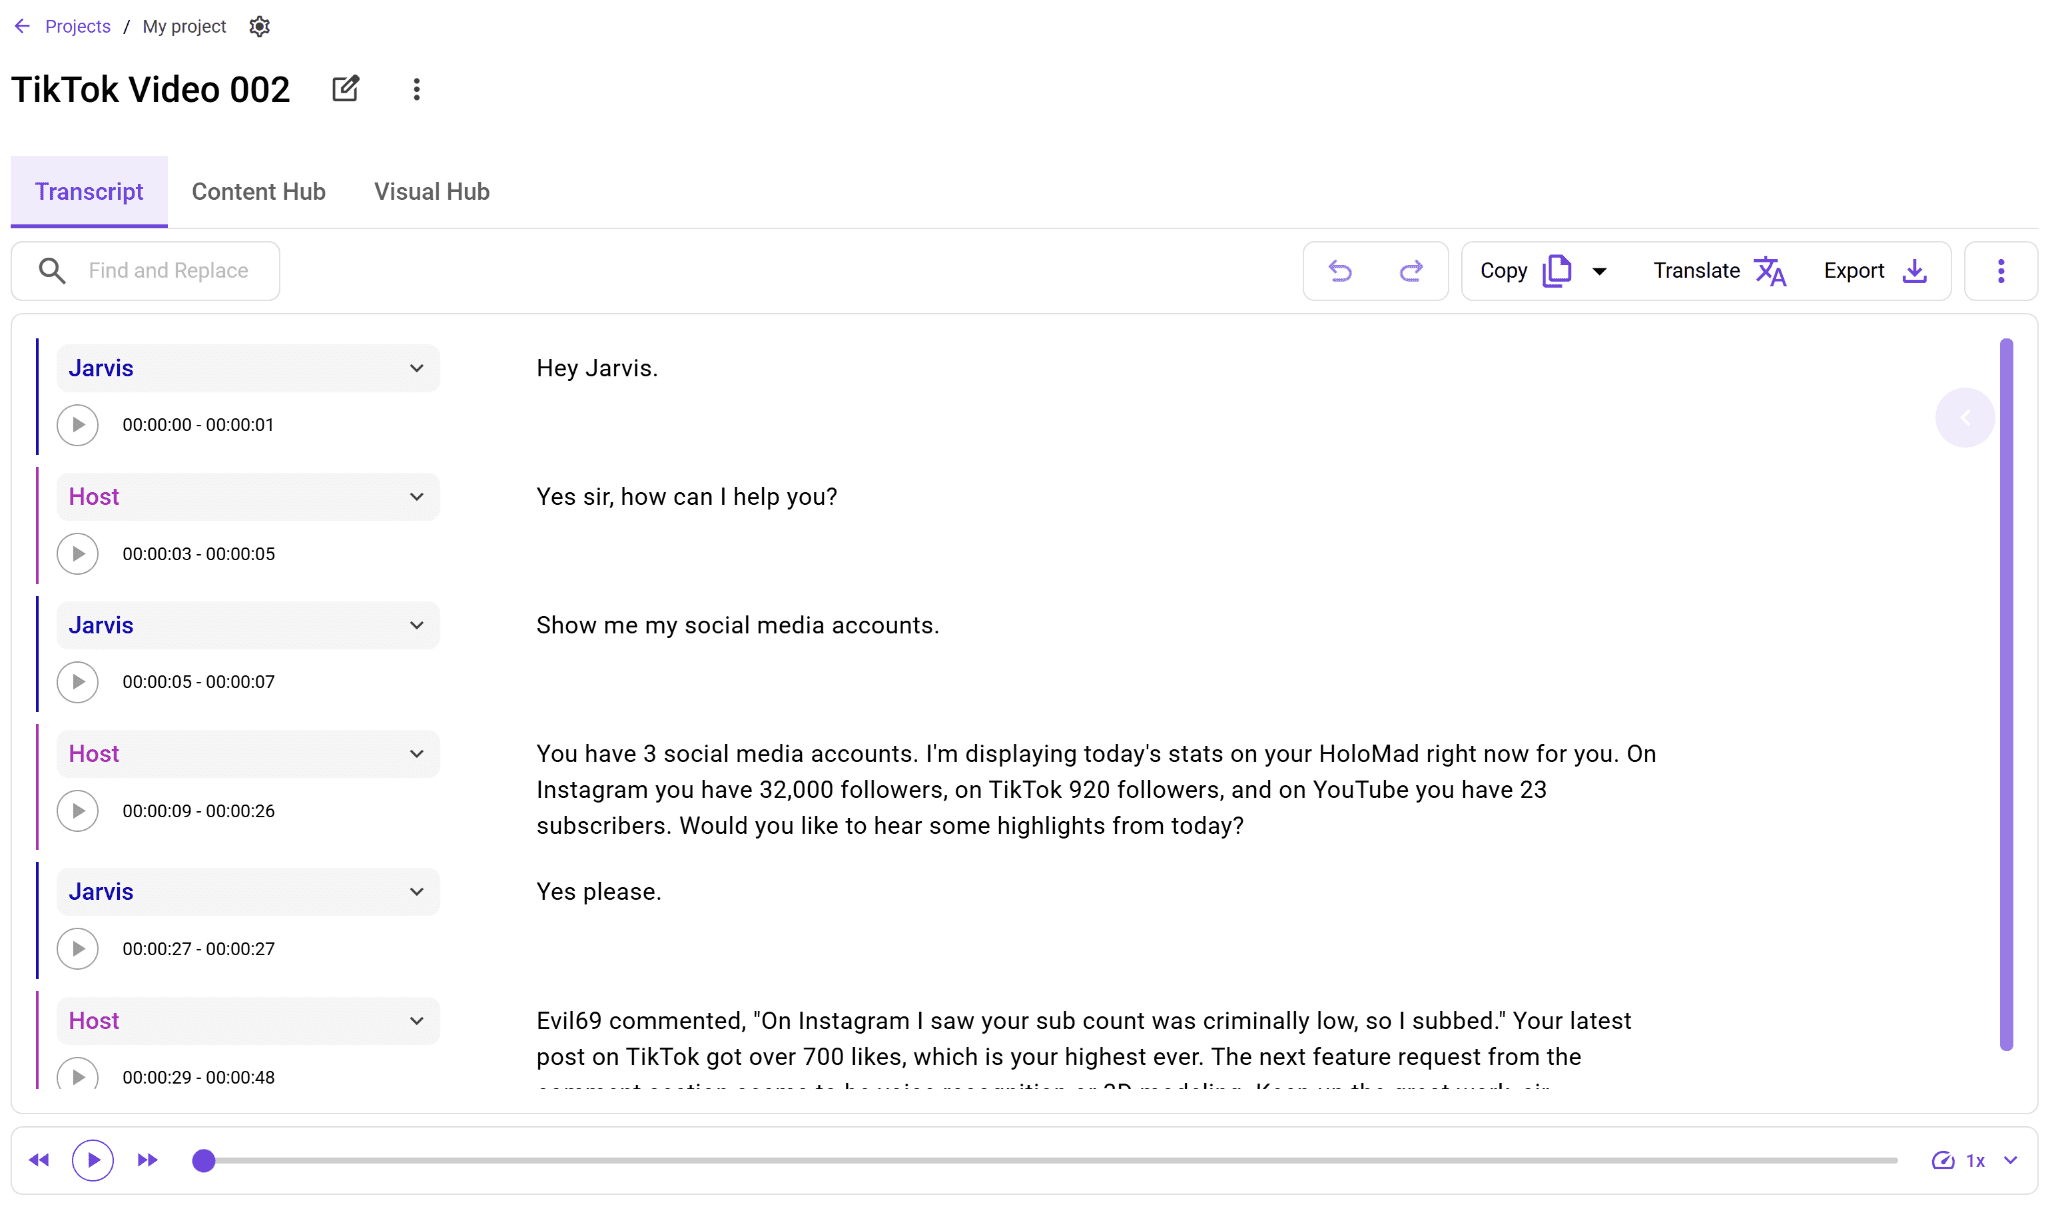
This is not real-time transcription. Processing happens after the recording, so you won’t see the text appear while someone is still speaking. Instead, WhisperTranscribe works from the completed audio and returns the finished transcript when processing is done.
Step 5: Review, Edit, and Translate
The transcript opens in the built-in editor when processing finishes. You can fix misheard words, adjust speaker labels, and mark sections you want to use later.
Click "Translate" to convert the transcript into any of 99+ languages while keeping the timing intact for subtitles.

The editor is where the workflow earns its time savings. Cleanup beats transcription from scratch every time.
Step 6: Export and Repurpose
Export the Transcript: Download it as SRT, VTT, TXT, or Word. Use SRT/VTT for captions and subtitles, and TXT/Word for drafts, notes, or documentation.
Create More From the Same Video: Open Content Hub to turn the transcript into a blog post, newsletter, LinkedIn post, tweet, show notes, or short clip.
Find Answers Faster: Use Magic Chat to ask questions like “What were the three main objections raised?” without scanning the full transcript.
For creators and teams, this is the real workflow: one video becomes a transcript, content assets, and social posts from the same source.
Method 2: YouTube Studio's Auto-Transcript
YouTube auto-generates captions for many uploaded videos. If the video is already on your channel, you can review the automatic captions in YouTube Studio and use them as a transcript.
This method only works for videos you've uploaded yourself. For other people's YouTube videos, see our guide on how to transcribe a YouTube video.
Step 1: Open YouTube Studio
Go to studio.youtube.com and sign in to your YouTube account. The dashboard shows your recent uploads and channel activity.
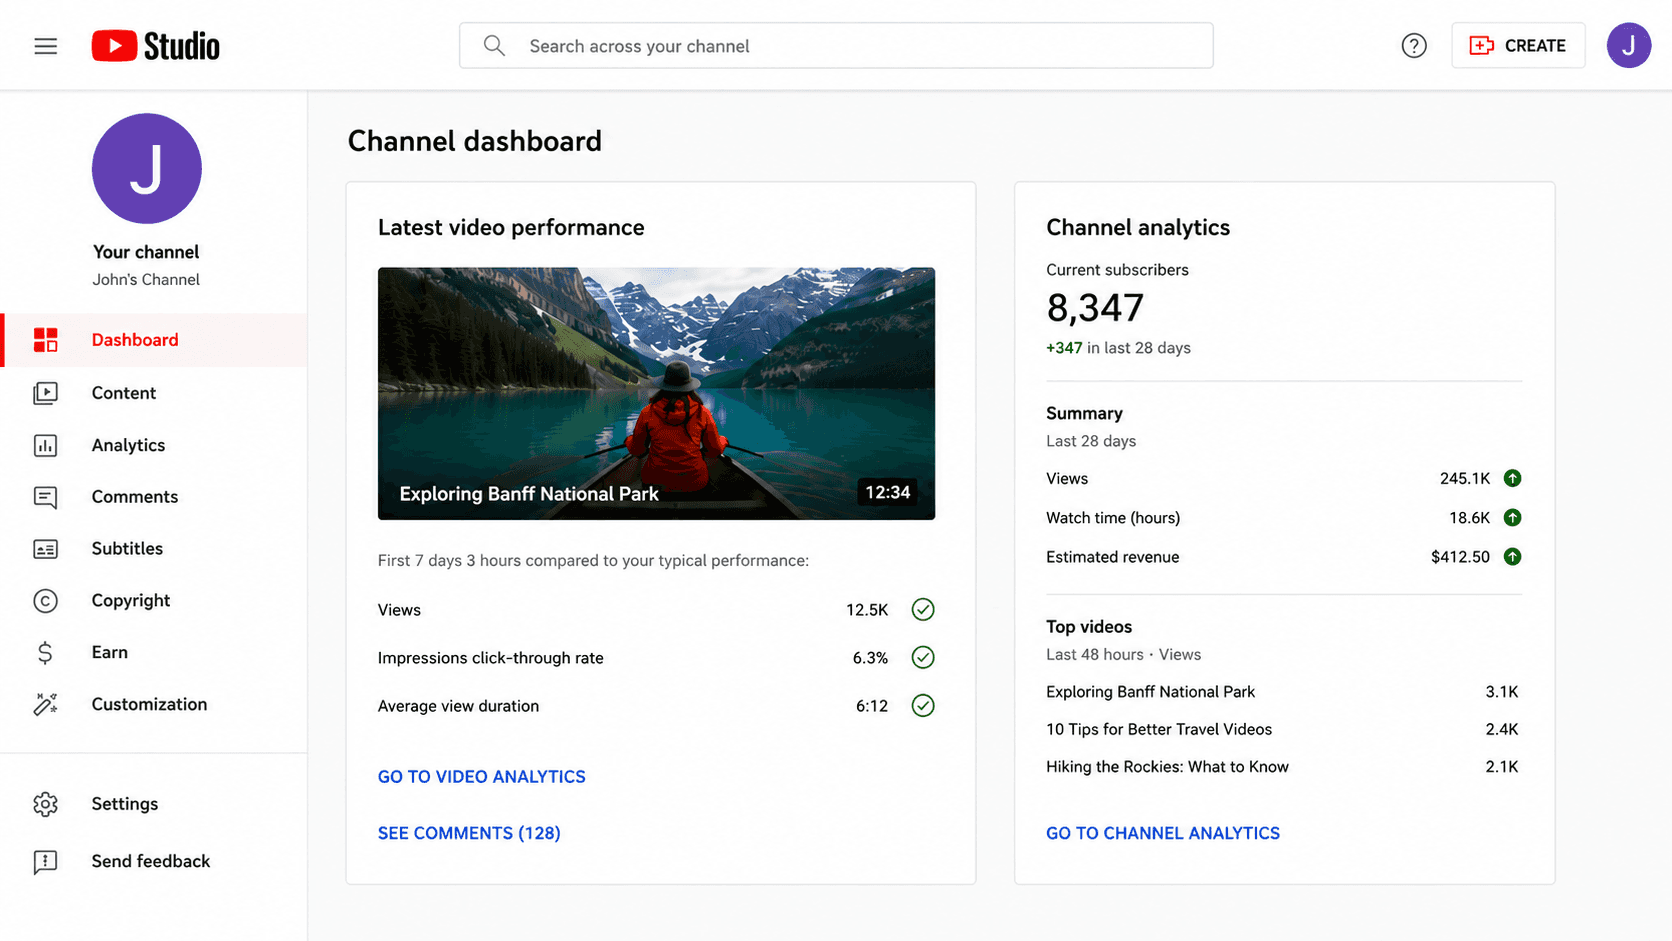
Step 2: Select the Video You Want to Transcribe
Click ‘Subtitles’ in the left-hand menu, then select the video you want to transcribe.
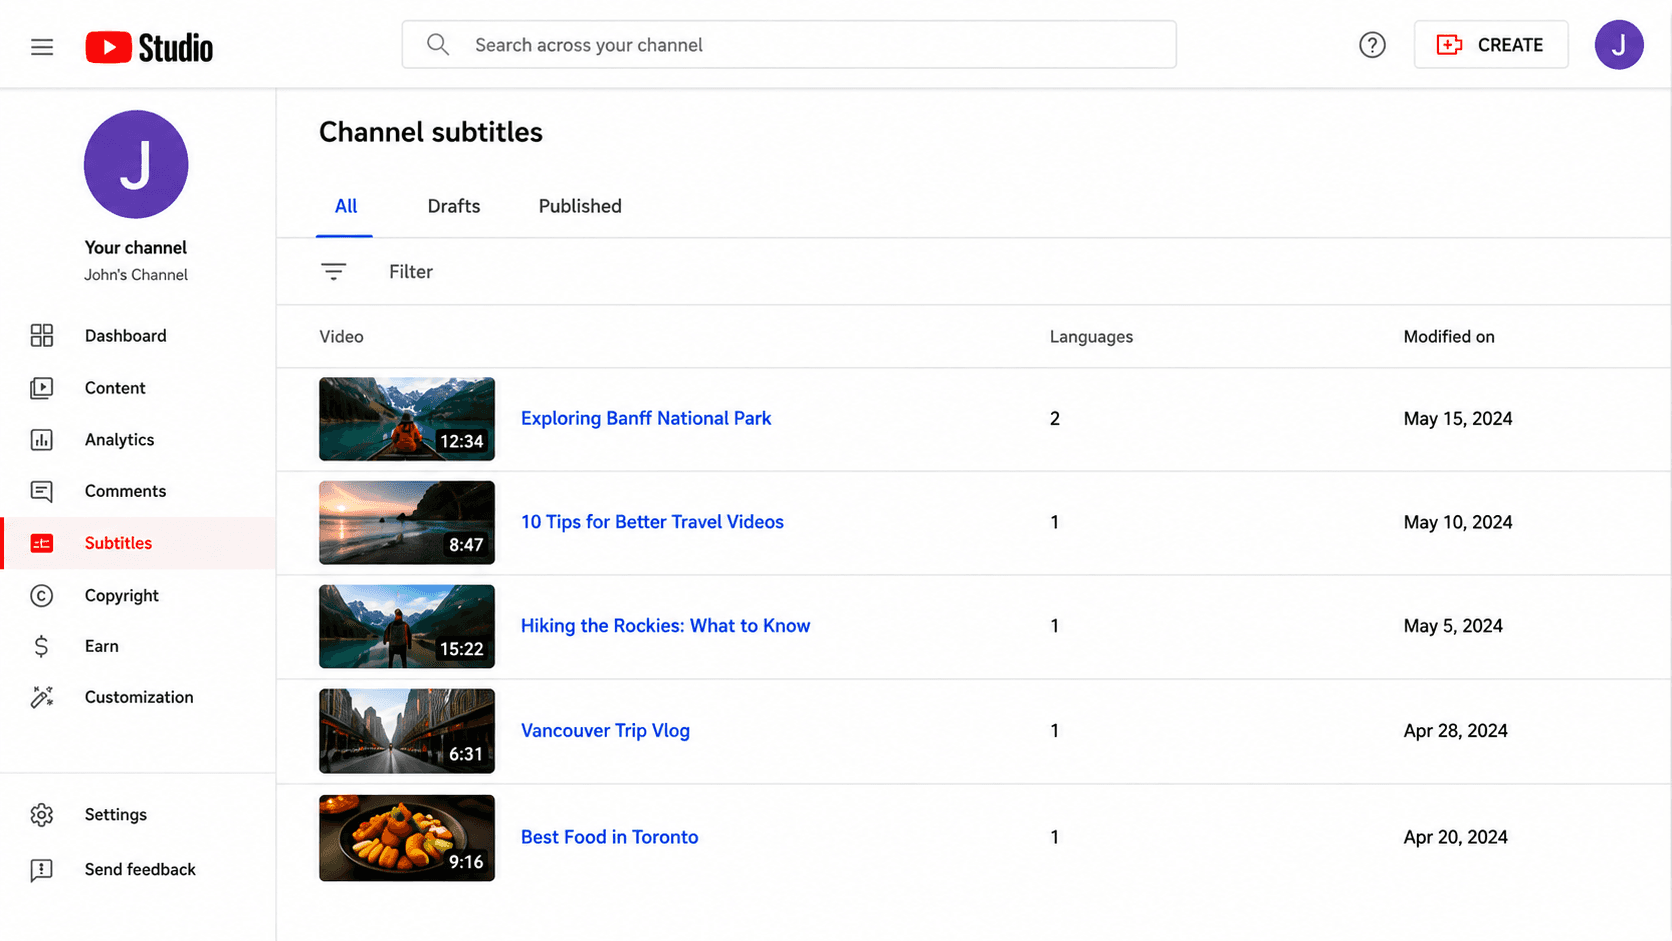
Step 3: Open the Subtitles Section
Under ‘Subtitles,’ look for the automatic captions row for your video language. If you do not see it yet, YouTube may still be processing the captions, or automatic captions may not be available for that video.
If you don't see that row, YouTube either hasn't finished processing the video yet or doesn't support auto-generation for the language. Wait a few hours after upload for shorter videos, longer for anything over an hour.
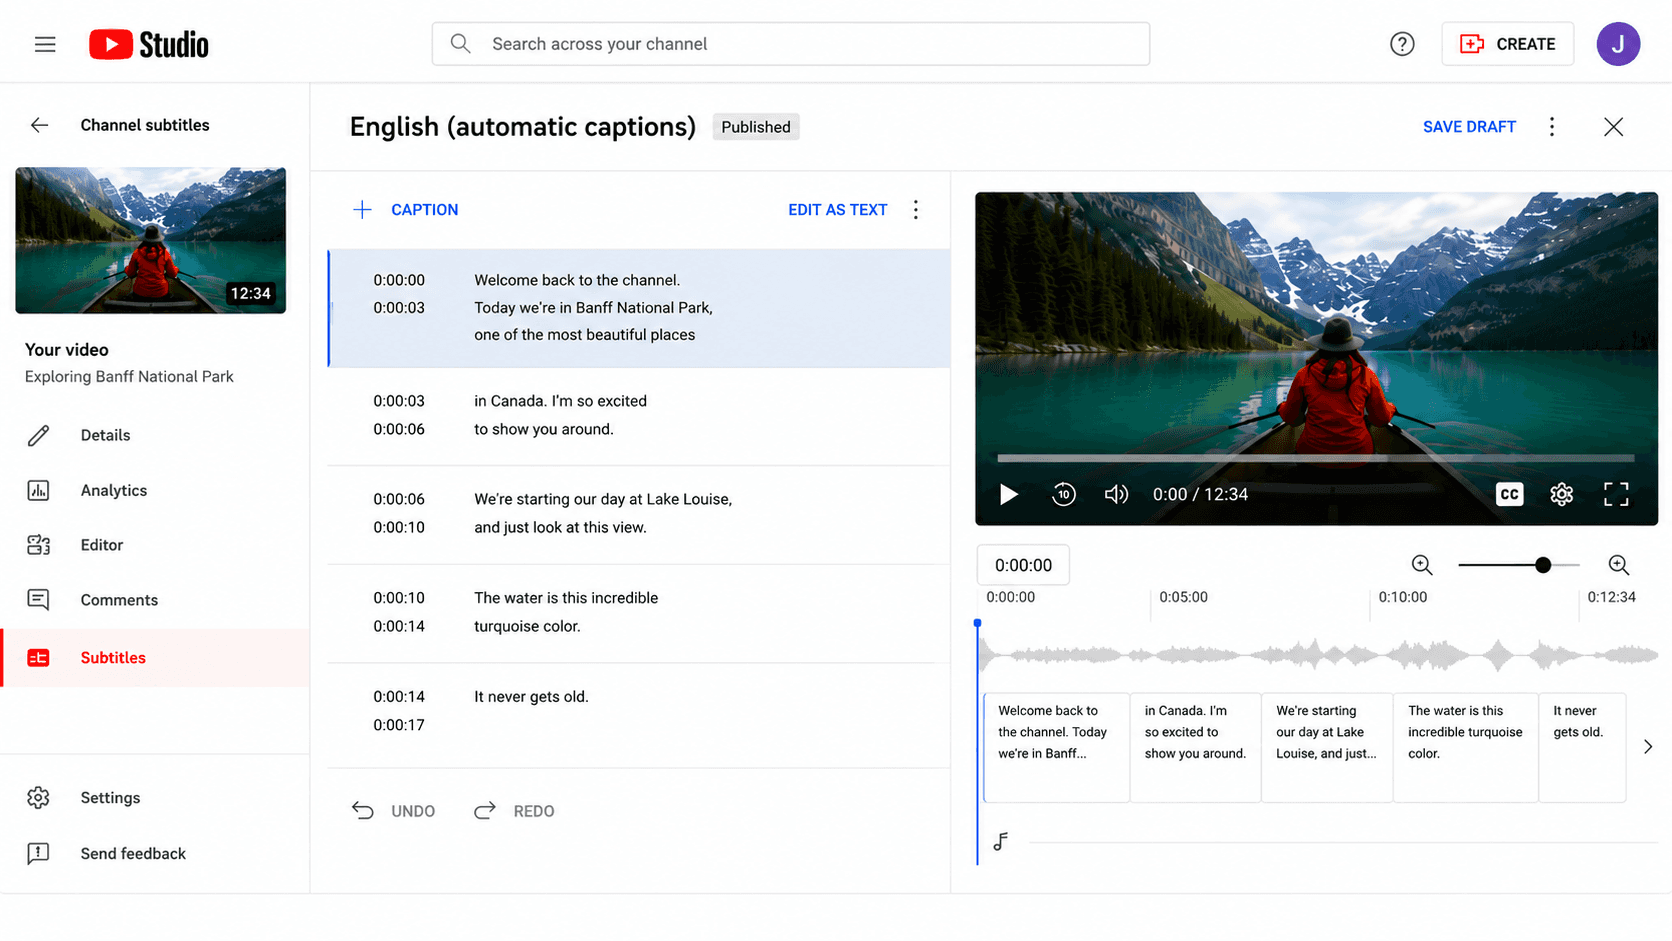
Step 4: Review the Transcript
Open the automatic captions to review the transcript. YouTube shows the caption text with timing, so you can play the video while checking each line.
Step 5: Copy or Download the Transcript
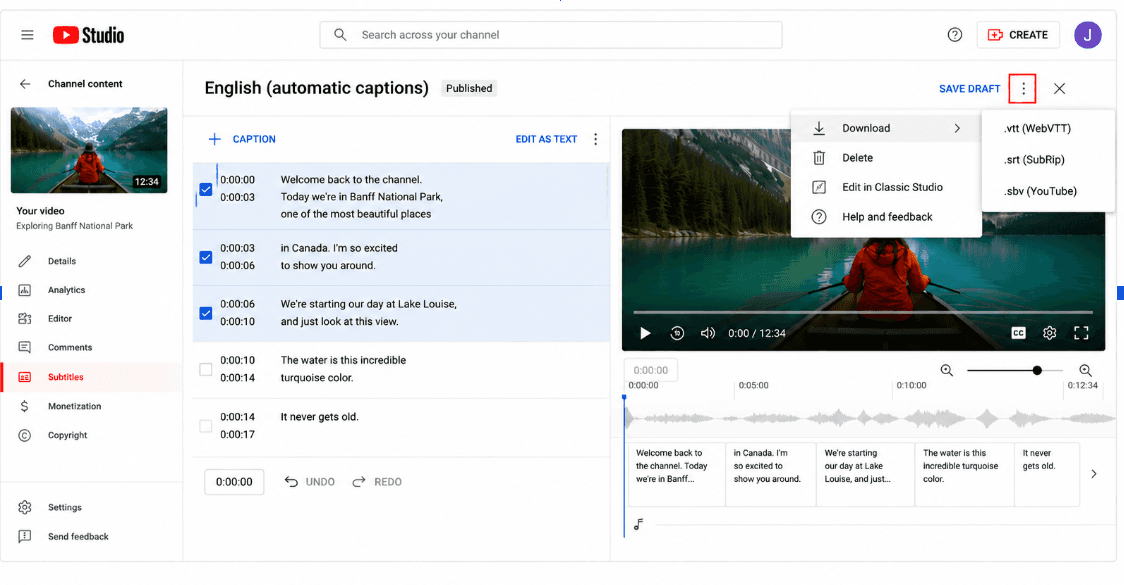
To copy the text into a document, select the lines and paste into your editor of choice. To download the file, click the three-dot menu near the language label and pick a format. Depending on your YouTube Studio interface, you can download caption files such as VTT, SRT, or SBV.
What’s limited here: YouTube Studio’s free transcript is useful for videos you own, but it cannot transcribe other people’s links, accuracy can vary with accents, fast speech, music, or background noise, speaker labels and repurposing tools are limited, and automatic captions are only available for supported languages.
Method 3: Adobe Premiere Pro's Speech to Text
If Premiere Pro is already your editor, you can transcribe footage without leaving your editing workflow. Speech to Text is included with an active Premiere Pro subscription, so it is not free, but it does not cost extra if you already use Premiere.
Speech to Text handles English, Spanish, French, German, and a growing list of other languages, though English remains the most reliable.
Step 1: Import Your Video Into Premiere
Open Premiere Pro and create a new project, or open the project where your footage already lives. Import your video into the Project panel.
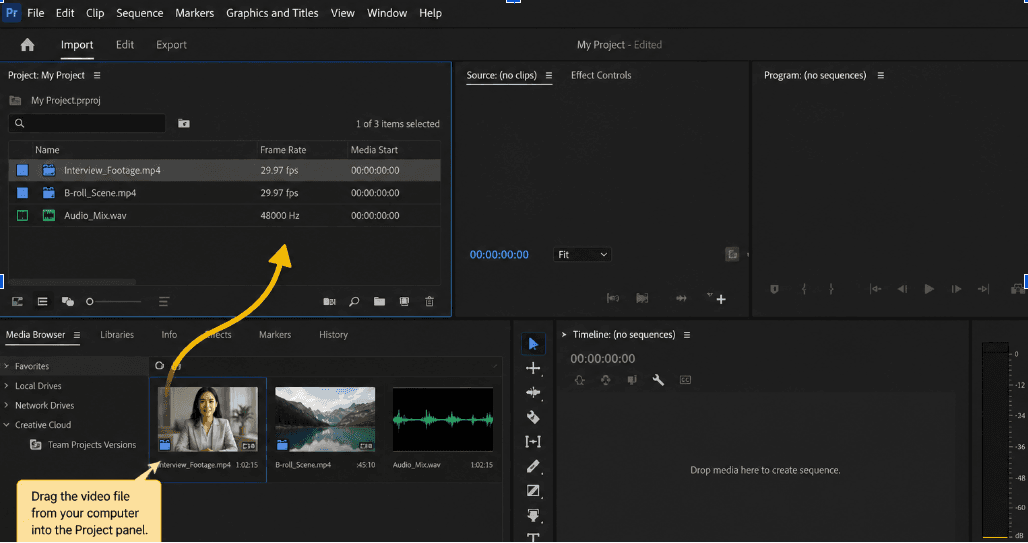
Step 2: Add the Video to a Sequence
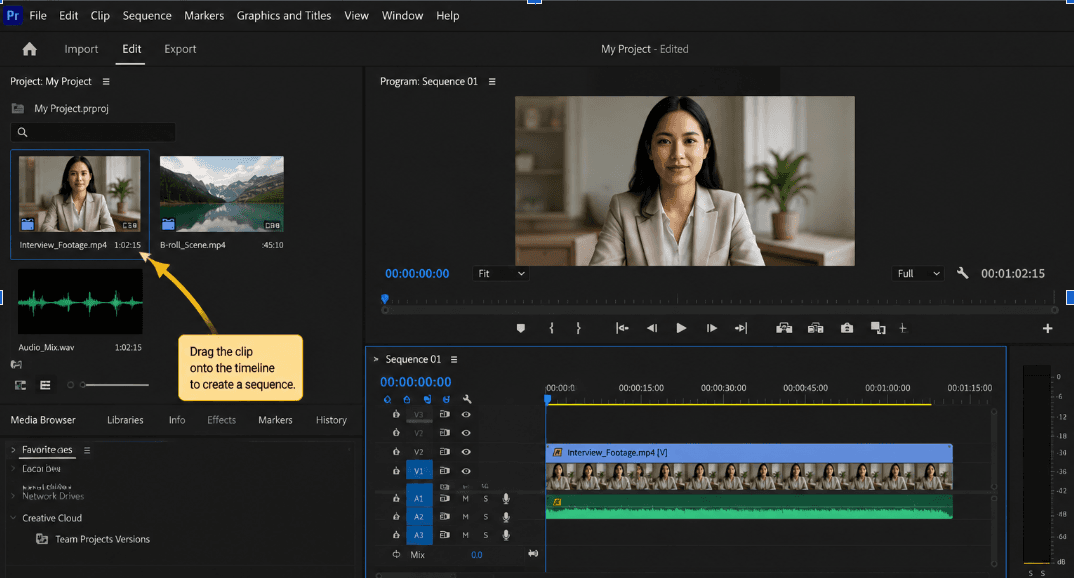
Drag the clip onto the timeline to create a sequence. This is useful if you want to transcribe the edited timeline or use the transcript to create captions.
Step 3: Open the Text Panel
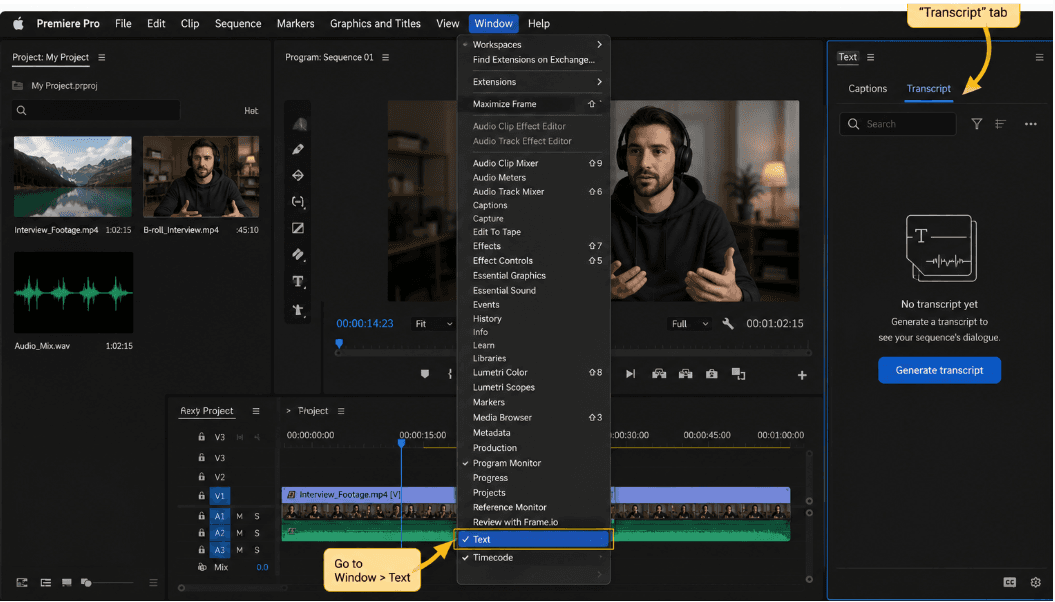
Go to Window > Text. In the Text panel, open the Transcript tab.
Step 4: Generate the Transcript
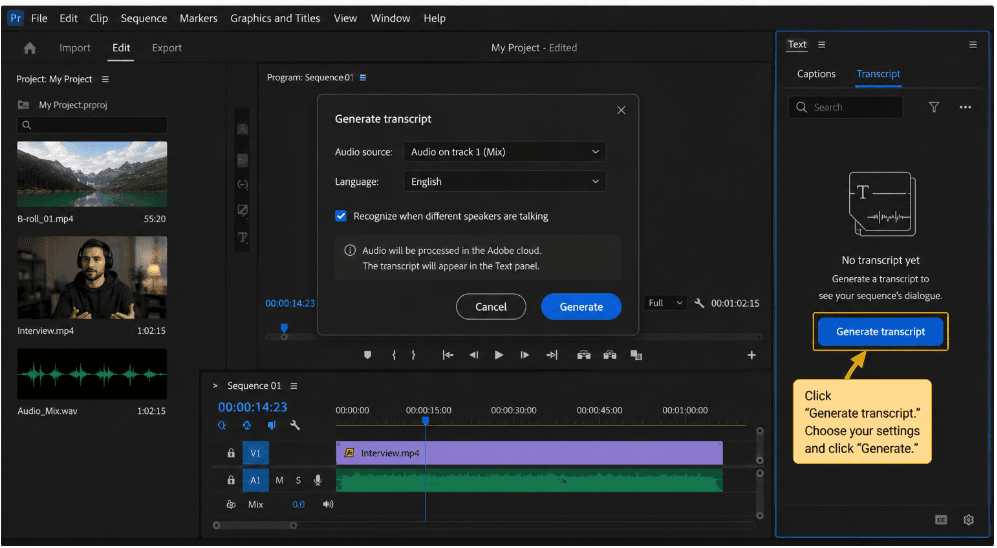
Click the transcript options icon and choose Generate static transcript. Select the spoken language, speaker labeling preference, and audio source, such as dialogue-tagged clips or a specific audio track.
Then click ‘Transcribe.’
Step 5: Review and Export
The transcript appears in the Text panel when processing finishes, with each line tied to a timecode. Click any line to jump the playhead to that point in the timeline.
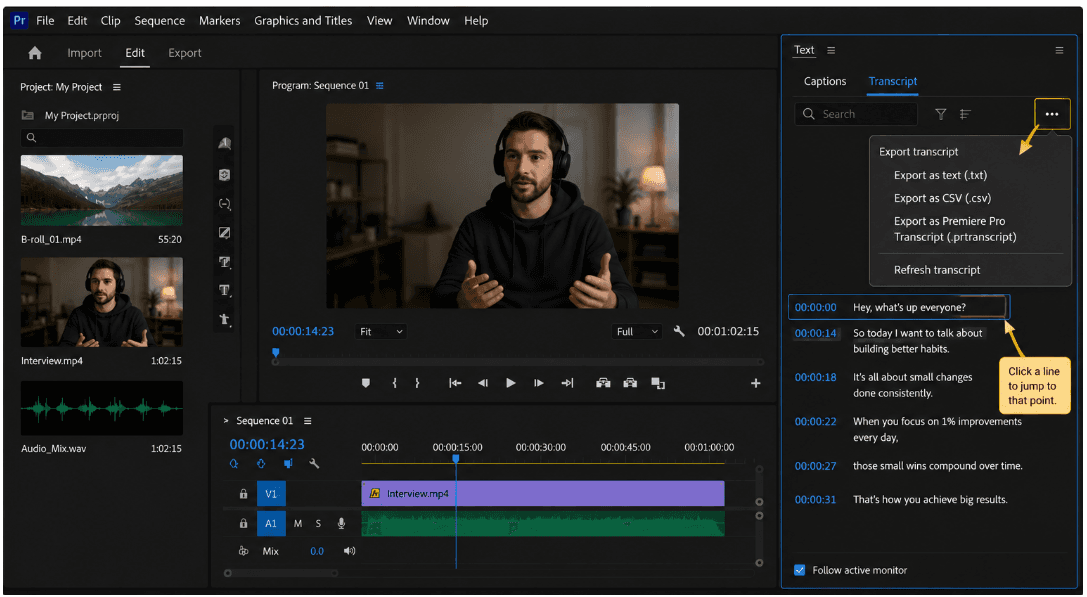
To export, click the three-dot menu in the top right of the Transcript tab. Premiere lets you save the transcript as .txt, .csv, or .prtranscript. You can also use the transcript to generate captions inside Premiere.
What’s limited here: Premiere’s Speech to Text is best if you already edit in Premiere. It requires an active subscription, a growing range of languages, and accuracy still depends on audio quality, accents, background noise, and speaker clarity. It creates transcripts and captions, but not blog posts, summaries, or social content.
Comparison: 3 Ways to Transcribe a Video for Free or With Tools
Feature | WhisperTranscribe | YouTube Studio | Adobe Premiere Pro |
Best for | Any video source | Your own YouTube uploads | Footage you’re already editing |
File upload | Yes, most video formats | Requires upload to your own YouTube channel | Yes |
Link paste | Yes, including YouTube and Vimeo | No | No |
Speaker recognition | Yes | No | Yes |
Export formats | SRT, VTT, TXT, Word | SRT, SBV, VTT where available | TXT, CSV, native Premiere transcript |
Content repurposing built in | Yes, 57+ asset types | No | No |
Cost | Free trial, then paid | Free | Premiere subscription |
Best Practices for Video Transcription
These habits will improve your transcript, no matter which method you use:
Start with the cleanest source video. Background music, echo, overlapping voices, accents, and unclear speech can reduce accuracy across automatic transcription tools.
Match the tool to the video source. Use a URL-based tool for YouTube or Vimeo links, YouTube Studio for videos on your own channel, Premiere for footage you’re already editing, and a dedicated app for standalone files.
Use platform-specific guides for short-form content. For example, guides on how to transcribe TikTok videos and how to transcribe Instagram Reels can cover platform-specific steps.
Review proper nouns and technical terms. AI handles common speech well, but brand names, acronyms, and industry jargon often need a manual check.
Turn on speaker recognition for multi-voice videos. Interviews, webinars, and panels are easier to scan when each speaker has a label.
Repurpose the transcript quickly. Turn it into the assets you need while the recording is still fresh, instead of letting it sit unused.
Review names and technical terms. Even accurate transcription tools can misinterpret proper nouns, acronyms, and specialized terminology, so verify them.
Pick the Method That Fits Your Video
Where your video lives decides the right method. YouTube Studio handles the captions if you've already uploaded the video to your channel. Premiere Pro handles the transcript if you're already editing the footage.
For everything else, and for the moments you want the transcript to do more than sit in a folder, WhisperTranscribe earns the recommendation. It works with any video source and lands a 95% accurate transcript in minutes. The Content Hub then turns that transcript into whatever asset you need next.
Start your free trial and get more from every video you make.